
 Computer Tutorials
Computer Knowledge
Move photos from old Photos to the new Photos app in Windows 11
Computer Tutorials
Computer Knowledge
Move photos from old Photos to the new Photos app in Windows 11
Move photos from old Photos to the new Photos app in Windows 11
Mar 10, 2024 am 09:37 AM
This article will guide you on how to migrate photos from Photos Legacy to the new Photos app in Windows 11. Microsoft has introduced a revamped Photos app in Windows 11, giving users a simpler and more feature-rich experience. The new Photos app sorts photos differently than the past Photos Legacy app. It organizes photos into folders like other Windows files instead of creating albums. However, users still using the Photos Legacy app can easily migrate their photos to the new version of Microsoft Photos.

What is the Photos Legacy app?
Photos Legacy app is one of the first apps launched in Windows 11. It has a similar interface and functionality to the new version of the Photos app. As the new Photos app replaces it, the Photos Legacy app remains available for performing some common actions:
- Collect photos from their PCs, mobile phones and other devices.
- Easily edit, compare and create albums/movies of their special memories.
- Use the Filmstrip to jump to other photos and videos at that location.
Why is the new Photos app better than Photos Legacy?
The new version of Photos application has a more refined interface design, better library management and seamless integration with OneDrive. In addition, it provides more powerful photo management and editing functions, allowing users to view all photos and videos in the same window. Users can easily use the app to automatically generate slideshows with music and themes to review precious moments in a whole new way.
How to move photos from Photos Legacy to the new Photos app in Windows 11?
To transfer photos from Photos Legacy to the new Photos app:
Open the Photos Legacy app, navigate to the photo album, and create a new album.
Add all the photos you want to move to the newly created album to the album.
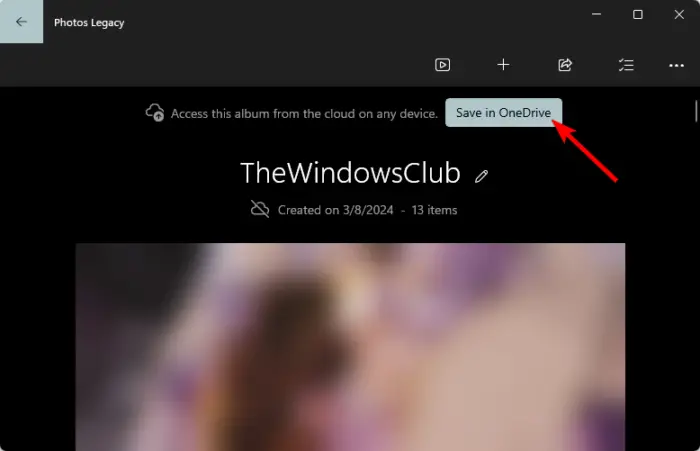
When finished, open the created album and click Save in OneDrive at the top. This will back up the complete photo album to your personal OneDrive account.
After uploading the album to OneDrive, close Photos Legacy and open the new Photos app.
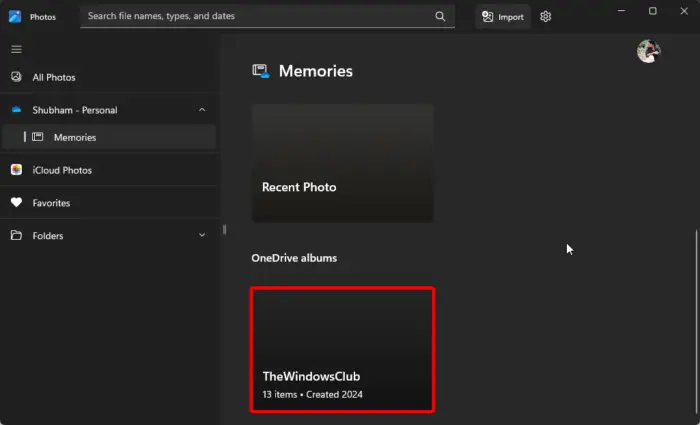
Click your OneDrive account in the left pane and select Memory.
Under OneDrive Albums you will find the album imported from the Photos Legacy app along with all your photos.
Your photos will be transferred from Photos Legacy to the new Photos app.
Read: Hide or show slideshows in Windows’ Photos app
I hope this article can be helpful to you.
Is Microsoft Photos Legacy still available?
Yes, the Photos Legacy app is still available in the Microsoft Store. However, you can also install it using the new Photos app. To do this, open the Photos app, navigate to Settings, scroll down, and tap Get Photo Legacy.
How to import photos into Windows Photos app?
To import photos to the Windows Photos app, connect your device to your PC using a USB cable and open the Photos app. Click Import and select your device from the list of connected devices. When finished, select the photos you want to import, choose a location, and select Confirm.
Read: Unable to Save Changes Photos app error in Windows.
The above is the detailed content of Move photos from old Photos to the new Photos app in Windows 11. For more information, please follow other related articles on the PHP Chinese website!

Hot AI Tools

Undress AI Tool
Undress images for free

Undresser.AI Undress
AI-powered app for creating realistic nude photos

AI Clothes Remover
Online AI tool for removing clothes from photos.

Clothoff.io
AI clothes remover

Video Face Swap
Swap faces in any video effortlessly with our completely free AI face swap tool!

Hot Article
Hot Tools

Notepad++7.3.1
Easy-to-use and free code editor

SublimeText3 Chinese version
Chinese version, very easy to use

Zend Studio 13.0.1
Powerful PHP integrated development environment

Dreamweaver CS6
Visual web development tools

SublimeText3 Mac version
God-level code editing software (SublimeText3)


 How to change the system display language for all users in Windows
Jul 31, 2025 am 08:18 AM
How to change the system display language for all users in Windows
Jul 31, 2025 am 08:18 AM
InstallthedesiredlanguagepackviaSettings→Time&Language→Language®ion,ensuring"SetasmyWindowsdisplaylanguage"isselected.2.Changethesystemdisplaylanguageinthesamemenuandrestart.3.OpenControlPanel→Region→Administrativetab,click"
 How to reset the Microsoft Store in Windows
Jul 31, 2025 am 08:23 AM
How to reset the Microsoft Store in Windows
Jul 31, 2025 am 08:23 AM
ResettheMicrosoftStoreviaSettingsbygoingtoApps>Installedapps,selectingMicrosoftStore,clickingAdvancedoptions,thenRepairandResetifneeded.2.Ifthatfails,re-registertheStoreusingPowerShellasadminwiththecommand:Get-AppXPackage-NameMicrosoft.WindowsStor
 How to reset the TCP/IP stack in Windows
Aug 02, 2025 pm 01:25 PM
How to reset the TCP/IP stack in Windows
Aug 02, 2025 pm 01:25 PM
ToresolvenetworkconnectivityissuesinWindows,resettheTCP/IPstackbyfirstopeningCommandPromptasAdministrator,thenrunningthecommandnetshintipreset,andfinallyrestartingyourcomputertoapplychanges;ifissuespersist,optionallyrunnetshwinsockresetandrebootagain
 How to install Windows on a Mac without Boot Camp
Jul 31, 2025 am 11:58 AM
How to install Windows on a Mac without Boot Camp
Jul 31, 2025 am 11:58 AM
Without BootCamp, installing Windows on Mac is feasible and works for different chips and needs. 1. First check compatibility: The M1/M2 chip Mac cannot use BootCamp, it is recommended to use virtualization tools; the Intel chip Mac can manually create a boot USB disk and install it in partition. 2. Recommended to use virtual machines (VMs) for M1 and above chip users: Windows ISO files, virtualization software (such as ParallelsDesktop or UTM), at least 64GB of free space, and reasonably allocate resources. 3. IntelMac users can manually install it by booting the USB drive: USB drive, WindowsISO, DiskU is required
 A guide to custom Windows installation options
Aug 01, 2025 am 04:48 AM
A guide to custom Windows installation options
Aug 01, 2025 am 04:48 AM
Choose"Custom:InstallWindowsonly(advanced)"forfullcontrol,asitallowsacleaninstallthatremovesoldissuesandoptimizesperformance.2.Duringsetup,managepartitionsbydeletingoldones(afterbackingupdata),creatingnewpartitions,formatting(usingNTFS),ors
 Step-by-step guide to installing Windows from an ISO file
Aug 01, 2025 am 01:10 AM
Step-by-step guide to installing Windows from an ISO file
Aug 01, 2025 am 01:10 AM
DownloadtheWindowsISOfromMicrosoft’sofficialsite.2.CreateabootableUSBusingMediaCreationToolorRufuswithaUSBdriveofatleast8GB.3.BootfromtheUSBbyaccessingthebootmenuoradjustingBIOS/UEFIsettings.4.InstallWindowsbyselectingcustominstallation,choosingtheco
 How to manage AppLocker policies in Windows
Aug 02, 2025 am 12:13 AM
How to manage AppLocker policies in Windows
Aug 02, 2025 am 12:13 AM
EnableAppLockerviaGroupPolicybyopeninggpedit.msc,navigatingtoApplicationControlPolicies,creatingdefaultrules,andconfiguringruletypes;2.Createcustomrulesusingpublisher,path,orhashconditions,preferringpublisherrulesforsecurityandflexibility;3.Testrules
 How to install Windows on a Mac
Jul 31, 2025 am 10:07 AM
How to install Windows on a Mac
Jul 31, 2025 am 10:07 AM
ForIntel-basedMacs,useBootCampAssistanttocreateadual-bootsystemwithWindowsbypreparingaUSBdrive,downloadingaWindowsISO,partitioningthedisk,andinstallingWindowsalongsidemacOSwithsupportdrivers.2.ForAppleSiliconMacs(M1/M2/M3),usevirtualizationsoftwareli
