

where is windows10 credential manager
Jul 09, 2023 am 10:09 AM
The Credential Manager is a function used by users to manage web credentials and Windows credentials, but many users still don’t know where the Windows 10 Credential Manager is. In fact, the credential manager is on the operation panel. After opening the control panel, remember to change the viewing method to a small icon, so that you can see the credential manager. Click View to view all kinds of information. If you want to view a large amount of , you need to enter the account password.
Where is the Windows 10 Credential Manager:
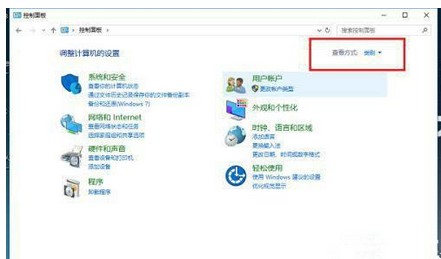
1. Open the control panel in the system, click the View method in the upper right corner, and convert the type into a small icon.
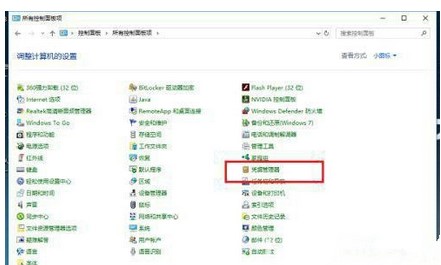
#2. After viewing it as a small icon, click "Credential Manager".
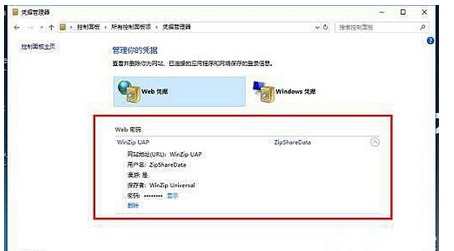
#3. Once you enter the Credential Manager, you can view and delete login information that has been saved on websites, applications, and networks, and learn about its related functions.

#4. Click on the WEB certificate to view the URL, login name, and password.
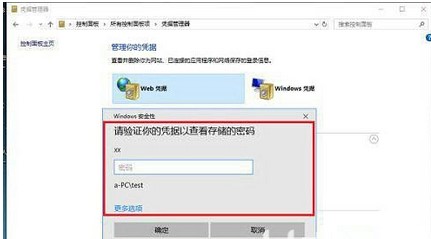
#5. We can also view the password of the WEB certificate. After the user name and password are required, you can view it.
The above is the introduction of where is the Windows 10 Credential Manager and the location of the Windows 10 Credential Manager.
The above is the detailed content of where is windows10 credential manager. For more information, please follow other related articles on the PHP Chinese website!

Hot AI Tools

Undress AI Tool
Undress images for free

Undresser.AI Undress
AI-powered app for creating realistic nude photos

AI Clothes Remover
Online AI tool for removing clothes from photos.

Clothoff.io
AI clothes remover

Video Face Swap
Swap faces in any video effortlessly with our completely free AI face swap tool!

Hot Article
Hot Tools

Notepad++7.3.1
Easy-to-use and free code editor

SublimeText3 Chinese version
Chinese version, very easy to use

Zend Studio 13.0.1
Powerful PHP integrated development environment

Dreamweaver CS6
Visual web development tools

SublimeText3 Mac version
God-level code editing software (SublimeText3)


 How to reset the TCP/IP stack in Windows
Aug 02, 2025 pm 01:25 PM
How to reset the TCP/IP stack in Windows
Aug 02, 2025 pm 01:25 PM
ToresolvenetworkconnectivityissuesinWindows,resettheTCP/IPstackbyfirstopeningCommandPromptasAdministrator,thenrunningthecommandnetshintipreset,andfinallyrestartingyourcomputertoapplychanges;ifissuespersist,optionallyrunnetshwinsockresetandrebootagain
 How to reset the Microsoft Store in Windows
Jul 31, 2025 am 08:23 AM
How to reset the Microsoft Store in Windows
Jul 31, 2025 am 08:23 AM
ResettheMicrosoftStoreviaSettingsbygoingtoApps>Installedapps,selectingMicrosoftStore,clickingAdvancedoptions,thenRepairandResetifneeded.2.Ifthatfails,re-registertheStoreusingPowerShellasadminwiththecommand:Get-AppXPackage-NameMicrosoft.WindowsStor
 A guide to custom Windows installation options
Aug 01, 2025 am 04:48 AM
A guide to custom Windows installation options
Aug 01, 2025 am 04:48 AM
Choose"Custom:InstallWindowsonly(advanced)"forfullcontrol,asitallowsacleaninstallthatremovesoldissuesandoptimizesperformance.2.Duringsetup,managepartitionsbydeletingoldones(afterbackingupdata),creatingnewpartitions,formatting(usingNTFS),ors
 How to install Windows on a Mac without Boot Camp
Jul 31, 2025 am 11:58 AM
How to install Windows on a Mac without Boot Camp
Jul 31, 2025 am 11:58 AM
Without BootCamp, installing Windows on Mac is feasible and works for different chips and needs. 1. First check compatibility: The M1/M2 chip Mac cannot use BootCamp, it is recommended to use virtualization tools; the Intel chip Mac can manually create a boot USB disk and install it in partition. 2. Recommended to use virtual machines (VMs) for M1 and above chip users: Windows ISO files, virtualization software (such as ParallelsDesktop or UTM), at least 64GB of free space, and reasonably allocate resources. 3. IntelMac users can manually install it by booting the USB drive: USB drive, WindowsISO, DiskU is required
 Step-by-step guide to installing Windows from an ISO file
Aug 01, 2025 am 01:10 AM
Step-by-step guide to installing Windows from an ISO file
Aug 01, 2025 am 01:10 AM
DownloadtheWindowsISOfromMicrosoft’sofficialsite.2.CreateabootableUSBusingMediaCreationToolorRufuswithaUSBdriveofatleast8GB.3.BootfromtheUSBbyaccessingthebootmenuoradjustingBIOS/UEFIsettings.4.InstallWindowsbyselectingcustominstallation,choosingtheco
 How to manage AppLocker policies in Windows
Aug 02, 2025 am 12:13 AM
How to manage AppLocker policies in Windows
Aug 02, 2025 am 12:13 AM
EnableAppLockerviaGroupPolicybyopeninggpedit.msc,navigatingtoApplicationControlPolicies,creatingdefaultrules,andconfiguringruletypes;2.Createcustomrulesusingpublisher,path,orhashconditions,preferringpublisherrulesforsecurityandflexibility;3.Testrules
 How to install Windows on a Mac
Jul 31, 2025 am 10:07 AM
How to install Windows on a Mac
Jul 31, 2025 am 10:07 AM
ForIntel-basedMacs,useBootCampAssistanttocreateadual-bootsystemwithWindowsbypreparingaUSBdrive,downloadingaWindowsISO,partitioningthedisk,andinstallingWindowsalongsidemacOSwithsupportdrivers.2.ForAppleSiliconMacs(M1/M2/M3),usevirtualizationsoftwareli
 how to fix 'reboot and select proper boot device' on a win pc
Aug 01, 2025 am 05:20 AM
how to fix 'reboot and select proper boot device' on a win pc
Aug 01, 2025 am 05:20 AM
First,checkandcorrectthebootorderinBIOS/UEFItoensuretheWindowsdriveistheprimarybootdevice.2.VerifytheWindowsdriveisdetectedinBIOSunderstorageordrives.3.Ifnotdetected,troubleshoothardwareconnectionsbyreseatingSATAandpowercablesfordesktopsorreseatingth