
 Computer Tutorials
Computer Knowledge
How to have files automatically copied to another folder on Windows 11/10
Computer Tutorials
Computer Knowledge
How to have files automatically copied to another folder on Windows 11/10
How to have files automatically copied to another folder on Windows 11/10
Feb 19, 2024 am 11:24 AM
In this article, we will show you how to automatically copy files to another folder on Windows 11/10. Creating backups is necessary to avoid data loss. Data loss can occur due to many reasons such as hard drive corruption, malware attack, etc. You can manually backup your data by using copy and paste method or using third-party tools. Did you know you can automatically back up data on your Windows computer? We'll show you how to do this in this article.
How to make files automatically copied to another folder on Windows 11/10
How to automatically copy files and folders to another destination folder on Windows 11/10 using Task Scheduler? This article will provide you with detailed guidance.
Please follow the steps below:
Let's see how to do this.
Open Notepad and create a batch file
First, you need to create a script to copy the files in the source folder to the target folder. To do this, we will use the xCopy command, whose syntax is as follows.
X復(fù)制“源文件夾的路徑”“目標(biāo)文件夾的路徑”/e/y
In the above command, the /e parameter is used to open all subfolders in the source folder. This parameter also copies empty subfolders.
When Windows finds the same file in the target folder, an overwrite confirmation prompt will pop up. To avoid a large number of prompts, we can use the /y parameter to disable overwriting confirmation prompts.
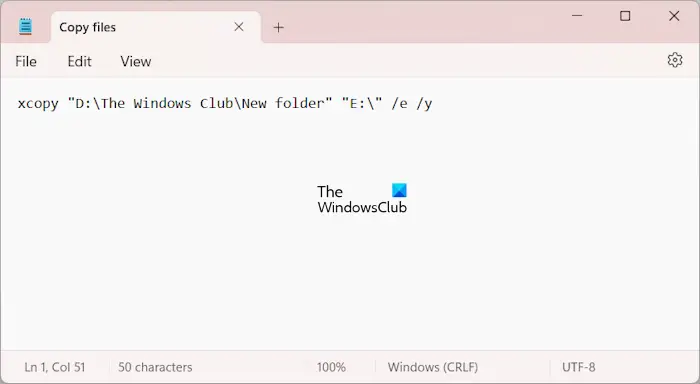
Make sure you specify the paths to the source and destination folders accurately when entering the command, otherwise the command will fail to execute. For example, to copy from "D:\The Windows Club\New Folders" to USB flash drive E, use the correct command.
X復(fù)制“D:The Windows ClubNew Folders”“E:”/e/y
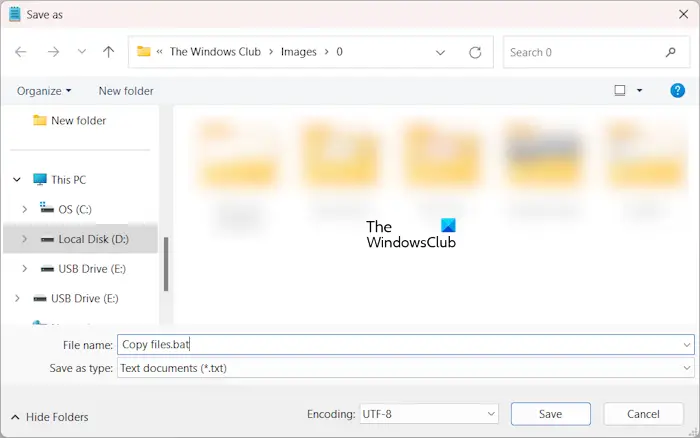
Now, go to File>Save As. Name the file to save it and write .bat at the end of the file name. When finished, click Save.
Use the task scheduler to call the batch file
Now, the next step is to call the batch file using the task scheduler. The instructions below will guide you in doing this.
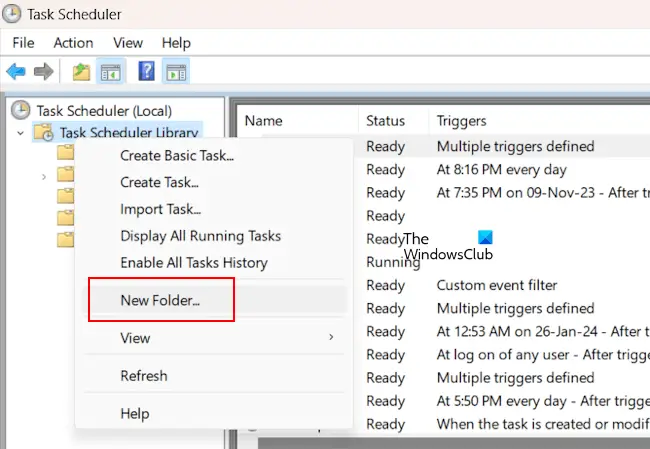
Open the task scheduler. Expand the Task Scheduler Library folder. Now, right-click on the Task Scheduler Library folder and select New Folder. Name this folder "Custom Tasks" or give it a name of your choice.
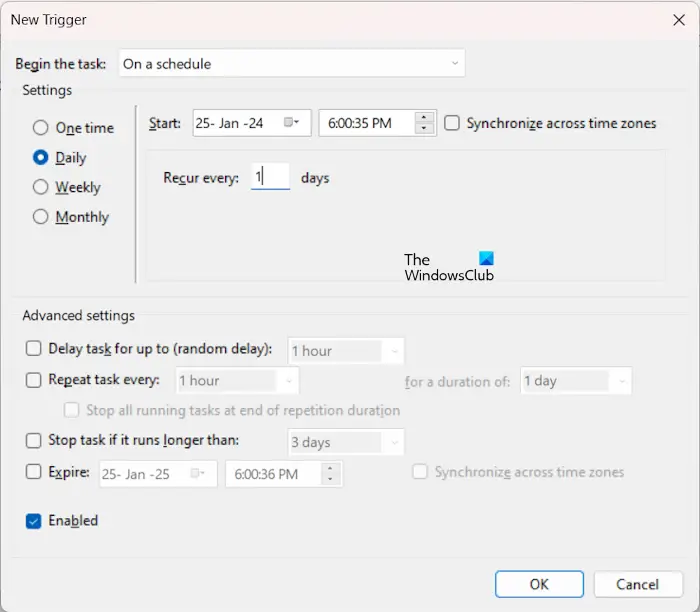
Now, right-click on the custom task folder or a folder you have created and select Create Task. Give your task a name, such as Copy Files under the General tab. Now, select the triggers folder and click New. Set the frequency of tasks according to your requirements. For example, if you want to automatically copy files every day, select Daily. When finished, click OK.
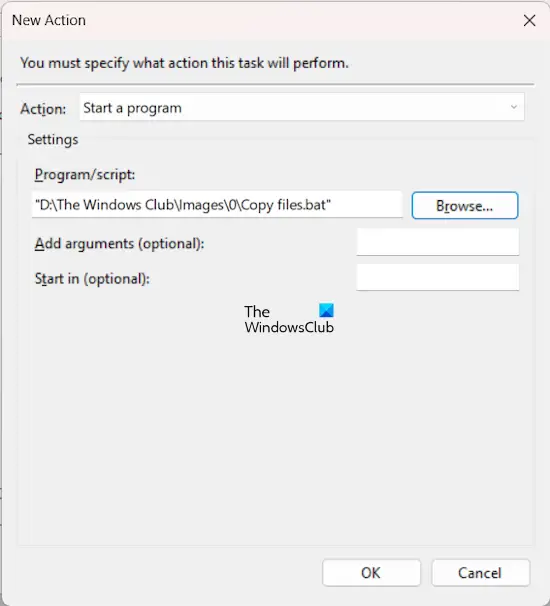
Now, go to the Actions tab and click New. Select Start a program in the Action drop-down list. Click Browse and select the batch file from your computer. Click OK.
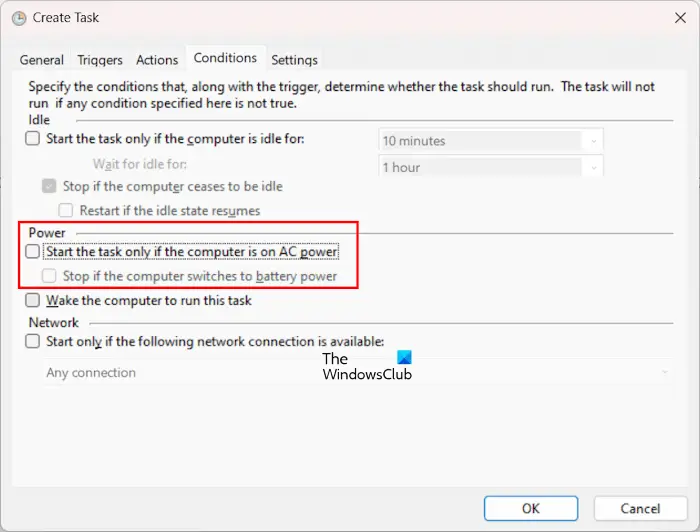
An automated task has been created to copy your files from the source folder to the destination folder. But if you are a laptop user, this automatic task will only run when your laptop is connected to the charger. If your laptop is on battery, this task will not run. To prevent this from happening, go to the Conditions tab and uncheck the following checkbox:
- Start the task only when the computer is on AC power
- Stop if computer switches to battery power.
This task will not run if your computer is in hibernation mode. To cause your computer to wake from sleep mode and run an automated task, select the Wake computer to run this task check box. Now, click OK.
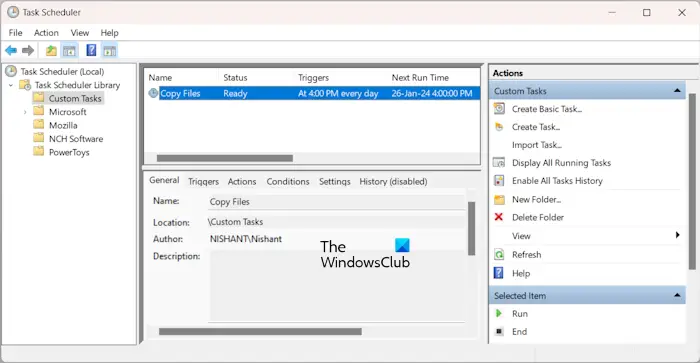
After performing the above steps, the task will be added to the custom tasks folder in Task Scheduler, and you will see its status as Ready. If the status shows Disabled, right-click and select Enable. From now on, the task will run at the desired time.
Please note that if you create a task that automatically copies files to an external hard drive, the hard drive should be connected to your computer.
that's all.
How to copy files to other folders in Windows 11?
The easiest way to copy files to another folder in Windows 11 is to use the copy and paste method. Select the files you want to copy and press Ctrl C key. Now, open the folder to which you want to copy these files. Once the folder is open, press Ctrl V key.
How to repeat a task every day in Task Scheduler?
To repeat a task in Task Scheduler every day, you must create a Daily trigger. When you create this trigger, set a time when you want the task to start. You can also set this setting if you want the task to repeat every other day, every 3 days, etc.
Read next: Schedule Shutdown or Restart using the Task Scheduler in Windows.
The above is the detailed content of How to have files automatically copied to another folder on Windows 11/10. For more information, please follow other related articles on the PHP Chinese website!

Hot AI Tools

Undress AI Tool
Undress images for free

Undresser.AI Undress
AI-powered app for creating realistic nude photos

AI Clothes Remover
Online AI tool for removing clothes from photos.

Clothoff.io
AI clothes remover

Video Face Swap
Swap faces in any video effortlessly with our completely free AI face swap tool!

Hot Article
Hot Tools

Notepad++7.3.1
Easy-to-use and free code editor

SublimeText3 Chinese version
Chinese version, very easy to use

Zend Studio 13.0.1
Powerful PHP integrated development environment

Dreamweaver CS6
Visual web development tools

SublimeText3 Mac version
God-level code editing software (SublimeText3)


 How to reset the TCP/IP stack in Windows
Aug 02, 2025 pm 01:25 PM
How to reset the TCP/IP stack in Windows
Aug 02, 2025 pm 01:25 PM
ToresolvenetworkconnectivityissuesinWindows,resettheTCP/IPstackbyfirstopeningCommandPromptasAdministrator,thenrunningthecommandnetshintipreset,andfinallyrestartingyourcomputertoapplychanges;ifissuespersist,optionallyrunnetshwinsockresetandrebootagain
 A guide to custom Windows installation options
Aug 01, 2025 am 04:48 AM
A guide to custom Windows installation options
Aug 01, 2025 am 04:48 AM
Choose"Custom:InstallWindowsonly(advanced)"forfullcontrol,asitallowsacleaninstallthatremovesoldissuesandoptimizesperformance.2.Duringsetup,managepartitionsbydeletingoldones(afterbackingupdata),creatingnewpartitions,formatting(usingNTFS),ors
 How to install Windows on a Mac without Boot Camp
Jul 31, 2025 am 11:58 AM
How to install Windows on a Mac without Boot Camp
Jul 31, 2025 am 11:58 AM
Without BootCamp, installing Windows on Mac is feasible and works for different chips and needs. 1. First check compatibility: The M1/M2 chip Mac cannot use BootCamp, it is recommended to use virtualization tools; the Intel chip Mac can manually create a boot USB disk and install it in partition. 2. Recommended to use virtual machines (VMs) for M1 and above chip users: Windows ISO files, virtualization software (such as ParallelsDesktop or UTM), at least 64GB of free space, and reasonably allocate resources. 3. IntelMac users can manually install it by booting the USB drive: USB drive, WindowsISO, DiskU is required
 Step-by-step guide to installing Windows from an ISO file
Aug 01, 2025 am 01:10 AM
Step-by-step guide to installing Windows from an ISO file
Aug 01, 2025 am 01:10 AM
DownloadtheWindowsISOfromMicrosoft’sofficialsite.2.CreateabootableUSBusingMediaCreationToolorRufuswithaUSBdriveofatleast8GB.3.BootfromtheUSBbyaccessingthebootmenuoradjustingBIOS/UEFIsettings.4.InstallWindowsbyselectingcustominstallation,choosingtheco
 How to manage AppLocker policies in Windows
Aug 02, 2025 am 12:13 AM
How to manage AppLocker policies in Windows
Aug 02, 2025 am 12:13 AM
EnableAppLockerviaGroupPolicybyopeninggpedit.msc,navigatingtoApplicationControlPolicies,creatingdefaultrules,andconfiguringruletypes;2.Createcustomrulesusingpublisher,path,orhashconditions,preferringpublisherrulesforsecurityandflexibility;3.Testrules
 How to install Windows on a Mac
Jul 31, 2025 am 10:07 AM
How to install Windows on a Mac
Jul 31, 2025 am 10:07 AM
ForIntel-basedMacs,useBootCampAssistanttocreateadual-bootsystemwithWindowsbypreparingaUSBdrive,downloadingaWindowsISO,partitioningthedisk,andinstallingWindowsalongsidemacOSwithsupportdrivers.2.ForAppleSiliconMacs(M1/M2/M3),usevirtualizationsoftwareli
 how to fix 'reboot and select proper boot device' on a win pc
Aug 01, 2025 am 05:20 AM
how to fix 'reboot and select proper boot device' on a win pc
Aug 01, 2025 am 05:20 AM
First,checkandcorrectthebootorderinBIOS/UEFItoensuretheWindowsdriveistheprimarybootdevice.2.VerifytheWindowsdriveisdetectedinBIOSunderstorageordrives.3.Ifnotdetected,troubleshoothardwareconnectionsbyreseatingSATAandpowercablesfordesktopsorreseatingth
 How to troubleshoot a failed Windows installation
Aug 02, 2025 pm 12:53 PM
How to troubleshoot a failed Windows installation
Aug 02, 2025 pm 12:53 PM
VerifytheWindowsISOisfromMicrosoftandrecreatethebootableUSBusingtheMediaCreationToolorRufuswithcorrectsettings;2.Ensurehardwaremeetsrequirements,testRAMandstoragehealth,anddisconnectunnecessaryperipherals;3.ConfirmBIOS/UEFIsettingsmatchtheinstallatio
