
 Computer Tutorials
Computer Knowledge
The USB device that has not been recognized in Win10. What is the USB device that has not been recognized in Win10?
Computer Tutorials
Computer Knowledge
The USB device that has not been recognized in Win10. What is the USB device that has not been recognized in Win10?
The USB device that has not been recognized in Win10. What is the USB device that has not been recognized in Win10?
May 22, 2025 pm 09:21 PM
Some users reported that when using Windows 10, they encountered an unrecognized USB device problem. The system always popped up the prompt "Unrecognized USB device" repeatedly. Even if all USB devices are unplugged, the prompt still appears. In response to this situation, the editor of System Home will provide you with a solution. Let’s take a look at the specific operation steps.
How to deal with frequent prompts on Windows 10 that it cannot recognize USB devices?
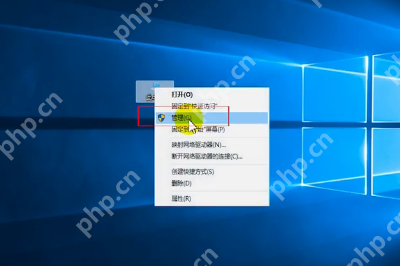
1. Open "This Computer" through the right-click menu and enter the device manager interface.
/> 2. Find and click "Universal Serial Bus Controller" in Device Manager, and then uninstall the USB hub option.

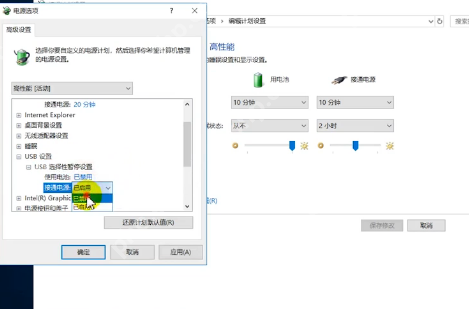
/> 3. Switch to the Windows settings page and follow the following path: "System"--"Power and Sleep"--"Other Power Settings"--"Change Schedule Settings"--"Change Advanced Power Settings".

/> 4. In the Advanced Power Settings, find the "Selective Pause" function in the USB settings and disable it. After completing the setup, restarting the computer will solve the problem.
/>
The above is the detailed content of The USB device that has not been recognized in Win10. What is the USB device that has not been recognized in Win10?. For more information, please follow other related articles on the PHP Chinese website!

Hot AI Tools

Undress AI Tool
Undress images for free

Undresser.AI Undress
AI-powered app for creating realistic nude photos

AI Clothes Remover
Online AI tool for removing clothes from photos.

Clothoff.io
AI clothes remover

Video Face Swap
Swap faces in any video effortlessly with our completely free AI face swap tool!

Hot Article
Hot Tools

Notepad++7.3.1
Easy-to-use and free code editor

SublimeText3 Chinese version
Chinese version, very easy to use

Zend Studio 13.0.1
Powerful PHP integrated development environment

Dreamweaver CS6
Visual web development tools

SublimeText3 Mac version
God-level code editing software (SublimeText3)
Hot Topics


 How to assign a drive letter in Windows
Jul 30, 2025 am 04:54 AM
How to assign a drive letter in Windows
Jul 30, 2025 am 04:54 AM
ToassignadriveletterinWindows,useDiskManagementorCommandPrompt.2.InDiskManagement,pressWindows X,selectDiskManagement,right-clickthevolumewithoutaletter,choose"ChangeDriveLetterandPaths",clickAdd,selectaletter(avoidA:orB:),andclickOK.3.Alte
 How to find the installation date of Windows
Jul 30, 2025 am 04:57 AM
How to find the installation date of Windows
Jul 30, 2025 am 04:57 AM
UseCommandPromptbytypingsysteminfo|find"OriginalInstallDate"toinstantlyseetheoriginalWindowsinstallationdate.2.Alternatively,usePowerShellwith(Get-ItemProperty-Path"HKLM:\SOFTWARE\Microsoft\WindowsNT\CurrentVersion").InstallDatean
 How to set up an FTP server in Windows
Jul 30, 2025 am 04:02 AM
How to set up an FTP server in Windows
Jul 30, 2025 am 04:02 AM
InstallIISandFTPcomponentsviaWindowsFeatures,ensuringFTPService,FTPExtensibility,andIISManagementConsoleareenabled.2.CreateadedicatedFTPfolder(e.g.,C:\FTP),grantIIS_IUSRSModifypermissions,andoptionallyaddspecificusers.3.InIISManager,addanFTPsitebyspe
 How to create a system image in Windows
Jul 30, 2025 am 04:57 AM
How to create a system image in Windows
Jul 30, 2025 am 04:57 AM
OpenBackupandRestoreviaWindows S,typeBackupandRestore,clickCreateasystemimage.2.Savetheimagetoanexternalharddrive(recommended),selectitfromthedropdown,andclickNext.3.Confirmincludeddrives(systemreservedandC:bydefault),addothersifneeded,thenclickNext.
 How to change the system display language for all users in Windows
Jul 31, 2025 am 08:18 AM
How to change the system display language for all users in Windows
Jul 31, 2025 am 08:18 AM
InstallthedesiredlanguagepackviaSettings→Time&Language→Language®ion,ensuring"SetasmyWindowsdisplaylanguage"isselected.2.Changethesystemdisplaylanguageinthesamemenuandrestart.3.OpenControlPanel→Region→Administrativetab,click"
 How to install Windows on a Mac without Boot Camp
Jul 31, 2025 am 11:58 AM
How to install Windows on a Mac without Boot Camp
Jul 31, 2025 am 11:58 AM
Without BootCamp, installing Windows on Mac is feasible and works for different chips and needs. 1. First check compatibility: The M1/M2 chip Mac cannot use BootCamp, it is recommended to use virtualization tools; the Intel chip Mac can manually create a boot USB disk and install it in partition. 2. Recommended to use virtual machines (VMs) for M1 and above chip users: Windows ISO files, virtualization software (such as ParallelsDesktop or UTM), at least 64GB of free space, and reasonably allocate resources. 3. IntelMac users can manually install it by booting the USB drive: USB drive, WindowsISO, DiskU is required
 my win pc fans are constantly loud even when idle
Jul 30, 2025 am 03:55 AM
my win pc fans are constantly loud even when idle
Jul 30, 2025 am 03:55 AM
CheckTaskManagerforhiddenhighCPUordiskusagefrombackgroundprocesseslikeWindowsUpdate,antivirusscans,orthird-partyapps,andendordisablethem.2.UsetoolslikeHWMonitororCoreTemptocheckifCPUorGPUtemperaturesareabnormallyhighatidleduetodust,poorthermalpaste,o
 Binance official website safely enter Binance new version download and install
Jul 30, 2025 pm 06:27 PM
Binance official website safely enter Binance new version download and install
Jul 30, 2025 pm 06:27 PM
The core methods of secure access to Binance official website are: 1. Manually enter the official website and add bookmarks; 2. Verify the lock icon and HTTPS in the browser address bar; 3. Avoid clicking on links in search engines, social media or unknown messages. When downloading a new version of the application, the desktop should be downloaded from the official website, iOS users should go through the App Store, and Android users should choose Google Play. If you cannot access it, you must download it through the verified official website. Always enable two-factor verification and be alert to false customer service information to ensure your account is secure.
