
 Software Tutorial
Computer Software
What should I do if League of Legends does not support DX9? How to upgrade to DX11 when playing League of Legends on PC
Software Tutorial
Computer Software
What should I do if League of Legends does not support DX9? How to upgrade to DX11 when playing League of Legends on PC
What should I do if League of Legends does not support DX9? How to upgrade to DX11 when playing League of Legends on PC
May 06, 2024 pm 12:07 PM
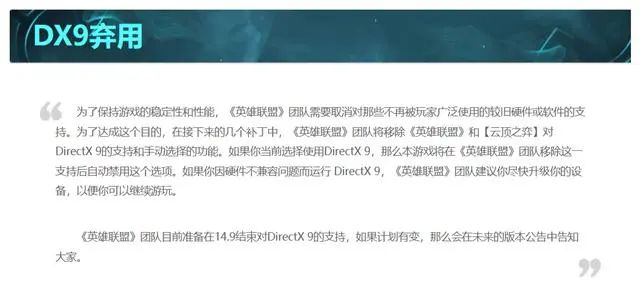
Question: Can't update while playing "League of Legends"? Simple explanation: With the 14.9 update of League of Legends, DirectX 9 will no longer be supported in all regions around the world. This means that players whose graphics cards only support DirectX 9 will need to change their graphics cards or devices to continue playing. Boot: If you're unable to launch League of Legends after updating, here's a detailed guide on how to resolve the issue, including checking if your graphics card is compatible, updating drivers, and upgrading your operating system. PHP editor Baicao provides you with a series of solutions to help you return to the canyon.
It is understood that DirectX is a series of application development interfaces (referred to as APIs) developed by Microsoft.
This API allows various applications to interact with your computer's hardware (including but not limited to mouse, keyboard, graphics card, etc.).
Many applications use DirectX, but the most common use of DirectX is in game running.
In order to allow players to play the game normally, "League of Legends" officially released a tutorial for upgrading DirectX 9 to DirectX 11.

Players need to confirm that their computer supports DirectX 11, and players need to ensure that their graphics card supports DirectX 11.
In addition, the operating system also needs to support DirectX 11. Both Windows 7 and 10 support DirectX 11.
Make sure the graphics card driver is up to date to take full advantage of DirectX 11 features. Players can use the graphics card upgrade tool to find and download the latest driver for the graphics card.
DirectX 11 will be automatically installed when installing the latest version of Windows. If it is not installed automatically, players can download and install the DirectX End-User Runtime Web Installer from the official Microsoft website, which will install the latest DirectX components suitable for the player's system.
After the installation is complete, press the Win R key combination to open the run window, enter "Dxdiag" and press the Enter key.
In the opened DirectX diagnostic tool, players can check whether DirectX 11 has been successfully installed and its version information.
It is worth mentioning that the official also recommends that players take this opportunity to upgrade the Win7 system to a more advanced version, because during the process of upgrading the Win10/11 operating system, the DirectX version will also be automatically updated.
The above is the detailed content of What should I do if League of Legends does not support DX9? How to upgrade to DX11 when playing League of Legends on PC. For more information, please follow other related articles on the PHP Chinese website!

Hot AI Tools

Undress AI Tool
Undress images for free

Undresser.AI Undress
AI-powered app for creating realistic nude photos

AI Clothes Remover
Online AI tool for removing clothes from photos.

ArtGPT
AI image generator for creative art from text prompts.

Stock Market GPT
AI powered investment research for smarter decisions

Hot Article
Hot Tools

Notepad++7.3.1
Easy-to-use and free code editor

SublimeText3 Chinese version
Chinese version, very easy to use

Zend Studio 13.0.1
Powerful PHP integrated development environment

Dreamweaver CS6
Visual web development tools

SublimeText3 Mac version
God-level code editing software (SublimeText3)

 What is the problem that win10 cannot join the home group_File sharing alternative after Win10 home group feature has been removed
Sep 24, 2025 pm 05:33 PM
What is the problem that win10 cannot join the home group_File sharing alternative after Win10 home group feature has been removed
Sep 24, 2025 pm 05:33 PM
After Windows 10 version 1803, the home group function was removed, and file sharing needs to be achieved by enabling network discovery, configuring system services and registry modification. First, confirm the system version and check whether the home group options are missing; then enable network discovery and file printer sharing in "Network and Sharing Center" and turn off password protection; then start key services such as FunctionDiscoveryResourcePublication in the service manager, and adjust the MachineKeys folder permissions if necessary; then set AllowInsecureGuestAuth to 1 through the registry editor to support unsafe guest authentication; finally use File Explorer to share files directly
 This computer can't be stuck when resetting win10_Solve the problem that the system progress of Win10 resetting is stuck at a certain percentage
Sep 24, 2025 pm 05:30 PM
This computer can't be stuck when resetting win10_Solve the problem that the system progress of Win10 resetting is stuck at a certain percentage
Sep 24, 2025 pm 05:30 PM
When the reset computer is stuck, wait and observe the activity of the hard disk to confirm whether it is running; then disconnect the network to avoid update interference, or enter safe mode to eliminate software conflicts; check disk errors through chkdsk, clean the SoftwareDistribution cache to fix update problems; if it is still invalid, use Windows installation media to start the repair and perform the reset operation.
 What to do if the SD card cannot be read by the win10 computer_Solutions for the win10 system to not recognize the SD card
Sep 24, 2025 pm 05:27 PM
What to do if the SD card cannot be read by the win10 computer_Solutions for the win10 system to not recognize the SD card
Sep 24, 2025 pm 05:27 PM
First check the physical connection and lock switch of the SD card to ensure that it is inserted correctly and is not locked; then enable or restart the card reader device in the Device Manager; then update or reinstall the driver; run sfc/scannow to repair the system files; finally assign a disk letter or online to the SD card through disk management.
 How to clean the C drive of Win10 system when it is full_Win10 system C drive space cleaning method
Sep 24, 2025 pm 05:36 PM
How to clean the C drive of Win10 system when it is full_Win10 system C drive space cleaning method
Sep 24, 2025 pm 05:36 PM
First, use the disk cleaning tool to delete temporary files and old version updates, then manually clear the cache in the %temp% and C:\Windows\Temp directory. Then execute powercfg-hoff to close hibernation and release hiberfil.sys space through the administrator command prompt, and then migrate the virtual memory paging file to other disks. Finally, by compressing adjacent partitions and expanding the capacity of the C disk or using third-party tools to complete the capacity expansion operation.
 How to disable automatic maintenance services in Windows 10 system?
Sep 25, 2025 am 11:09 AM
How to disable automatic maintenance services in Windows 10 system?
Sep 25, 2025 am 11:09 AM
Windows 10 system comes with automatic maintenance function, which can perform maintenance tasks on the system according to the set time, such as system updates or disk defragmentation. By default, Windows 10 automatic maintenance is enabled. However, in some cases, we may prefer to manage these maintenance operations on our own to better control the equipment. So, how can I turn off the automatic maintenance service of Windows 10? Next, let’s take a look at the specific steps together, I hope it will be helpful to everyone. The specific method for disabling the automatic maintenance function in Win10 is as follows: Step 1, press the Win and R keys at the same time to open the running window. After entering regedit, click OK or press Enter; step 2: If the user account control is added
 Win10 Blue Screen: Kernel
Sep 25, 2025 am 10:48 AM
Win10 Blue Screen: Kernel
Sep 25, 2025 am 10:48 AM
Everyone knows that there are many types of blue screen phenomena in Windows 10. When blue screen occurs, many people often don’t know how to deal with it. Since most of the code displayed on the blue screen is obscure and difficult to understand, many users are confused and difficult to solve the problem on their own. Today, let’s talk about how to effectively deal with Kernel_Security_check_Failure blue screen code. This blue screen code usually indicates that there are problems with the driver, and the most common errors are network cards and graphics drivers. The reasons for the KERNEL-SECURITY-CHECK-FAILURE blue screen may be as follows: There are compatibility issues with network card drivers. The graphics card driver version does not match or is damaged. In response to this situation,
 How to view IP address in win10_Win10 local IP address and public network IP query method
Sep 24, 2025 pm 05:09 PM
How to view IP address in win10_Win10 local IP address and public network IP query method
Sep 24, 2025 pm 05:09 PM
First, you can check the local IP through settings, command prompts or network sharing centers, and then you can obtain the public IP through online websites or PowerShell commands to fully grasp the device network identity.
 How to solve the problem of 'The built-in administrator cannot activate this application' when Win10 prompts?
Sep 24, 2025 am 11:21 AM
How to solve the problem of 'The built-in administrator cannot activate this application' when Win10 prompts?
Sep 24, 2025 am 11:21 AM
When using a Windows 10 computer, you may encounter the problem that the system prompts "The built-in administrator cannot start the application". So how to solve this situation? Next, let’s take a look at the detailed solution steps. In this way, when you encounter similar problems again, you will not be in a hurry. The solution is as follows: First press the Win R key combination to open the run window, enter gpedit.msc in the run window and press Enter to open the local group policy editor. In Group Policy Manager, locate Windows Settings -> Security Settings -> Local Policies -> Security Options. Find "User Account Control: Applied to Built-in Administrator Accounts
