

Win10 Blue Screen: Kernel
Sep 25, 2025 am 10:48 AM
Everyone knows that there are many types of blue screen phenomena in Windows 10. When blue screen occurs, many people often don’t know how to deal with it. Since most of the code displayed on the blue screen is obscure and difficult to understand, many users are confused and difficult to solve the problem on their own. Today, let’s talk about how to effectively deal with Kernel_Security_check_Failure blue screen code. This blue screen code usually indicates that there are problems with the driver, and the most common errors are network cards and graphics drivers.
There may be the following reasons for the KERNEL-SECURITY-CHECK-FAILURE blue screen:
- There is compatibility problem with the network card driver.
- The graphics card driver version does not match or is damaged.
In this case, we can take the following solutions:
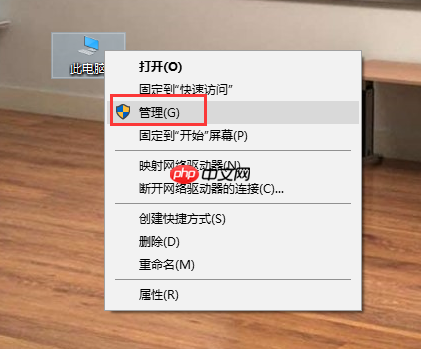
First, try to solve the problem by starting with the sound card driver. Because the graphics card driver is relatively large, priority is given to check whether the sound card driver is normal. The specific steps are as follows: 1. Right-click the "This Computer" icon on the desktop and select the "Management" option;
2. Enter the device manager, find the sound card device, and uninstall its driver;
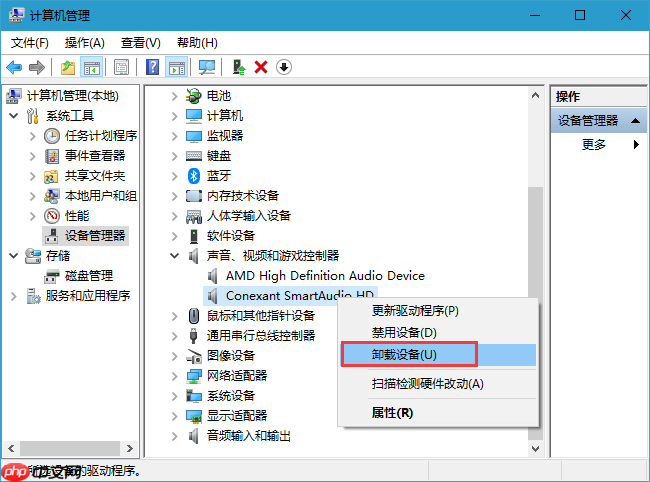
3. After the uninstallation is completed, the Windows 10 system will automatically match the appropriate driver and wait for the installation to be completed. If this method does not work, you can uninstall the driver again and go to the official website of the corresponding brand to download the latest version of the driver. If it is a laptop, it is recommended to directly access the official channel to obtain driver updates.
4. If the sound card driver still cannot solve the problem after reinstalling it, the same processing is required for the graphics card driver. The specific operation steps are consistent with the sound card.
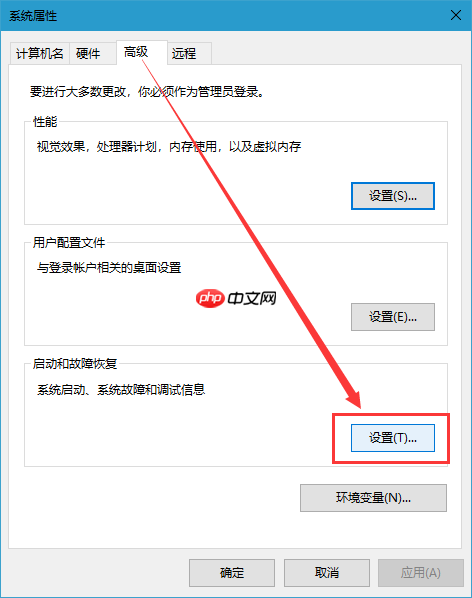
Another method is to find the root cause of the problem by analyzing the files generated by the blue screen: 1. Ensure that Windows 10 can generate DMP files when the blue screen occurs. You can set it through the following steps: Right-click "This Computer" and select [Settings] in [Properties] - [Advanced System Settings] - [Startup and Failure Recovery];
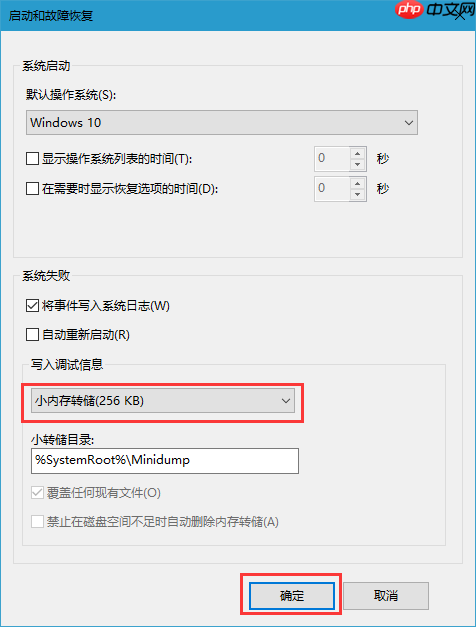
After opening, set it as instructed: Write debugging information >>Select "Small Memory Dump (256KB)", keep the default path, check [Write Events to System Log], and finally confirm and restart the computer;
2. Download and use the Blue Screen File Analysis Tool to help determine the specific reasons for the Blue Screen.
In summary, when encountering a blue screen, the exclusion method should be first used, reviewing recent operation records to see if there are newly installed software or hardware that may cause conflicts. If it still cannot be solved, you can use the Blue Screen file analysis tool to dig deeper into the problem. However, this requires a certain technical foundation to be completed smoothly.
The above is the detailed content of Win10 Blue Screen: Kernel. For more information, please follow other related articles on the PHP Chinese website!

Hot AI Tools

Undress AI Tool
Undress images for free

Undresser.AI Undress
AI-powered app for creating realistic nude photos

AI Clothes Remover
Online AI tool for removing clothes from photos.

ArtGPT
AI image generator for creative art from text prompts.

Stock Market GPT
AI powered investment research for smarter decisions

Hot Article
Hot Tools

Notepad++7.3.1
Easy-to-use and free code editor

SublimeText3 Chinese version
Chinese version, very easy to use

Zend Studio 13.0.1
Powerful PHP integrated development environment

Dreamweaver CS6
Visual web development tools

SublimeText3 Mac version
God-level code editing software (SublimeText3)

 How to set the taskbar clock to the second in win11_How to set the seconds displayed in the win11 taskbar clock
Oct 14, 2025 am 11:21 AM
How to set the taskbar clock to the second in win11_How to set the seconds displayed in the win11 taskbar clock
Oct 14, 2025 am 11:21 AM
Windows 11 can enable the taskbar clock to display seconds through settings, registry, command line, or third-party tools. 1. Turn it on in settings: Go to Personalization → Taskbar → Taskbar Behavior and turn on "Show seconds in system tray clock"; 2. Registry modification: Create a new DWORD value ShowSecondsInSystemClock under HKEY_CURRENT_USER\SOFTWARE\Microsoft\Windows\CurrentVersion\Explorer\Advanced and set it to 1; 3. Command line execution: Run PowerShell as an administrator and enter regaddHKCU\Softw
 How to set up screen tearing when playing games in win11_Win11 game screen tearing repair and setting tutorial
Oct 14, 2025 am 11:18 AM
How to set up screen tearing when playing games in win11_Win11 game screen tearing repair and setting tutorial
Oct 14, 2025 am 11:18 AM
Screen tearing is caused by the graphics card frame rate being out of sync with the monitor refresh rate, which can be solved by enabling windowed optimization, turning off full-screen optimization, setting vertical sync, calibrating the refresh rate, and turning off automatic HDR.
 How to run an app in compatibility mode for an older version of Windows?
Oct 14, 2025 am 02:32 AM
How to run an app in compatibility mode for an older version of Windows?
Oct 14, 2025 am 02:32 AM
IfanolderapphasissuesonWindows11,usecompatibilitymode:runthebuilt-introubleshooter,manuallyselectapastWindowsversion,enableadministratorrights,oradjusthigh-DPIsettingsforbetterdisplayandperformance.
 How to solve the green screen or black screen when playing video in edge browser_How to solve the green screen and black screen when playing video in edge browser
Oct 14, 2025 am 10:42 AM
How to solve the green screen or black screen when playing video in edge browser_How to solve the green screen and black screen when playing video in edge browser
Oct 14, 2025 am 10:42 AM
First, adjust the hardware acceleration settings, close and then restart the Edge browser; second, update or reinstall the graphics card driver to improve compatibility; then clear the GPUCache folder in the ShaderCache; and finally, reset the browser settings to eliminate abnormalities.
 How to run a disk defragmentation on your Windows PC? A guide to drive optimization.
Oct 14, 2025 am 03:47 AM
How to run a disk defragmentation on your Windows PC? A guide to drive optimization.
Oct 14, 2025 am 03:47 AM
IfyourWindowsPCisslow,trydiskdefragmentation:1.Usethebuilt-inDefragmenttooltoanalyzeandoptimizedrives.2.Scheduleautomaticoptimizationweeklyormonthly.3.UseCommandPromptwithadminrightsforadvancedcontrolviadefragcommands.
 Where to set up 360 browser compatibility view? 360 browser compatibility view setting entrance and steps
Oct 14, 2025 am 10:39 AM
Where to set up 360 browser compatibility view? 360 browser compatibility view setting entrance and steps
Oct 14, 2025 am 10:39 AM
1. Quickly switch to compatibility mode by clicking the lightning icon in the address bar; 2. Add specified website rules in the settings to achieve automatic compatibility; 3. Use the Alt T shortcut key to bring up the kernel switching menu; 4. Set global compatibility through desktop shortcut properties.
 How to set the default audio device in Windows_How to set the default audio playback and recording device in Windows
Oct 14, 2025 am 11:24 AM
How to set the default audio device in Windows_How to set the default audio playback and recording device in Windows
Oct 14, 2025 am 11:24 AM
First, change the default playback device through the system sound settings, right-click the volume icon and select Sound Settings, select the target device in the output options and test; then set the default microphone in the recording tab of the sound control panel, right-click the required device and set it as the default; you can also use third-party tools such as AudioSwitch to quickly switch input and output devices; advanced users can use the nircmd command line tool to achieve automatic switching, and use the setdefaultsounddevice command to specify the playback or recording device.
 What to do if windows11 cannot install net framework 3.5_How to fix the failure of windows11 to install .NET 3.5
Oct 14, 2025 am 11:09 AM
What to do if windows11 cannot install net framework 3.5_How to fix the failure of windows11 to install .NET 3.5
Oct 14, 2025 am 11:09 AM
First, use the DISM command to install .NET Framework 3.5 from local sources. If it fails, enable the function through the control panel, then repair the system files and reset the update service, check the group policy settings, and finally use third-party tools to assist in the repair.
