
 System Tutorial
Windows Series
How to disable automatic maintenance services in Windows 10 system?
System Tutorial
Windows Series
How to disable automatic maintenance services in Windows 10 system?
How to disable automatic maintenance services in Windows 10 system?
Sep 25, 2025 am 11:09 AM
Windows 10 system comes with automatic maintenance function, which can perform maintenance tasks on the system at a set time, such as system updates or disk defragmentation. By default, automatic maintenance of Win10 is enabled. However, in some cases, we may prefer to manage these maintenance operations on our own to better control the equipment. So, how can I turn off the automatic maintenance service of Windows 10? Next, let’s take a look at the specific steps together, I hope it will be helpful to everyone.
The specific methods for disabling the automatic maintenance function in Win10 are as follows:
Step 1: Press Win and R keys at the same time to open the run window. After entering regedit, click OK or press Enter;
Step 2: If the user account control prompt appears, just click "Yes";
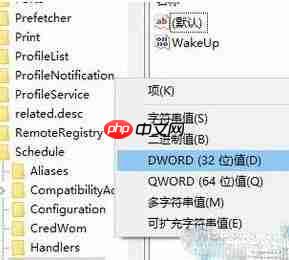
Step 3: After entering the Registry Editor, find and expand the HKEY_LOCAL_MACHINE\SOFTWARE\Microsoft\Windows NT\CurrentVersion\Schedule\Maintenance folder in turn. Right-click the mouse in the blank area on the right, select "New" in the pop-up menu, and then click "DWORD (32-bit) Value". Name it MaintenanceDisabled and double-click to open it;
Step 4: In the dialog box for editing DWORD (32-bit) value, set the numerical data to 1, and then click the "OK" button;
Step 5: Restart the computer to ensure the changes take effect.
The above content introduces the operating guide for disabling the automatic maintenance function under Windows 10 system.
The above is the detailed content of How to disable automatic maintenance services in Windows 10 system?. For more information, please follow other related articles on the PHP Chinese website!

Hot AI Tools

Undress AI Tool
Undress images for free

Undresser.AI Undress
AI-powered app for creating realistic nude photos

AI Clothes Remover
Online AI tool for removing clothes from photos.

ArtGPT
AI image generator for creative art from text prompts.

Stock Market GPT
AI powered investment research for smarter decisions

Hot Article
Hot Tools

Notepad++7.3.1
Easy-to-use and free code editor

SublimeText3 Chinese version
Chinese version, very easy to use

Zend Studio 13.0.1
Powerful PHP integrated development environment

Dreamweaver CS6
Visual web development tools

SublimeText3 Mac version
God-level code editing software (SublimeText3)

 How to set the taskbar clock to the second in win11_How to set the seconds displayed in the win11 taskbar clock
Oct 14, 2025 am 11:21 AM
How to set the taskbar clock to the second in win11_How to set the seconds displayed in the win11 taskbar clock
Oct 14, 2025 am 11:21 AM
Windows 11 can enable the taskbar clock to display seconds through settings, registry, command line, or third-party tools. 1. Turn it on in settings: Go to Personalization → Taskbar → Taskbar Behavior and turn on "Show seconds in system tray clock"; 2. Registry modification: Create a new DWORD value ShowSecondsInSystemClock under HKEY_CURRENT_USER\SOFTWARE\Microsoft\Windows\CurrentVersion\Explorer\Advanced and set it to 1; 3. Command line execution: Run PowerShell as an administrator and enter regaddHKCU\Softw
 How to set up screen tearing when playing games in win11_Win11 game screen tearing repair and setting tutorial
Oct 14, 2025 am 11:18 AM
How to set up screen tearing when playing games in win11_Win11 game screen tearing repair and setting tutorial
Oct 14, 2025 am 11:18 AM
Screen tearing is caused by the graphics card frame rate being out of sync with the monitor refresh rate, which can be solved by enabling windowed optimization, turning off full-screen optimization, setting vertical sync, calibrating the refresh rate, and turning off automatic HDR.
 How to run an app in compatibility mode for an older version of Windows?
Oct 14, 2025 am 02:32 AM
How to run an app in compatibility mode for an older version of Windows?
Oct 14, 2025 am 02:32 AM
IfanolderapphasissuesonWindows11,usecompatibilitymode:runthebuilt-introubleshooter,manuallyselectapastWindowsversion,enableadministratorrights,oradjusthigh-DPIsettingsforbetterdisplayandperformance.
 How to solve the green screen or black screen when playing video in edge browser_How to solve the green screen and black screen when playing video in edge browser
Oct 14, 2025 am 10:42 AM
How to solve the green screen or black screen when playing video in edge browser_How to solve the green screen and black screen when playing video in edge browser
Oct 14, 2025 am 10:42 AM
First, adjust the hardware acceleration settings, close and then restart the Edge browser; second, update or reinstall the graphics card driver to improve compatibility; then clear the GPUCache folder in the ShaderCache; and finally, reset the browser settings to eliminate abnormalities.
 How to run a disk defragmentation on your Windows PC? A guide to drive optimization.
Oct 14, 2025 am 03:47 AM
How to run a disk defragmentation on your Windows PC? A guide to drive optimization.
Oct 14, 2025 am 03:47 AM
IfyourWindowsPCisslow,trydiskdefragmentation:1.Usethebuilt-inDefragmenttooltoanalyzeandoptimizedrives.2.Scheduleautomaticoptimizationweeklyormonthly.3.UseCommandPromptwithadminrightsforadvancedcontrolviadefragcommands.
 Where to set up 360 browser compatibility view? 360 browser compatibility view setting entrance and steps
Oct 14, 2025 am 10:39 AM
Where to set up 360 browser compatibility view? 360 browser compatibility view setting entrance and steps
Oct 14, 2025 am 10:39 AM
1. Quickly switch to compatibility mode by clicking the lightning icon in the address bar; 2. Add specified website rules in the settings to achieve automatic compatibility; 3. Use the Alt T shortcut key to bring up the kernel switching menu; 4. Set global compatibility through desktop shortcut properties.
 How to set the default audio device in Windows_How to set the default audio playback and recording device in Windows
Oct 14, 2025 am 11:24 AM
How to set the default audio device in Windows_How to set the default audio playback and recording device in Windows
Oct 14, 2025 am 11:24 AM
First, change the default playback device through the system sound settings, right-click the volume icon and select Sound Settings, select the target device in the output options and test; then set the default microphone in the recording tab of the sound control panel, right-click the required device and set it as the default; you can also use third-party tools such as AudioSwitch to quickly switch input and output devices; advanced users can use the nircmd command line tool to achieve automatic switching, and use the setdefaultsounddevice command to specify the playback or recording device.
 How does Google Chrome manage website location information permissions_How to manage website location permissions in Google Chrome
Oct 15, 2025 am 11:09 AM
How does Google Chrome manage website location information permissions_How to manage website location permissions in Google Chrome
Oct 15, 2025 am 11:09 AM
1. Website location permissions can be managed through Google Chrome settings: First click the three-dot menu to enter "Settings", select "Website Settings" under "Privacy and Security", and adjust the default behavior in "Location Information" to globally prohibit or allow access; 2. For specific websites, click the lock icon in the address bar and enter "Site Settings" to configure location permissions individually; 3. If you need to clear historical authorization records, you can delete website data including location permissions through the "Clear Browsing Data" function and reset all permission settings.
