

Python development_python installation
May 07, 2025 pm 04:33 PMPython can run on a variety of platforms, including our common ones: Windows, Unix, Linux, and Macintosh.
This article will introduce in detail the process of installing Python in Windows operating system. My operating system is Windows 7, 32-bit version.
When installing Python, we can choose to install it from the source code or select the already compiled binary version for installation. I chose the latter here.
Step 1 Download the installation package
We download the Python installation package from the official Python website: http://ipnx.cn/link/50959eee56aa5f4695971b375b69354f .
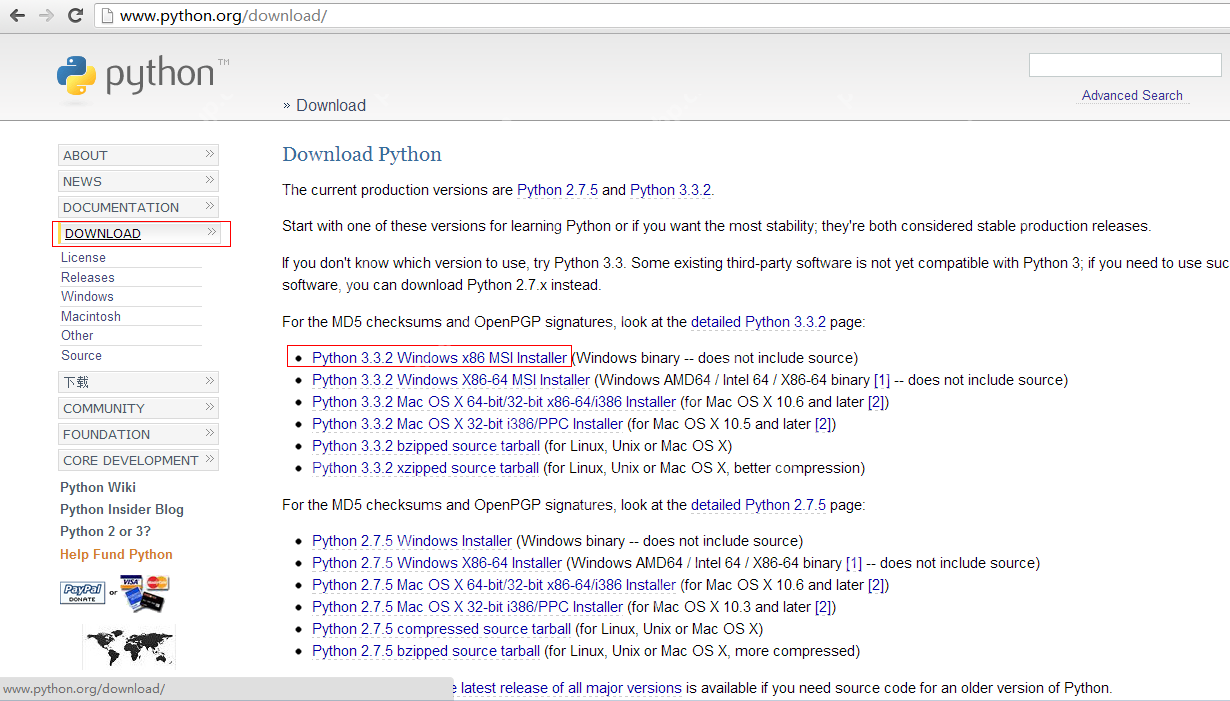 The version I chose is: python-3.3.2.msi
After clicking to download, we will get a python-3.3.2.msi installation package with a size of 19.3 MB.
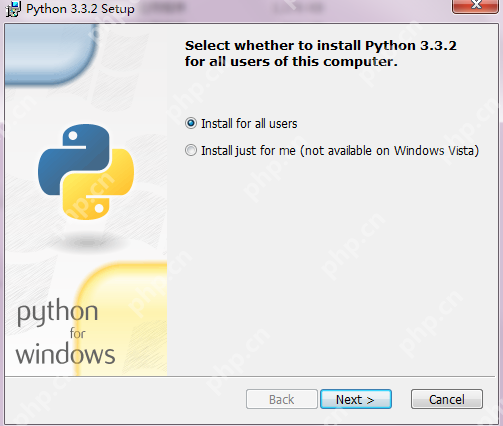
Step 2 Installation
After downloading the python-3.3.2.msi installation package, double-click the file to start the installation.
 The installation directory I chose is: E:\Python33
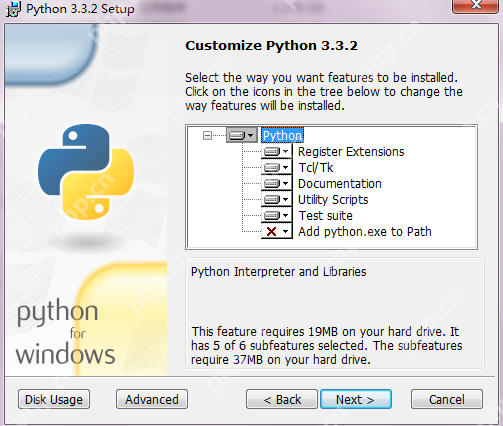 Click Next to start the installation process, which usually takes several minutes.
 After the installation is completed, click Finish to end the installation.
Step 3 path settings
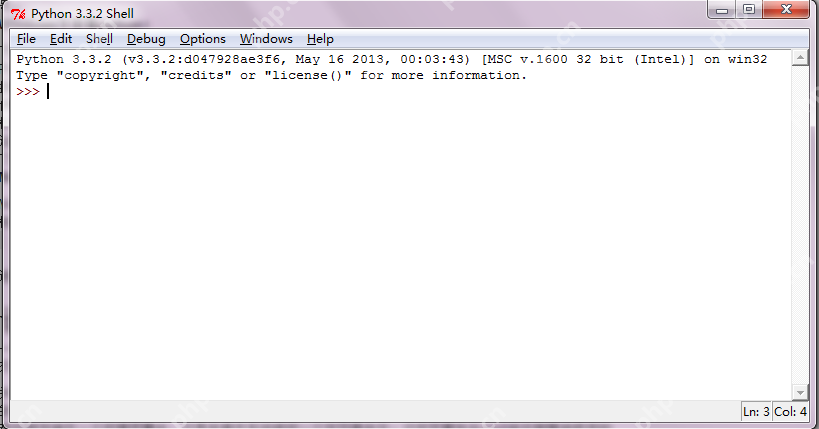
Usually, you can use it directly after installing Python. You can check whether you can enter Python's interactive mode by typing Python in the command line.
If you cannot enter, it may be because of the environment variable setting problem and some adjustments are needed.
In Windows, you can add Python's directory to the environment variable path through a command prompt, for example: %path%; C: Python, and press Enter.
Alternatively, you can set environment variables through the graphical interface, the path is: Computer -> Properties -> Advanced System Settings -> Advanced -> Environment Variables.
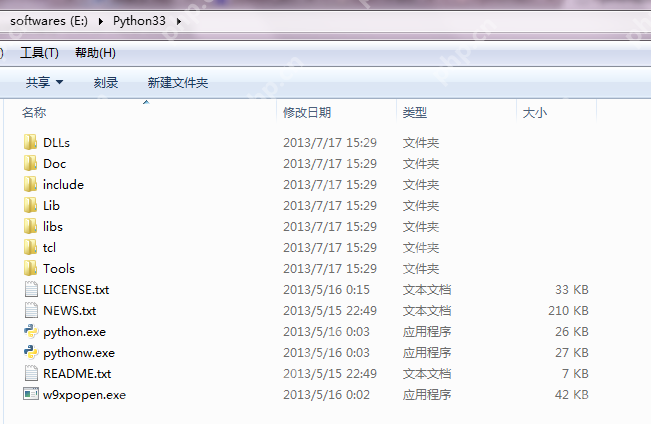
Step 4 Effect
After the installation is completed, the files in the installation directory are as follows:
 At this point, the Python installation process is completed.
The above is the detailed content of Python development_python installation. For more information, please follow other related articles on the PHP Chinese website!

Hot AI Tools

Undress AI Tool
Undress images for free

Undresser.AI Undress
AI-powered app for creating realistic nude photos

AI Clothes Remover
Online AI tool for removing clothes from photos.

Clothoff.io
AI clothes remover

Video Face Swap
Swap faces in any video effortlessly with our completely free AI face swap tool!

Hot Article
Hot Tools

Notepad++7.3.1
Easy-to-use and free code editor

SublimeText3 Chinese version
Chinese version, very easy to use

Zend Studio 13.0.1
Powerful PHP integrated development environment

Dreamweaver CS6
Visual web development tools

SublimeText3 Mac version
God-level code editing software (SublimeText3)
Hot Topics


 How to Schedule Tasks on Linux with Cron and anacron
Aug 01, 2025 am 06:11 AM
How to Schedule Tasks on Linux with Cron and anacron
Aug 01, 2025 am 06:11 AM
cronisusedforpreciseschedulingonalways-onsystems,whileanacronensuresperiodictasksrunonsystemsthataren'tcontinuouslypowered,suchaslaptops;1.Usecronforexacttiming(e.g.,3AMdaily)viacrontab-ewithsyntaxMINHOURDOMMONDOWCOMMAND;2.Useanacronfordaily,weekly,o
 How to change the system display language for all users in Windows
Jul 31, 2025 am 08:18 AM
How to change the system display language for all users in Windows
Jul 31, 2025 am 08:18 AM
InstallthedesiredlanguagepackviaSettings→Time&Language→Language®ion,ensuring"SetasmyWindowsdisplaylanguage"isselected.2.Changethesystemdisplaylanguageinthesamemenuandrestart.3.OpenControlPanel→Region→Administrativetab,click"
 How to reset the Microsoft Store in Windows
Jul 31, 2025 am 08:23 AM
How to reset the Microsoft Store in Windows
Jul 31, 2025 am 08:23 AM
ResettheMicrosoftStoreviaSettingsbygoingtoApps>Installedapps,selectingMicrosoftStore,clickingAdvancedoptions,thenRepairandResetifneeded.2.Ifthatfails,re-registertheStoreusingPowerShellasadminwiththecommand:Get-AppXPackage-NameMicrosoft.WindowsStor
 How to install Windows on a Mac without Boot Camp
Jul 31, 2025 am 11:58 AM
How to install Windows on a Mac without Boot Camp
Jul 31, 2025 am 11:58 AM
Without BootCamp, installing Windows on Mac is feasible and works for different chips and needs. 1. First check compatibility: The M1/M2 chip Mac cannot use BootCamp, it is recommended to use virtualization tools; the Intel chip Mac can manually create a boot USB disk and install it in partition. 2. Recommended to use virtual machines (VMs) for M1 and above chip users: Windows ISO files, virtualization software (such as ParallelsDesktop or UTM), at least 64GB of free space, and reasonably allocate resources. 3. IntelMac users can manually install it by booting the USB drive: USB drive, WindowsISO, DiskU is required
 How to share data between multiple processes in Python?
Aug 02, 2025 pm 01:15 PM
How to share data between multiple processes in Python?
Aug 02, 2025 pm 01:15 PM
Use multiprocessing.Queue to safely pass data between multiple processes, suitable for scenarios of multiple producers and consumers; 2. Use multiprocessing.Pipe to achieve bidirectional high-speed communication between two processes, but only for two-point connections; 3. Use Value and Array to store simple data types in shared memory, and need to be used with Lock to avoid competition conditions; 4. Use Manager to share complex data structures such as lists and dictionaries, which are highly flexible but have low performance, and are suitable for scenarios with complex shared states; appropriate methods should be selected based on data size, performance requirements and complexity. Queue and Manager are most suitable for beginners.
 How to install Windows on a Mac
Jul 31, 2025 am 10:07 AM
How to install Windows on a Mac
Jul 31, 2025 am 10:07 AM
ForIntel-basedMacs,useBootCampAssistanttocreateadual-bootsystemwithWindowsbypreparingaUSBdrive,downloadingaWindowsISO,partitioningthedisk,andinstallingWindowsalongsidemacOSwithsupportdrivers.2.ForAppleSiliconMacs(M1/M2/M3),usevirtualizationsoftwareli
 Step-by-step guide to installing Windows from an ISO file
Aug 01, 2025 am 01:10 AM
Step-by-step guide to installing Windows from an ISO file
Aug 01, 2025 am 01:10 AM
DownloadtheWindowsISOfromMicrosoft’sofficialsite.2.CreateabootableUSBusingMediaCreationToolorRufuswithaUSBdriveofatleast8GB.3.BootfromtheUSBbyaccessingthebootmenuoradjustingBIOS/UEFIsettings.4.InstallWindowsbyselectingcustominstallation,choosingtheco
 How to reset the TCP/IP stack in Windows
Aug 02, 2025 pm 01:25 PM
How to reset the TCP/IP stack in Windows
Aug 02, 2025 pm 01:25 PM
ToresolvenetworkconnectivityissuesinWindows,resettheTCP/IPstackbyfirstopeningCommandPromptasAdministrator,thenrunningthecommandnetshintipreset,andfinallyrestartingyourcomputertoapplychanges;ifissuespersist,optionallyrunnetshwinsockresetandrebootagain
