
 Computer Tutorials
Troubleshooting
PEAK Voice Chat Not Working on PC: Check This Stepwise Guide!
Computer Tutorials
Troubleshooting
PEAK Voice Chat Not Working on PC: Check This Stepwise Guide!
PEAK Voice Chat Not Working on PC: Check This Stepwise Guide!
Jul 03, 2025 pm 06:02 PM
Players have been experiencing the PEAK voice chat not working issue on PC, impacting their cooperation during climbs. If you are in the same situation, you can read this post from MiniTool to learn how to resolve PEAK voice chat issues.
PEAK Voice Chat Not Working
As a fun co-op game, relying on teamwork in PEAK is crucial for successful adventures to band players together and help each other up the highest of cliffs and unique landscapes. Therefore, a silent teammate can lead to problems.
Fortunately, the game features a chat option that improves collaboration. This allows players to communicate effectively through 3D directional audio. It can help players identify the direction from which their teammates’ voices are originating.
However, some players have recently encountered the PEAK voice chat issues. They have found the chat feature to be unexpectedly underutilized, which affects coordination during challenging climbs. If you are experiencing this vexing issue, here are the steps you can take to troubleshoot the PEAK voice chat not working issue on PC.
How to Fix the PEAK Voice Chat Not Working Issue on PC
Fix 1. Verify PEAK’s Audio Settings
Before jumping straight to more complex solutions, it’s advisable to adjust certain settings within the game first. Follow these comprehensive steps to accomplish that:
Step 1: Open PEAK and go to Settings.
Step 2: Switch to the Audio tab to arrive at the audio settings.
- If your device is equipped with two microphones, the game might randomly select one as the default input, potentially leading to problems with in-game voice chat. Therefore, in the Microphone section, ensure that the correct microphone is chosen in this setting to prevent any complications.
- Ensure that the Microphone Mode is not configured to Push to Talk if you’re accustomed to using Voice Activation mode. Using Push to Talk will entirely mute your communications unless you press the specified key. Therefore, change this setting to Voice Activation to keep your microphone active at all times.
Fix 2. Check System Audio Settings
Occasionally, the cause of the voice chat issue lies beyond PEAK. Recent updates to Windows or modifications to the driver can unexpectedly change the system’s default input device and trigger the PEAK mic not working issue.
>> Set the Correct Device
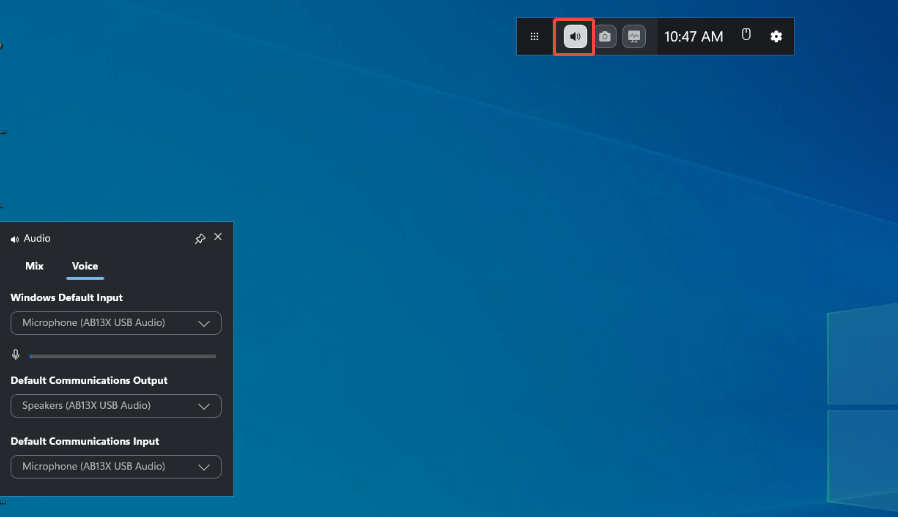
Step 1: Launch PEAK. Press Win G and click Audio in the top toolbar if you can’t see the Audio window. If the Audio window is right here, just go to this interface.
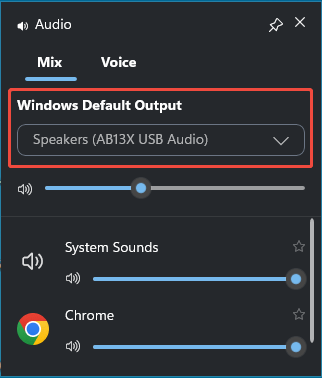
Step 2: Head to the Mix section, in the Windows Default Input part, select your audio device that you are using from the drop-down menu. Next, scroll down and if you see PEAK is listed, make sure the volume is set correctly.
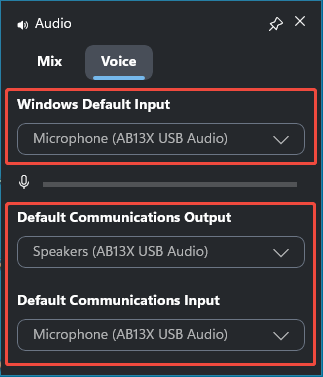
Step 3: Navigate to the Voice tab. In the Windows Default Input section, select your audio device that you are using. Both under the Default Communications Output and Default Communications Input, ensure they are set to the audio device you are using.
>> Enable Microphone Access
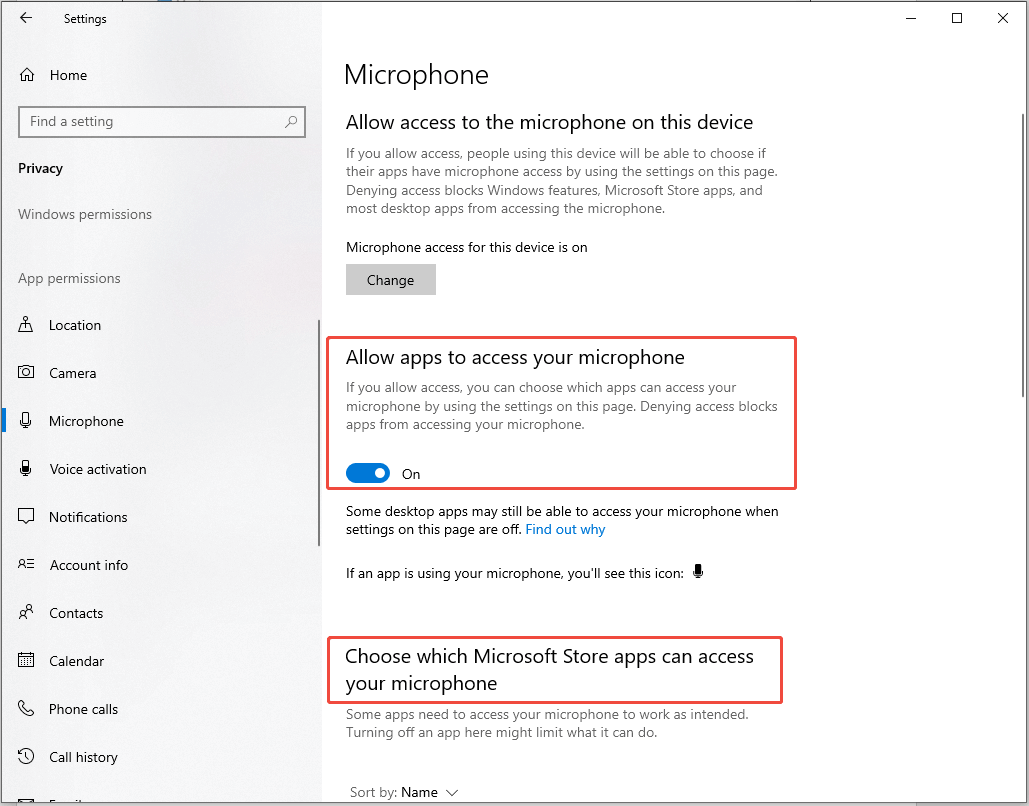
Step 1: Press Win I to open Windows Settings, then go to Privacy > Microphone.
Step 2: Under Allow apps to access your microphone, ensure the toggle is On.
Step 3: Scroll down to Allow desktop apps to access your microphone and confirm PEAK or Steam is listed and enabled.
>> Check Volume Mixer
Step 1: Launch PEAK. Right-click the audio icon at the bottom right and select Open Volume mixer.
Step 2: In the pop-up window, if you see PEAK in the list, make sure it is set to 100.
>> Check the Sound Settings
Step 1: Right-click the audio icon at the bottom right and select Open Sound settings.
Step 2: The Windows Settings interface will appear. In the Output section, select the audio drive you are using from the Choose your output device drop-down menu. Next, make sure the volume is set to 100.
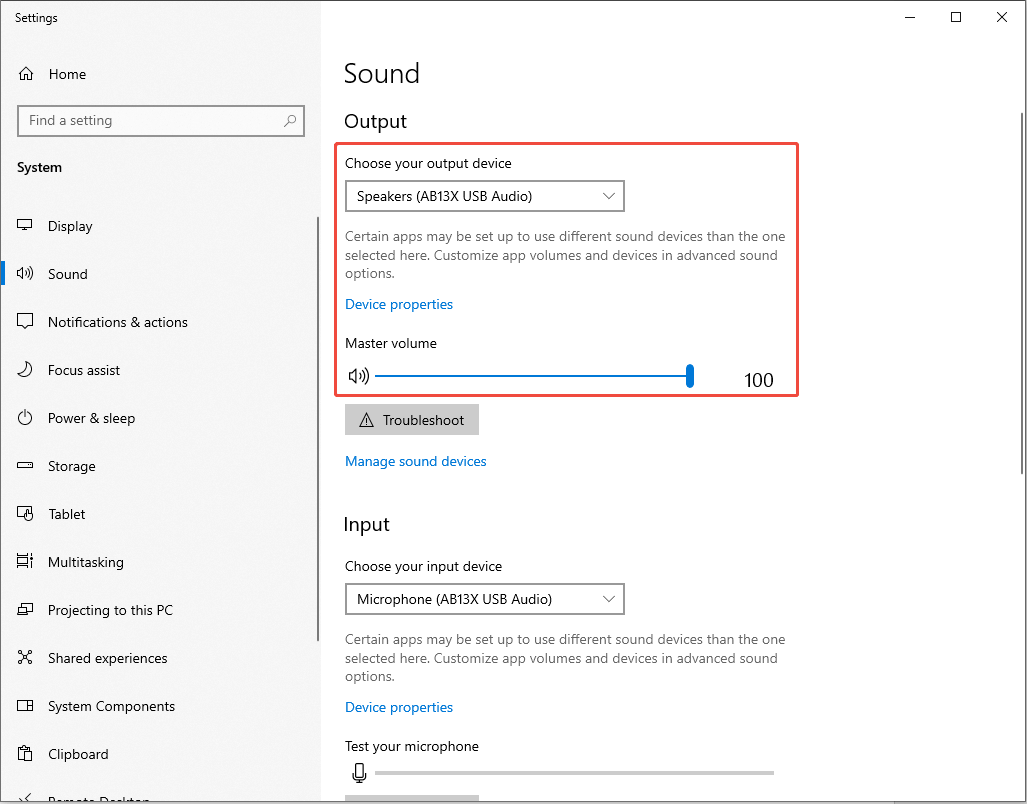
Step 3: Scroll down and navigate to the Input section. Select the audio drive you are using from the Choose your Input device drop-down menu and set the volume to 100.
Step 4: Launch the game and check whether the PEAK voice chat not working issue is gone.
Fix 3. Set Sound Sample Rate
Some players set the sound sample rate to 48000/44100 Hz helped them resolve the PEAK voice chat not working issue on their PCs.
Step 1: Press Win S to open the Windows Search bar, type Control Panel in the box, and press Enter.
Step 2: Navigate to Hardware and Sound > Sound.
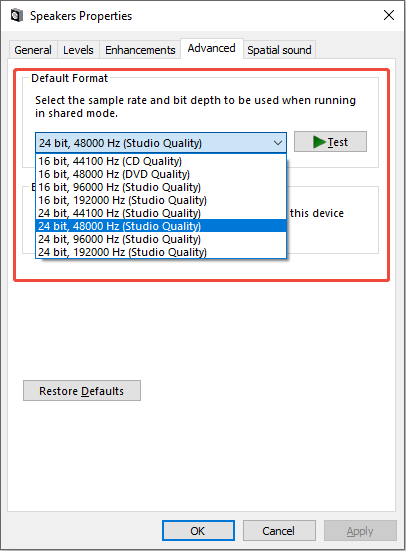
Step 3: In the following window, right-click the audio device you are using, which has a green tick under the Playback section, and select Properties.
Step 4: Go to the Advanced tab, select 48000 or 44100 Hz from the Default Format drop-down menu, and click Apply > OK.
Fix 4. Disable Oculus/Voicemeeter Audio Device
Sometimes, the Oculus or Voicemeeter audio devices can conflict with the device you are using and cause the PEAK voice chat not working issue. Follow the instructions to do it:
Step 1: Open Control Panel and go to Hardware and Sound > Sound.
Step 2: In the Playback section, if you see the Voicemeeter audio devices or other not used audio devices, just right-click them one by one and select Disable. Switch to the Recording tab, make sure the microphone you are using is enabled, and do the same thing to disable the Voicemeeter audio devices.
Step 3: Press Win X to open the WinX menu and select Device Manager.
Step 4: Expand the Sound, voice and game controllers category. If you can see a device called Oculus Virtual Audio Device and the Voicemeeter audio device, right-click them and select Disable device.
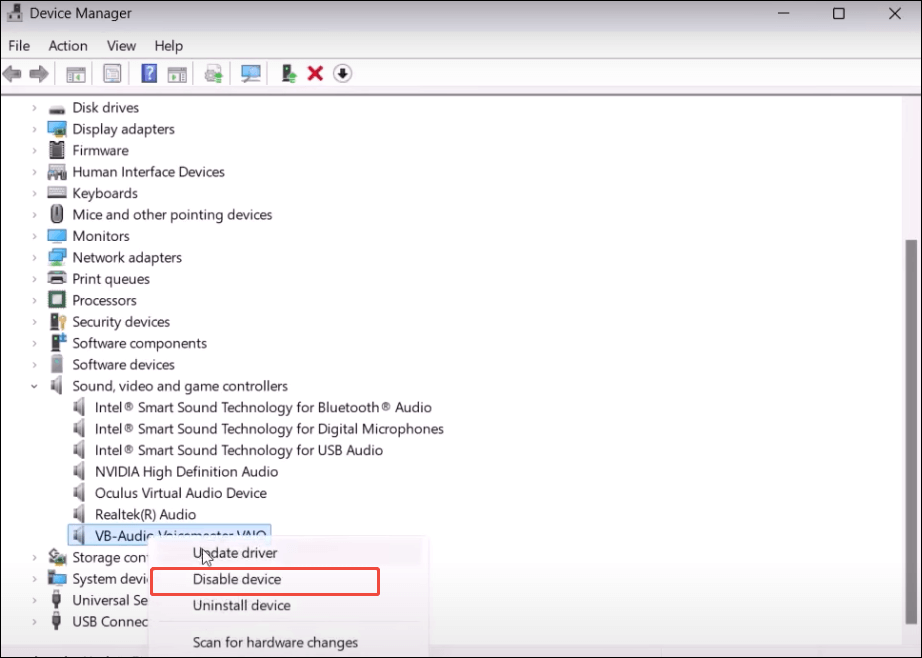
Step 5: In the pop-up interface, click Yes to confirm the action.
Step 6: Restart your PC.
Gentle Reminder
A common problem arises from audio-routing applications such as Voicemod, VoiceMeeter, and Razer Synapse. These programs operate between your microphone and the game, and they frequently interfere with PEAK’s capacity to detect your voice. The simplest solution is to disable them, or if you rarely use them, uninstall them entirely.
Fix 5. Update Your Audio Device
Updating your audio drivers is beneficial for enhancing your PC’s performance. Here’s the way to do it:
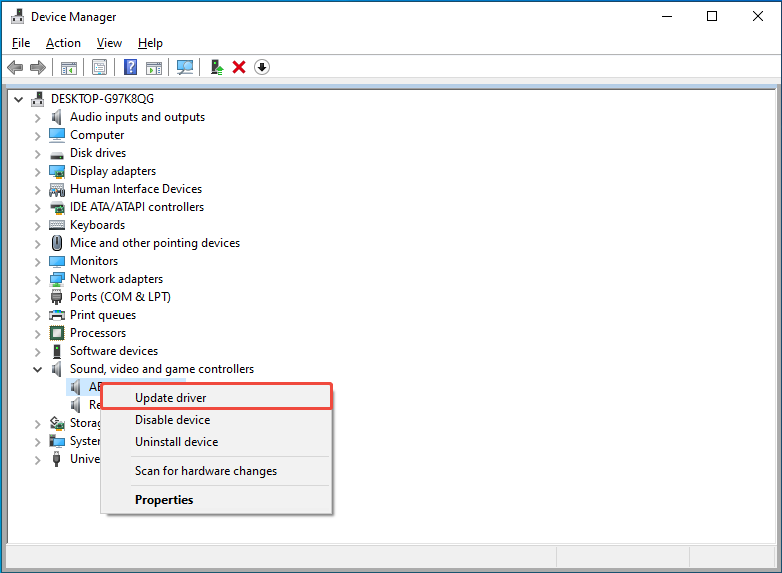
Step 1: Press Win X and select Device Manager.
Step 2: Expand Sound, Video, and Game Controllers.
Step 3: Right-click your audio device and select Update driver.
Step 4: Choose Search automatically for drivers.
Step 5: Restart your PC and check if voice chat works in PEAK.
Fix 6. Verify the Game Files
Corrupted or missing game files can trigger the PEAK voice chat not working issue. Therefore, consider using the Steam built-in tool to verify the integrity of the game files. To do it, Right-click Peak in your Steam Library > Properties > Installed files > Verify integrity of game files.
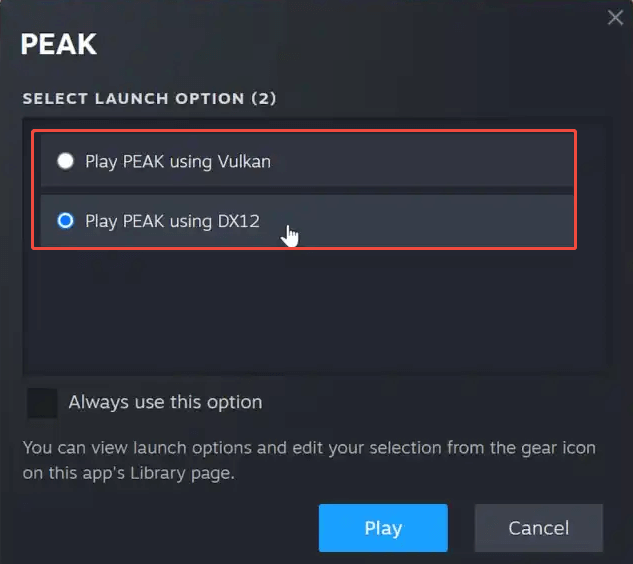
Fix 7. Run PEAK in DX12/Vulkan Mode
PEAK provides two game APIs for players to select based on the compatibility of their hardware. Certain PC hardware setups may perform better with DirectX 12, while others might favor Vulkan. Therefore, ensure you change to an alternate API and attempt to launch the game to check if the problem has been fixed.
To do this, just launch the game in Steam and select Play PEAK using DX12 or Play PEAK using Vulkan in the pop-up window. Next, click the Play button.
Final Words
In a word, this guide shows how to fix the PEAK voice chat not working issue on a PC. Hope the information provided above can help you get your game back on track.
The above is the detailed content of PEAK Voice Chat Not Working on PC: Check This Stepwise Guide!. For more information, please follow other related articles on the PHP Chinese website!

Hot AI Tools

Undress AI Tool
Undress images for free

Undresser.AI Undress
AI-powered app for creating realistic nude photos

AI Clothes Remover
Online AI tool for removing clothes from photos.

Clothoff.io
AI clothes remover

Video Face Swap
Swap faces in any video effortlessly with our completely free AI face swap tool!

Hot Article
Hot Tools

Notepad++7.3.1
Easy-to-use and free code editor

SublimeText3 Chinese version
Chinese version, very easy to use

Zend Studio 13.0.1
Powerful PHP integrated development environment

Dreamweaver CS6
Visual web development tools

SublimeText3 Mac version
God-level code editing software (SublimeText3)
Hot Topics


 Windows Security is blank or not showing options
Jul 07, 2025 am 02:40 AM
Windows Security is blank or not showing options
Jul 07, 2025 am 02:40 AM
When the Windows Security Center is blank or the function is missing, you can follow the following steps to check: 1. Confirm whether the system version supports full functions, some functions of the Home Edition are limited, and the Professional Edition and above are more complete; 2. Restart the SecurityHealthService service to ensure that its startup type is set to automatic; 3. Check and uninstall third-party security software that may conflict; 4. Run the sfc/scannow and DISM commands to repair system files; 5. Try to reset or reinstall the Windows Security Center application, and contact Microsoft support if necessary.
 PEAK Voice Chat Not Working on PC: Check This Stepwise Guide!
Jul 03, 2025 pm 06:02 PM
PEAK Voice Chat Not Working on PC: Check This Stepwise Guide!
Jul 03, 2025 pm 06:02 PM
Players have been experiencing the PEAK voice chat not working issue on PC, impacting their cooperation during climbs. If you are in the same situation, you can read this post from MiniTool to learn how to resolve PEAK voice chat issues.Quick Navigat
 Windows stuck on 'undoing changes made to your computer'
Jul 05, 2025 am 02:51 AM
Windows stuck on 'undoing changes made to your computer'
Jul 05, 2025 am 02:51 AM
The computer is stuck in the "Undo Changes made to the computer" interface, which is a common problem after the Windows update fails. It is usually caused by the stuck rollback process and cannot enter the system normally. 1. First of all, you should wait patiently for a long enough time, especially after restarting, it may take more than 30 minutes to complete the rollback, and observe the hard disk light to determine whether it is still running. 2. If there is no progress for a long time, you can force shut down and enter the recovery environment (WinRE) multiple times, and try to start repair or system restore. 3. After entering safe mode, you can uninstall the most recent update records through the control panel. 4. Use the command prompt to execute the bootrec command in the recovery environment to repair the boot file, or run sfc/scannow to check the system file. 5. The last method is to use the "Reset this computer" function
 Proven Ways for Microsoft Teams Error 657rx in Windows 11/10
Jul 07, 2025 pm 12:25 PM
Proven Ways for Microsoft Teams Error 657rx in Windows 11/10
Jul 07, 2025 pm 12:25 PM
Encountering something went wrong 657rx can be frustrating when you log in to Microsoft Teams or Outlook. In this article on MiniTool, we will explore how to fix the Outlook/Microsoft Teams error 657rx so you can get your workflow back on track.Quick
 The requested operation requires elevation Windows
Jul 04, 2025 am 02:58 AM
The requested operation requires elevation Windows
Jul 04, 2025 am 02:58 AM
When you encounter the prompt "This operation requires escalation of permissions", it means that you need administrator permissions to continue. Solutions include: 1. Right-click the "Run as Administrator" program or set the shortcut to always run as an administrator; 2. Check whether the current account is an administrator account, if not, switch or request administrator assistance; 3. Use administrator permissions to open a command prompt or PowerShell to execute relevant commands; 4. Bypass the restrictions by obtaining file ownership or modifying the registry when necessary, but such operations need to be cautious and fully understand the risks. Confirm permission identity and try the above methods usually solve the problem.
 The RPC server is unavailable Windows
Jul 06, 2025 am 12:07 AM
The RPC server is unavailable Windows
Jul 06, 2025 am 12:07 AM
When encountering the "RPCserverisunavailable" problem, first confirm whether it is a local service exception or a network configuration problem. 1. Check and start the RPC service to ensure that its startup type is automatic. If it cannot be started, check the event log; 2. Check the network connection and firewall settings, test the firewall to turn off the firewall, check DNS resolution and network connectivity; 3. Run the sfc/scannow and DISM commands to repair the system files; 4. Check the group policy and domain controller status in the domain environment, and contact the IT department to assist in the processing. Gradually check it in sequence to locate and solve the problem.
 the default gateway is not available Windows
Jul 08, 2025 am 02:21 AM
the default gateway is not available Windows
Jul 08, 2025 am 02:21 AM
When you encounter the "DefaultGatewayisNotAvailable" prompt, it means that the computer cannot connect to the router or does not obtain the network address correctly. 1. First, restart the router and computer, wait for the router to fully start before trying to connect; 2. Check whether the IP address is set to automatically obtain, enter the network attribute to ensure that "Automatically obtain IP address" and "Automatically obtain DNS server address" are selected; 3. Run ipconfig/release and ipconfig/renew through the command prompt to release and re-acquire the IP address, and execute the netsh command to reset the network components if necessary; 4. Check the wireless network card driver, update or reinstall the driver to ensure that it works normally.
 How to fix 'SYSTEM_SERVICE_EXCEPTION' stop code in Windows
Jul 09, 2025 am 02:56 AM
How to fix 'SYSTEM_SERVICE_EXCEPTION' stop code in Windows
Jul 09, 2025 am 02:56 AM
When encountering the "SYSTEM_SERVICE_EXCEPTION" blue screen error, you do not need to reinstall the system or replace the hardware immediately. You can follow the following steps to check: 1. Update or roll back hardware drivers such as graphics cards, especially recently updated drivers; 2. Uninstall third-party antivirus software or system tools, and use WindowsDefender or well-known brand products to replace them; 3. Run sfc/scannow and DISM commands as administrator to repair system files; 4. Check memory problems, restore the default frequency and re-plug and unplug the memory stick, and use Windows memory diagnostic tools to detect. In most cases, the driver and software problems can be solved first.
