

How to use Dynamic Island on iPhone 14 Pro
Apr 13, 2023 pm 06:10 PM
iPhone 14 Pro comes with many new unique features, such as a new 48MP sensor, Always-On Display, and new Dynamic Island. Dynamic Island is Apple's attempt to blur the line between hardware and software by covering the front display cutout with a software overlay. This overlay interacts with your iPhone and displays ongoing activity in real time. If you recently received a new device and want to make the most of the new Dynamic Island, you can use it on iPhone 14 Pro and Pro Max.
When will the dynamic island be activated?
Dynamic Island comes to life whenever there is activity in the background that you want to track in real time. These activities include incoming notifications, live activity, media playing in the background, and more. Depending on its nature, each supported activity will appear in Dynamic Island, and you can then interact with it using dedicated gestures.
Apple uses existing APIs and software toolkits to demonstrate ongoing activity in Dynamic Island. Additionally, Dynamic Island has its own set of new animations designed to take advantage of new ProMotion displays with refresh rates of up to 120Hz. Animations seem smoother compared to older devices, and Dynamic Island's new physics make it feel alive when interacting with it.
How to use Dynamic Island on iPhone 14 Pro
You can use Dynamic Island on iPhone 14 Pro and Pro Max by launching a supported background activity. Depending on the activity, you can use gestures to interact and control ongoing activities directly from Dynamic Island without switching to a dedicated app, Notification Center, or Control Center. Let’s take a quick look at a few examples and how to interact and manage common activities in Dynamic Island.
Step 1: Trigger a compatible activity
The dynamic island will remain static and non-interactive unless you are running a compatible activity. So let's try to trigger the compatible activity for this example. Let's play some music for this example. Most music streaming apps are currently compatible with Dynamic Island as most of them use MPNowPlayingInfoCenter. For this example, we'll play some music on Spotify. However, you can use any music streaming app you like.
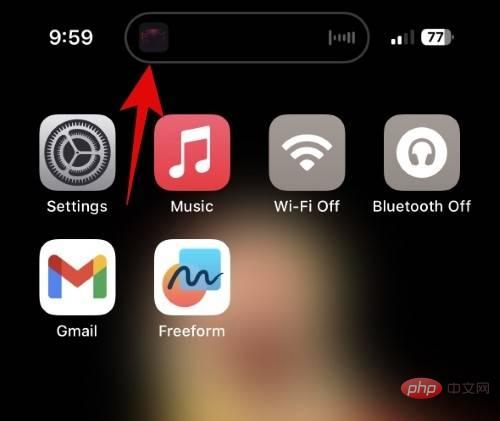
After playing a song, simply swipe up from the bottom to minimize the app on your iPhone.
#Dynamic Island will now automatically come to life and indicate that music is currently playing in the background on your iPhone.
#You can now use the sections below and interact with Dynamic Island on your iPhone.?
Step 2: Use Dynamic Island
As mentioned above, Dynamic Island will come to life whenever you have compatible activity in the background. This includes using map navigation, music playback, voice memo recording, call notifications, and more. Let’s take a look at some common activities and how to manage and interact with them on iPhone 14 Pro.
Manage music playback
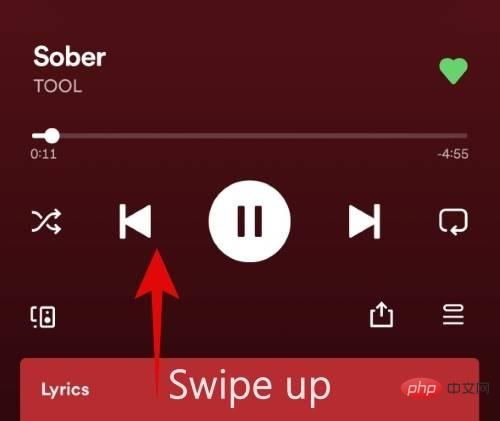
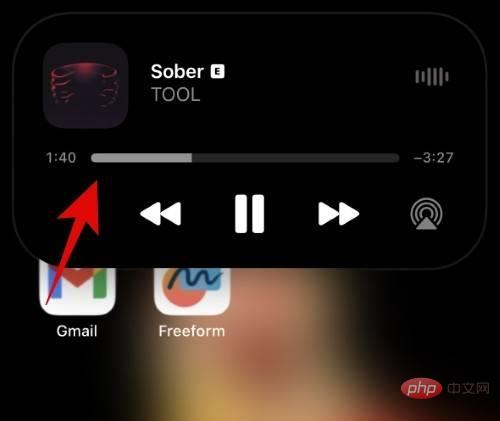
After playing music from a compatible app on iPhone 14 Pro, you can minimize the app to view music playback in Dynamic Island. Dynamic Island will automatically expand to fit the music playback and display the current song's album cover to the left of Dynamic Island. A small waveform will be displayed on the right side of the dynamic island, matching the currently playing audio in real time.
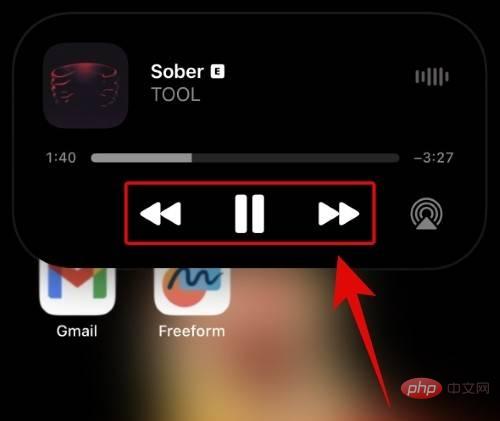
#Tap and hold on the dynamic island to see the playback controls for the currently playing song. Dynamic Island will expand and show you music playback controls to help you manage the currently playing media. The expanded Dynamic Island will display the seek bar, album art, wave, play, pause, next, previous and Airplay icons. You can now use these icons to control music playback just like you would in any music streaming app.
#You can click and drag the search bar to browse the currently playing songs.
Now, if you click on Dynamic Island, you will automatically be redirected to the app that plays music on your iPhone. Once you pause or stop music playback, Dynamic Island will automatically return to its usual static state.
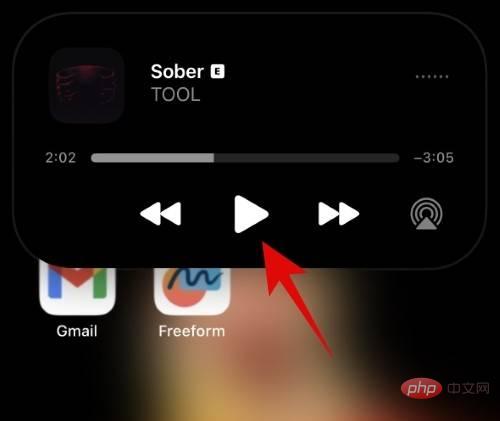
#This is how you manage music playback on your iPhone with Dynamic Island.
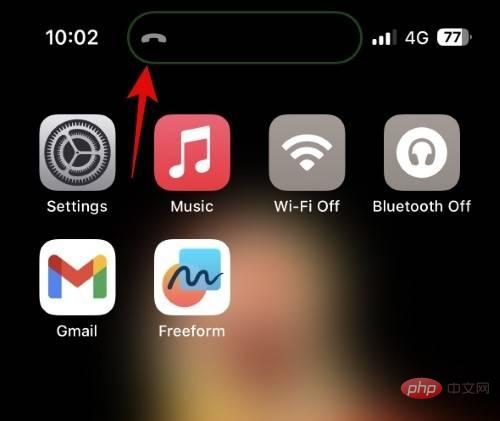
Manage Incoming Calls
When you use your iPhone, incoming calls will appear in your Dynamic Island. Calls usually appear on the lock screen when you're not using your device. Once you receive a call, it will appear in your Dynamic Island in the following manner.
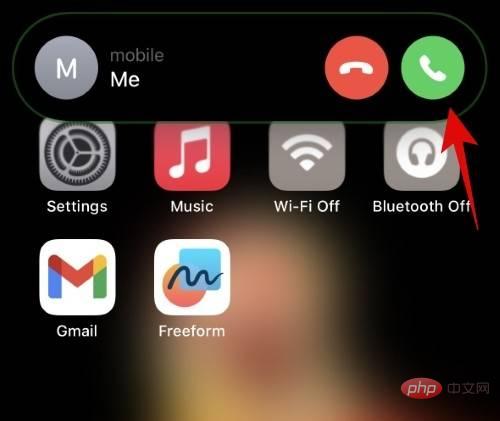
You can now click the green icon to answer the call or the red icon to end the call.
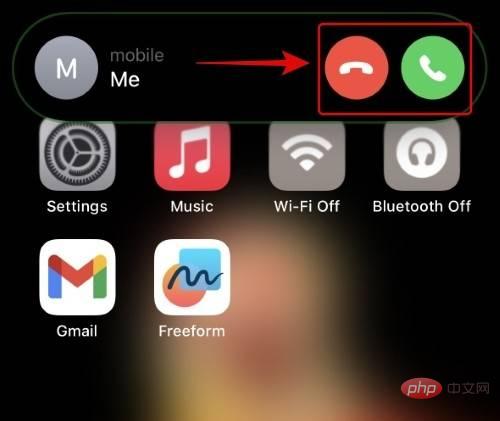
You can also swipe up on Dynamic Island to turn off incoming call notifications.
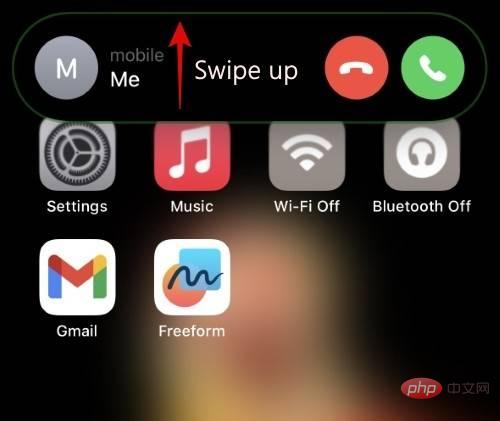
When completed, the contact's avatar will appear on the left side of Dynamic Island, and the call indicator will appear on the right. Once you do this, your phone will continue to ring/vibrate, depending on your current settings.
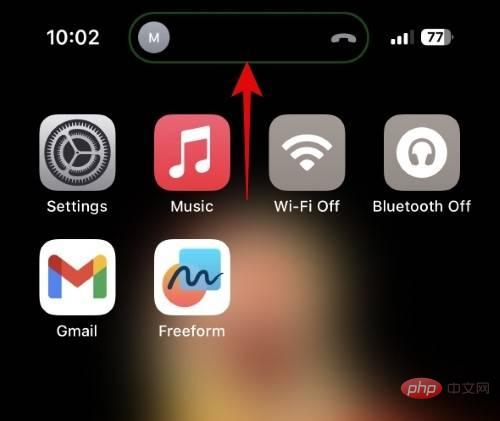
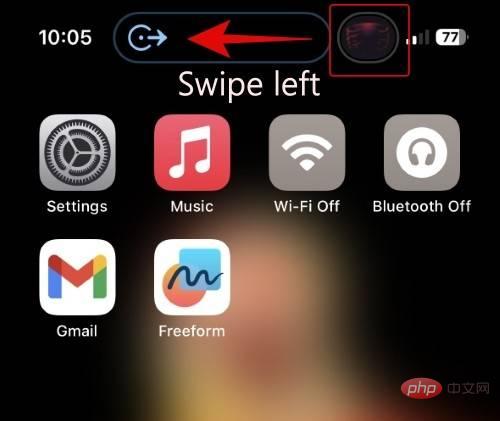
Additionally, for privacy reasons, you can hide a contact's profile picture by swiping left or right on a closed notification in the dynamic island. When you have two or more running in the background, the same gesture can help you switch between activities in Dynamic Island and eventually get a call.
#To reply to a canceled call, tap and hold on your Dynamic Island.
This is how you can manage your incoming calls with Dynamic Island.
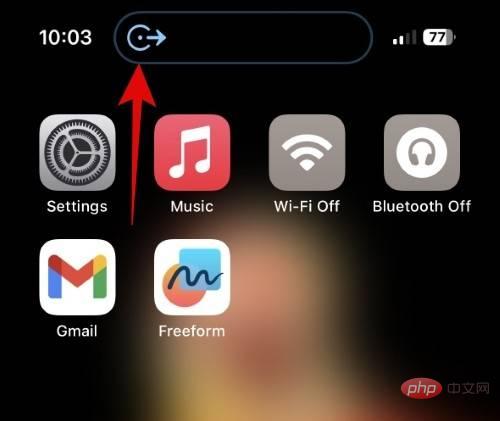
Manage Directions
In our testing, only Apple Maps supported interactable elements in dynamic islands when navigating to a location. Google Maps and Waze do show upcoming directions, but there aren't any interactive controls or expanded views of dynamic islands yet. However, this may change with future updates, so if you prefer Waze or Google Maps, we recommend you keep your apps updated. Let’s look at how routes are displayed in Dynamic Island when using Apple Maps, and how to interact with and manage it on your iPhone.
Open Apple Maps and start navigating to any preferred location. After launching navigation, swipe up from the bottom to minimize Apple Maps.
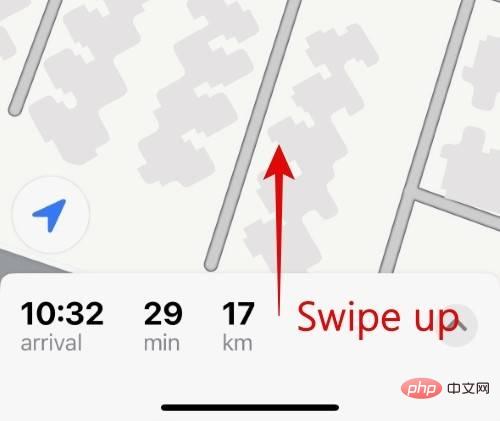
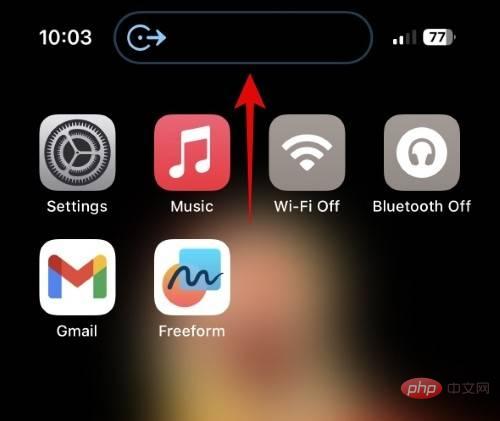
The app will automatically transition to your dynamic island and show upcoming directions to the left of it.
Tap and hold on the dynamic island to see an expanded view. This will show you detailed directions and options for End Route.
Clicking End Route will end the navigation immediately.
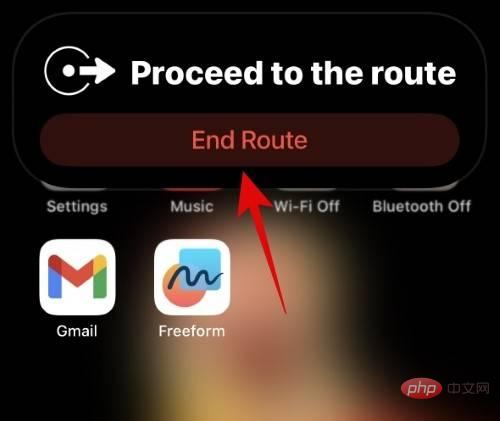
#Tap Dynamic Island to return to the Apple Maps app when needed.
#This is how you can manage directions in Dynamic Island when navigating with iPhone 14 Pro.
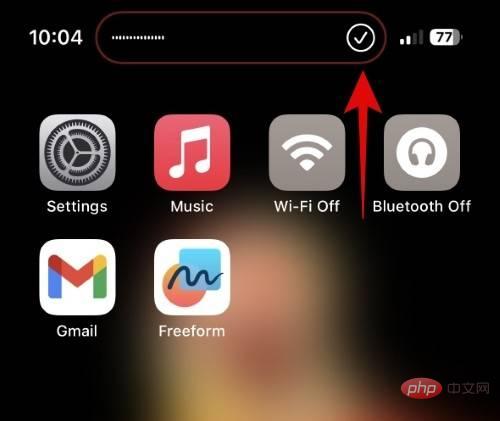
Manage Voice Memos
The Voice Memos app also allows you to record voice notes using Dynamic Island when needed. This comes in handy if you want to record notes about what you browse, write, play, etc. on your iPhone. You can take it a step further by adding the Voice Memos Control Center module, which can then be used to jump directly to the Voice Memos app from anywhere on your iPhone. Let’s take a quick look at voice memos in Dynamic Island.
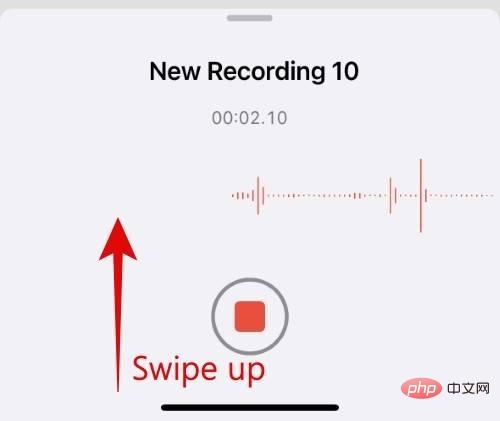
Open the Voice Memo app and tap the Record button to start recording the voice memo.
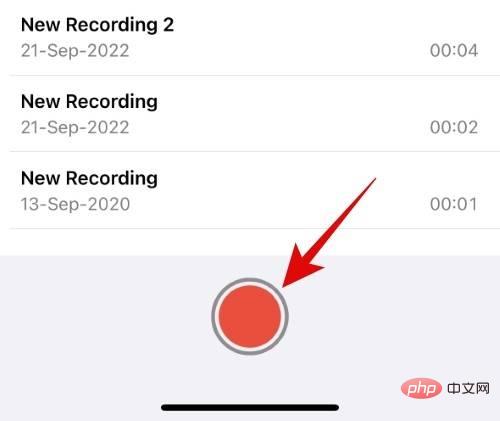
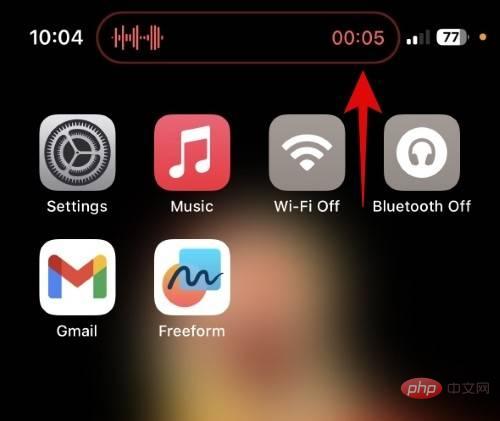
Now swipe up to minimize the app. The app will automatically transition to your dynamic island.
#The real-time confirmation audio input waveform will be displayed on the left side of Dynamic Island. The recorded time will be displayed on the right side of your dynamic island.
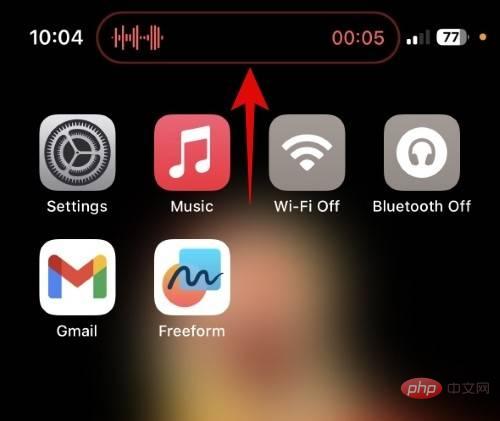
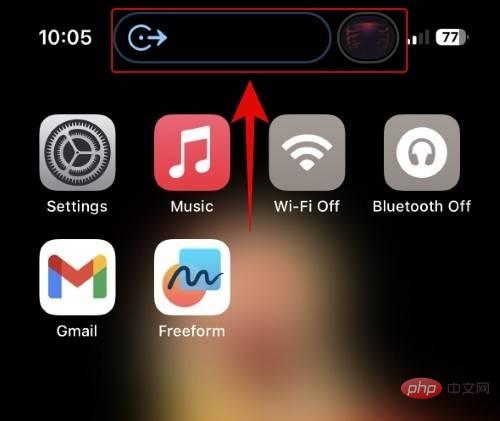
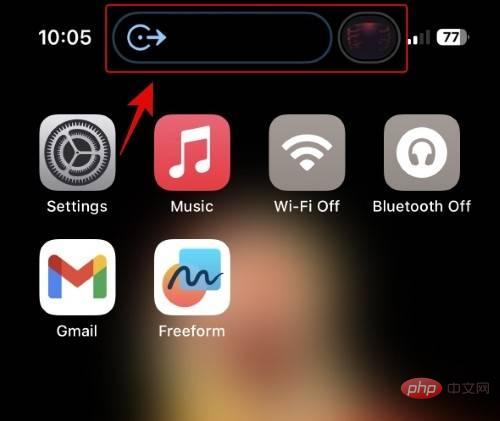
If you wish, tap the dynamic island now to return to the Voice Memos application. Tap and hold on the dynamic island to see additional controls without returning to the Voice Memos app.
You will now see an expanded waveform of the input audio along with a Stop button. Click the stop icon to stop voice memo recording when needed.
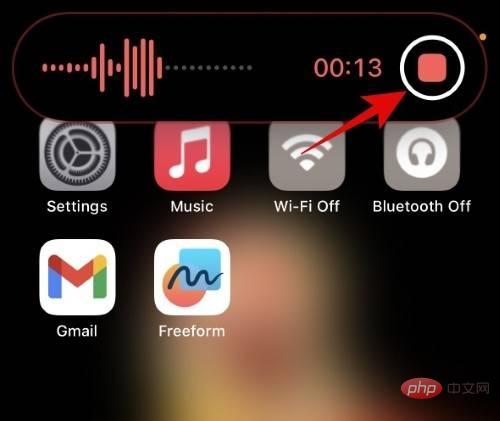
While recording, the Dynamic Island view will appear in red. When you stop recording, the voice memo information in Dynamic Island will turn white. Dynamic Island will also display a checkmark to the right to indicate that your recording has been stopped and saved.
This message will automatically disappear unless you choose to click on it. Tapping it will take you to the relevant recording in the Voice Memos app.

#This is how you manage your recordings in Dynamic Island when using the Voice Memos app.?
Dynamic Island Gestures for Multiple Activities
You may be wondering what happens when you have multiple supported activities running in the background. In this case, your dynamic island will be split in two and you can view each activity individually. You can then use gestures to switch and interact with these activities as needed. Let’s take a look at what happens when you play music while navigating on your iPhone 14 Pro.
As you can see, the larger cutout in Dynamic Island currently displays the direction, while the smaller pill next to it contains the currently playing music. Activities are automatically prioritized in the background and assigned to larger or smaller pills based on the data you may need immediately.
#To switch or see an expanded view of any activity, tap and hold the corresponding pill.
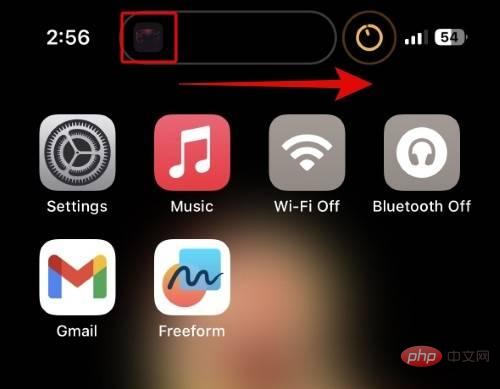
To turn off the assistive activity, swipe it to the left.
#As you can see, the currently playing music is no longer visible in Dynamic Island, but is still playing in the background.

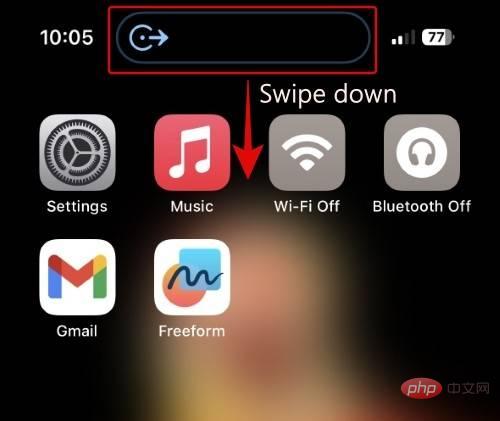
#To view secondary activities again, swipe down from Dynamic Island.
Likewise, you can make your secondary activity the primary activity by sliding the primary activity to your secondary activity.
NOTE: Some activities in our tests, such as navigation, have priority and cannot be hidden when making the primary activity secondary. Therefore, we use music and a timer in the example below.
As you can see, the timer is now our main activity with music hidden in the background.
 Before
 " data-medium-file="https://cdn.nerdschalk.com/wp-content/uploads/2022/11/ How to use Dynamic Island on iPhone 14 Pro.jpg" data-large-file="https://cdn.nerdschalk.com/wp-content/uploads/2022/11/How to use Dynamic Island on iPhone 14 Pro.jpg " data-origin-src="https://cdn.nerdschalk.com/wp-content/uploads/2022/11/How to use Dynamic Island on iPhone 14 Pro.jpg" data-mce-src="https:/ /cdn.nerdschalk.com/wp-content/uploads/2022/11/How to use Dynamic Island on iPhone 14 Pro.jpg?width=1000" data-mce- style="max-width:90%">
前 - After
" data-medium-file="https://cdn.nerdschalk.com/wp-content/uploads/2022/11/How to use Dynamic Island on iPhone 14 Pro.jpg" data-large-file=" https://cdn.nerdschalk.com/wp-content/uploads/2022/11/How to use Dynamic Island on iPhone 14 Pro.jpg" data-origin-src="https://cdn.nerdschalk.com/wp -content/uploads/2022/11/How to use Dynamic Island on iPhone 14 Pro.jpg" data-mce-src="https://cdn.nerdschalk.com/wp-content/uploads/2022/11/dynamic- island-gestures-new-2.jpg?width=1000" data-mce- style="max-width:90%">
后
 Before
 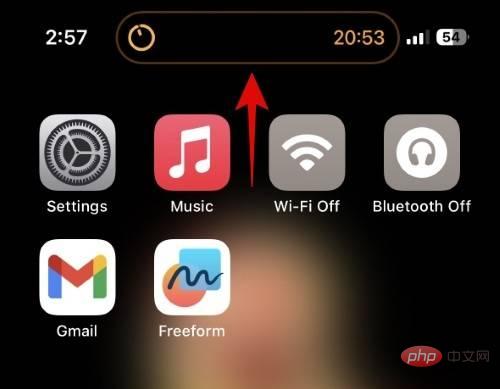 After
After - Live Activities
- Calls in Progress ( Voice and Video)
- SharePlay Activity
- Timer
- Voice Memo
- Screen Recording
- Personal Hotspot
- Microphone and camera indicator
- NFC interaction
- Silent switch switch
- Playback
- Bluetooth accessories
- Focus mode change
- AirDrop
- SIM Reminder
- Find My Network Alert
- Face Recognition
- Apple Pay
- Car Key
- Low battery alarm
- Charging reminder
The above is the detailed content of How to use Dynamic Island on iPhone 14 Pro. For more information, please follow other related articles on the PHP Chinese website!

Hot AI Tools

Undress AI Tool
Undress images for free

Undresser.AI Undress
AI-powered app for creating realistic nude photos

AI Clothes Remover
Online AI tool for removing clothes from photos.

Clothoff.io
AI clothes remover

Video Face Swap
Swap faces in any video effortlessly with our completely free AI face swap tool!

Hot Article
Hot Tools

Notepad++7.3.1
Easy-to-use and free code editor

SublimeText3 Chinese version
Chinese version, very easy to use

Zend Studio 13.0.1
Powerful PHP integrated development environment

Dreamweaver CS6
Visual web development tools

SublimeText3 Mac version
God-level code editing software (SublimeText3)


 How to create a contact group on iPhone
Jul 13, 2025 am 01:17 AM
How to create a contact group on iPhone
Jul 13, 2025 am 01:17 AM
iPhone does not support creating contact groups directly in the address book application, but similar functions can be achieved through the following methods: 1. Use the "Group" function in the address book application, click "Edit" > "Add Group" to create a custom group; 2. Add each contact to the corresponding group by editing it; 3. If you need to send a group message, you can create a new multi-person conversation in the information application; 4. Use iCloud or Gmail to synchronize tagged groups to facilitate the management of a large number of contacts on the computer. These methods are used in conjunction with efficient management of contact groups.
 How to check if an iPhone is unlocked
Jul 15, 2025 am 01:17 AM
How to check if an iPhone is unlocked
Jul 15, 2025 am 01:17 AM
TocheckifaniPhoneisunlocked,1)gotoSettings>Cellular>CellularDataOptionsandlookforlabelslike“Unlocked”or“NoSIMrestrictions,”2)insertadifferentcarrier’sactiveSIMcardandseeifthephoneacceptsit,3)usetheIMEInumberononlinetoolslikeIMEI.infotocheckunlo
 How to check iPhone trade-in value
Jul 13, 2025 am 01:13 AM
How to check iPhone trade-in value
Jul 13, 2025 am 01:13 AM
Determining the depreciation value of iPhone requires multiple factors and comparing different platforms. 2. The first choice is Apple's official replacement plan, which has a simple and transparent process, but the final valuation must be based on the actual condition of the equipment. 3. Third-party websites such as Gazelle, Swappa, etc. may provide higher quotations, but you need to pay attention to describing the real situation and avoiding the charging trap. 4. The core factors affecting value include model and storage capacity, equipment status, operator lock status, etc. Small problems may also affect the quotation. 5. If you pursue higher returns, you can choose to sell privately, but you need to weigh the time cost and transaction risks.
 How to create a Personal Voice on iPhone
Jul 11, 2025 am 02:19 AM
How to create a Personal Voice on iPhone
Jul 11, 2025 am 02:19 AM
To create PersonalVoice in iOS17, you first need to enable the feature in the settings and record a sound model for about five minutes. The specific steps are as follows: 1. Open "Settings" > "Assistance Functions" > "Narration", click "PersonalVoice" and select "Create PersonalVoice"; 2. Read the text provided by the system in a quiet environment to keep the speech speed stable; 3. After creation, you can use your personalized voice to read messages, notifications, etc. in "Narration", or switch back to the default voice; 4. Currently, only English and some languages ??are supported, and Chinese is not supported at the moment; 5. Pay attention to environmental noise, intonation consistency and storage space when recording, and re-record unsatisfactory content. Voice mode
 How to transfer contacts from one iPhone to another
Jul 12, 2025 am 02:36 AM
How to transfer contacts from one iPhone to another
Jul 12, 2025 am 02:36 AM
Migrating contacts can be accomplished in three ways when replacing a new iPhone: First, using iCloud synchronization is the most worry-free, ensuring that the old phone has turned on the iCloud address book backup, and the new phone logs into the same account and enables synchronization; Second, using AirDrop is suitable for a small number of contacts to transmit. After setting up AirDrop visibility on both phones, sending and receiving them through the share button; Third, with the help of computer relay, both Mac or Windows, synchronizing contacts through Finder or iTunes and replacing or merging data. Select the method that suits you and pay attention to your account and permission settings to easily complete the migration.
 How to buy stablecoins for Apple phones? Where to buy stablecoins for Apple phones?
Jul 24, 2025 pm 09:18 PM
How to buy stablecoins for Apple phones? Where to buy stablecoins for Apple phones?
Jul 24, 2025 pm 09:18 PM
Purchase USDT and other stablecoins on Apple phones, you must download the compliant exchange app through the overseas Apple ID and complete the authentication and conduct transactions. The specific steps are as follows: 1. Use Apple ID in the non-mainland region to log in to the App Store; 2. Download recommended platforms such as OKX, Binance, Huobi (HTX), Gate.io or KuCoin; 3. Complete registration and identity authentication (KYC); 4. Enter the "Buy Coin" or "C2C/P2P Transaction" page to select USDT; 5. Filter merchants according to the payment method and place orders; 6. Pay through Alipay, WeChat or bank card and confirm transactions; 7. Wait for the merchant to put the coins into the account, and the entire process is completed.
 How to clear RAM on iPhone
Jul 12, 2025 am 02:30 AM
How to clear RAM on iPhone
Jul 12, 2025 am 02:30 AM
The RAM of iPhone cannot be cleaned manually, but the following methods can be used to free memory to improve smoothness: 1. Close the background application: Double-click the Home button or slide from the bottom to pause and close the card; 2. Restart the phone regularly: Refresh the system status once a week; 3. Reduce background refresh: Enter Settings → General → Backend App Refresh to limit the number of applications; 4. Avoid running multiple high-resource applications at the same time, and use them in stages to reduce memory pressure. These operations can effectively alleviate the lag caused by the tight memory of iPhone.
 Forgot iPhone passcode
Jul 26, 2025 am 09:53 AM
Forgot iPhone passcode
Jul 26, 2025 am 09:53 AM
If you forget your iPhone password, you can try the following methods: 1. Use iTunes/Finder to enter recovery mode to restore the device (must be connected to the computer); 2. If you enable "Find My iPhone", you can erase the device through iCloud; 3. Contact Apple customer service for assistance (need to provide a purchase certificate). The first two of the above methods will clear the data. It is recommended to backup regularly in the future and enable the search function.