


To resolve the problem of applying icons, text, or interfaces on Windows 10, try the following methods: 1. Check and adjust the display zoom setting to 100% or the recommended options to ensure that the multi-display zoom is consistent; 2. Right-click to apply shortcuts → Properties → Compatibility → Check "Override High DPI Scaling Behavior" and select "Application" or "System (Enhanced)"; 3. Update graphics drivers and system updates to fix potential compatibility issues; 4. For old programs, manually set their DPI Scaling Mode; 5. Advanced users can enable "System (Enhanced)" mode through the registry. Some software may need to use the above methods in combination or search for specific solutions.

Blurry application icons, text or the entire interface are actually a common problem on Windows 10, especially when some old software or non-high DPI-adapted programs are prone to this situation. The good news is that it can be manually adjusted to improve in most cases.
Check and adjust the display zoom settings
Windows 10's "Show Zoom" function is to make the screen content clearer and easier to read, but if set incorrectly, some applications will become blurred.
- Go to Settings > System > Display
- Find "Change the size of text, apps, etc. items under "Scaling and Layout"
- Try to switch to 100% or other recommended options
- If you are using multiple monitors, make sure that the zoom ratio of each monitor is consistent (some applications do not support normal display across different zoom ratios)
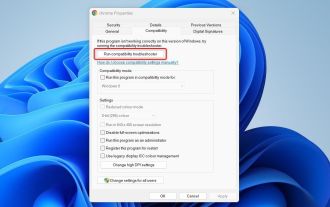
If an app is particularly vague, you can right-click its shortcut → Properties → Compatibility → Check "Override High DPI Scaling Behavior" and select "Application" or "System (Enhanced)".
Update graphics driver and system update
Many graphics display problems actually come from outdated drivers or unpatched system components.
- Open Device Manager and find the graphics card driver (such as NVIDIA, AMD, Intel)
- Right-click to select "Update Driver"
- At the same time, keep Windows updates on and install the latest system updates regularly
Sometimes Microsoft fixes some rendering or compatibility issues with cumulative updates, so it is important to keep the system up to date.
Adjust the DPI settings of the application itself
Some old programs do not adapt to HD screens, and will blur even if the system sets the correct zoom.
How to operate:
- Right-click on the shortcut or executable file of the application → Properties
- Switch to the Compatibility tab
- Click "Change high DPI scaling behavior"
- Set to "Application" or "System (Enhanced)"
This setting is equivalent to telling Windows: Don't automatically scale the program, let it handle it itself or better handle it by the system.
Temporarily enable "System (Enhanced)" mode using the registry (Advanced)
If you find the "System (Enhanced)" option gray-out, it may be because your system version limits the feature. It can be enabled temporarily through the registry:
?? It is recommended to back up the registry before operation.
The steps are as follows:
- Press
Win Rto enterregedit - Navigate to path:
Computer\HKEY_CURRENT_USER\Software\Microsoft\Windows\DWM - Create a new DWORD (32-bit) value, named
DpiValueScalingPolicy, and set the value to1 - After logging out and logging back into the system, the "System (Enhanced)" option should be available.
Basically these are the methods. Some fuzzy problems may require a combination of the above methods to solve, especially those that support high resolutions by old or non-native software. If you encounter any problems with the specific application, you can also search for the software name "dpi fix windows 10" separately to find a specific solution.
The above is the detailed content of how to fix blurry apps in Windows 10. For more information, please follow other related articles on the PHP Chinese website!

Hot AI Tools

Undress AI Tool
Undress images for free

Undresser.AI Undress
AI-powered app for creating realistic nude photos

AI Clothes Remover
Online AI tool for removing clothes from photos.

Clothoff.io
AI clothes remover

Video Face Swap
Swap faces in any video effortlessly with our completely free AI face swap tool!

Hot Article
Hot Tools

Notepad++7.3.1
Easy-to-use and free code editor

SublimeText3 Chinese version
Chinese version, very easy to use

Zend Studio 13.0.1
Powerful PHP integrated development environment

Dreamweaver CS6
Visual web development tools

SublimeText3 Mac version
God-level code editing software (SublimeText3)


 How to Change Font Color on Desktop Icons (Windows 11)
Jul 07, 2025 pm 12:07 PM
How to Change Font Color on Desktop Icons (Windows 11)
Jul 07, 2025 pm 12:07 PM
If you're having trouble reading your desktop icons' text or simply want to personalize your desktop look, you may be looking for a way to change the font color on desktop icons in Windows 11. Unfortunately, Windows 11 doesn't offer an easy built-in
 Fixed Windows 11 Google Chrome not opening
Jul 08, 2025 pm 02:36 PM
Fixed Windows 11 Google Chrome not opening
Jul 08, 2025 pm 02:36 PM
Fixed Windows 11 Google Chrome not opening Google Chrome is the most popular browser right now, but even it sometimes requires help to open on Windows. Then follow the on-screen instructions to complete the process. After completing the above steps, launch Google Chrome again to see if it works properly now. 5. Delete Chrome User Profile If you are still having problems, it may be time to delete Chrome User Profile. This will delete all your personal information, so be sure to back up all relevant data. Typically, you delete the Chrome user profile through the browser itself. But given that you can't open it, here's another way: Turn on Windo
 How to fix second monitor not detected in Windows?
Jul 12, 2025 am 02:27 AM
How to fix second monitor not detected in Windows?
Jul 12, 2025 am 02:27 AM
When Windows cannot detect a second monitor, first check whether the physical connection is normal, including power supply, cable plug-in and interface compatibility, and try to replace the cable or adapter; secondly, update or reinstall the graphics card driver through the Device Manager, and roll back the driver version if necessary; then manually click "Detection" in the display settings to identify the monitor to confirm whether it is correctly identified by the system; finally check whether the monitor input source is switched to the corresponding interface, and confirm whether the graphics card output port connected to the cable is correct. Following the above steps to check in turn, most dual-screen recognition problems can usually be solved.
 Fixed the failure to upload files in Windows Google Chrome
Jul 08, 2025 pm 02:33 PM
Fixed the failure to upload files in Windows Google Chrome
Jul 08, 2025 pm 02:33 PM
Have problems uploading files in Google Chrome? This may be annoying, right? Whether you are attaching documents to emails, sharing images on social media, or submitting important files for work or school, a smooth file upload process is crucial. So, it can be frustrating if your file uploads continue to fail in Chrome on Windows PC. If you're not ready to give up your favorite browser, here are some tips for fixes that can't upload files on Windows Google Chrome 1. Start with Universal Repair Before we learn about any advanced troubleshooting tips, it's best to try some of the basic solutions mentioned below. Troubleshooting Internet connection issues: Internet connection
 Want to Build an Everyday Work Desktop? Get a Mini PC Instead
Jul 08, 2025 am 06:03 AM
Want to Build an Everyday Work Desktop? Get a Mini PC Instead
Jul 08, 2025 am 06:03 AM
Mini PCs have undergone
 How to clear the print queue in Windows?
Jul 11, 2025 am 02:19 AM
How to clear the print queue in Windows?
Jul 11, 2025 am 02:19 AM
When encountering the problem of printing task stuck, clearing the print queue and restarting the PrintSpooler service is an effective solution. First, open the "Device and Printer" interface to find the corresponding printer, right-click the task and select "Cancel" to clear a single task, or click "Cancel all documents" to clear the queue at one time; if the queue is inaccessible, press Win R to enter services.msc to open the service list, find "PrintSpooler" and stop it before starting the service. If necessary, you can manually delete the residual files under the C:\Windows\System32\spool\PRINTERS path to completely solve the problem.

 How to run Command Prompt as an administrator in Windows 10?
Jul 05, 2025 am 02:31 AM
How to run Command Prompt as an administrator in Windows 10?
Jul 05, 2025 am 02:31 AM
To run command prompts as administrator, the most direct way is to search through the Start menu and right-click "Run as administrator"; secondly, use the Win X shortcut menu to select "Command Prompt (Administrator)" or "Windows Terminal (Administrator)"; you can also open the run window through Win R and enter cmd and press Ctrl Shift Enter to force running as administrator; in addition, you can set shortcut properties to achieve automatic running as administrator. All the above methods require administrator permission and confirmation through UAC. Pay attention to security risks during operation.
