

Fixed the failure to upload files in Windows Google Chrome
Jul 08, 2025 pm 02:33 PM
Have problems uploading files in Google Chrome? This may be annoying, right? Whether you are attaching documents to emails, sharing images on social media, or submitting important files for work or school, a smooth file upload process is crucial. Therefore, it can be frustrating if your file uploads continue to fail in Chrome on your Windows PC.
If you're not ready to give up your favorite browser, here are some tips to fix the problem of not uploading files on Windows Google Chrome
1. Start with a general repair
Before we understand any advanced troubleshooting tips, it is best to try some of the basic solutions mentioned below.
- Troubleshooting Internet Connection Issues: Weak or unstable Internet connections may be the reason why you cannot upload files in Chrome. To test your connection, open a new tab in Chrome and navigate to the reliable Internet speed testing website. If there is a problem with your internet, consider restarting your router or switching to another network connection and try again.
- Restart Chrome: Sometimes the easiest solution is the most effective. File upload problems in Chrome may be caused by temporary browser failure. If this is the case, restarting Chrome should fix the problem.
- Clear caches and cookies: Obsolete or corrupt browsing data can also cause such problems. You can try to clear caches and cookies in Google Chrome to see if it can solve the problem.
2. Use the invisible window
One of the main advantages of using Chrome is its extensive extension support. However, not all third-party extensions are reliable. When you upload a file from a Windows PC, one of your extensions may cause Chrome to be unresponsive or crash.
To rule out this possibility, you can try using Chrome in incognito mode, which loads the browser without installing any third-party extensions. To open an Incognito window in Chrome, click the icon in the upper right corner of the three-dot menu and select New Incognito window .
After completing the above steps, see if the file can be uploaded smoothly.
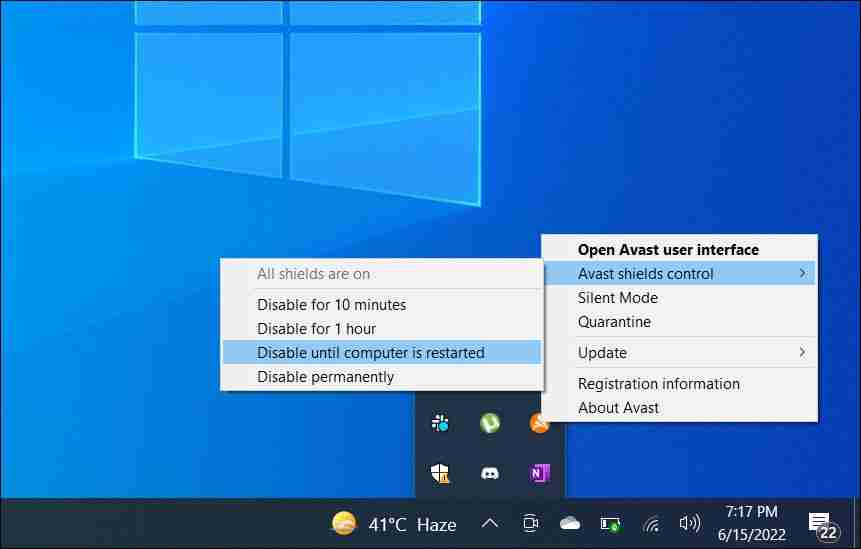
5. Disable antivirus software
Many third-party antivirus programs have network protection features designed to protect you as you browse the internet. However, these antivirus programs can sometimes be invasive and prevent files from uploading in Chrome.
To check this possibility, you can temporarily disable antivirus programs on Windows. To do this, just right-click the taskbar icon of the antivirus program and select Disable > Disable until the next restart .
If this solves your problem, you will need to check the network protection settings in the antivirus program and make the necessary changes to avoid any issues.
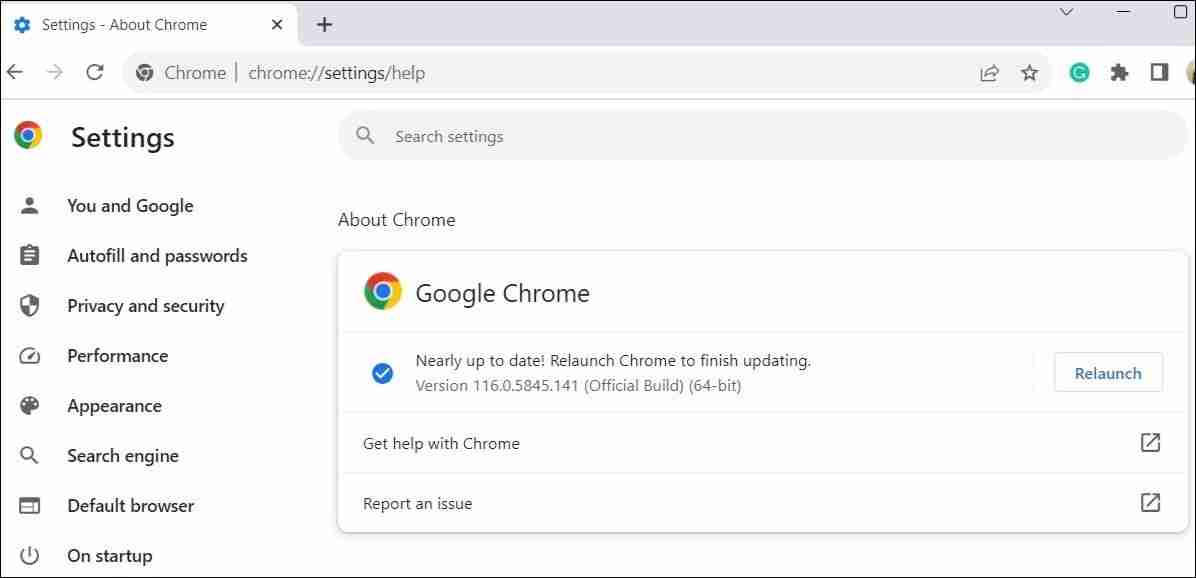
6. Install any pending Google Chrome updates
Another reason you may not be able to upload files in Google Chrome is that the browser version you are using is outdated or has errors. Although Google Chrome usually updates automatically, this may not happen if you haven't closed your browser for a while.
To check for and install pending Google Chrome updates, use the following steps:
- Open Google Chrome and click the menu icon (three vertical dots) in the upper right corner.
- Select Help > About Chrome .
- Wait for Chrome to download pending updates, and then click the Restart button to install them.

After you update Chrome, your file upload should go as expected.
7. Create a new Chrome configuration file
Issues with Chrome configuration files can also cause browser failure. This can happen if your Chrome configuration file is corrupted. You can try to create a new user profile in Chrome to see if it will solve the problem. Here's how to do this.
- Open Google Chrome and click your profile icon in the upper right corner.
- Select Add from the results menu.
- Select whether you want to log in with your account.
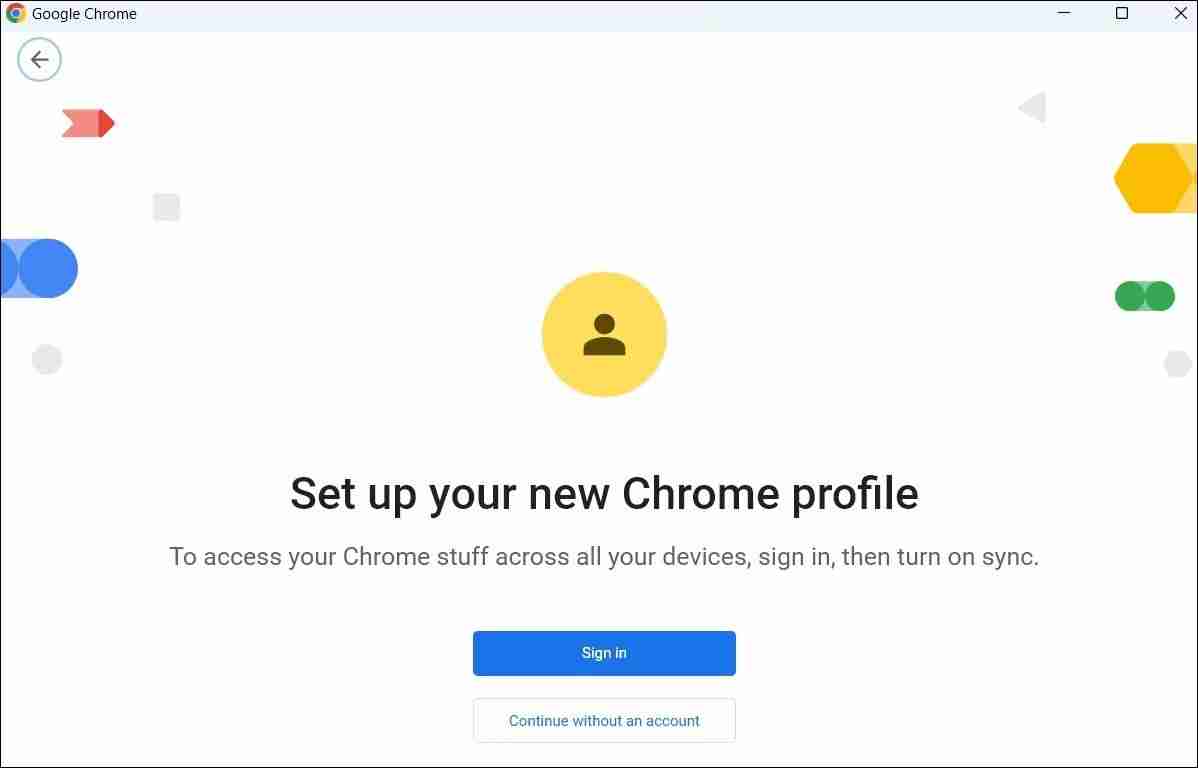
Switch to the newly created configuration file and try uploading the file again. If this solves your problem, you might consider deleting the old Google Chrome profile.
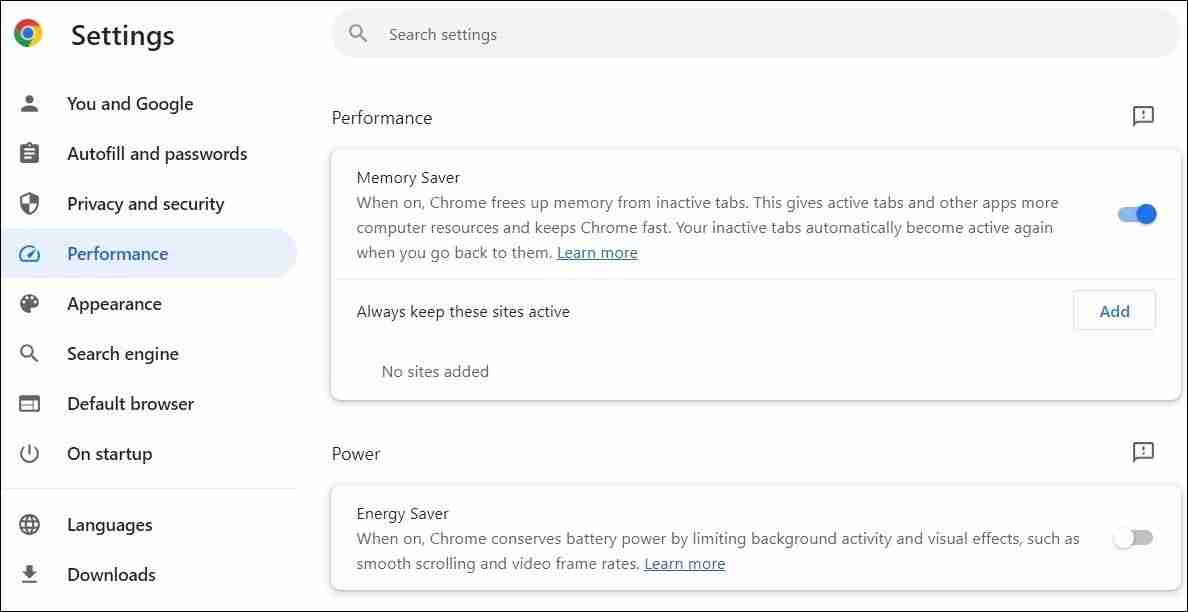
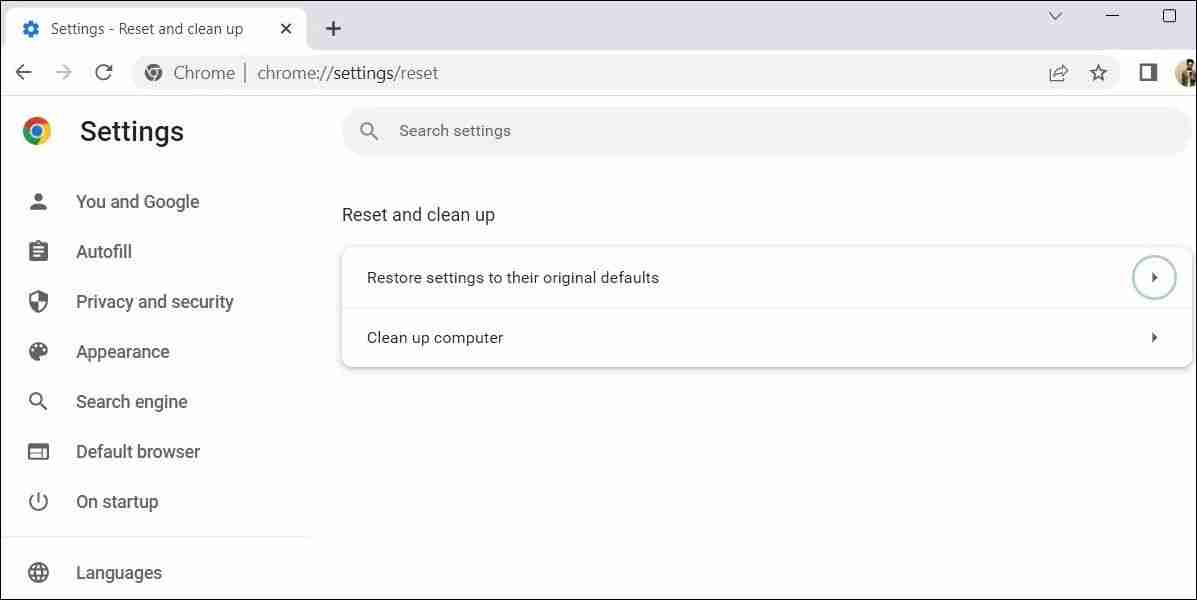
8. Reset Chrome settings
If you still can't upload files in Google Chrome, as a last resort, you can reset your browser. This will delete all your custom settings, disable extensions, and delete other temporary data. However, the bookmarks and passwords you save will not be affected, so you don't need to worry about them.
To reset Google Chrome on Windows:
- Launch Google Chrome and click the three-dot menu in the upper right corner.
- Select Settings From the Results menu.
- Select Reset from the left sidebar.
- Click Restore settings to original defaults Options in the right pane.
- Click Reset to confirm.
After resetting Chrome, restart it, this issue should bother you.
Experience easy uploads again with Chrome on Windows
Google Chrome may be a popular browser, but it is not without flaws. Sometimes, Chrome may disappoint you because it does not allow you to upload files from your Windows computer. Hopefully this is not the case anymore, and one of the above tips has helped fix the issue of not being able to upload files in Windows Google Chrome.
Recommended: How to Install Nextcloud on Amazon Linux 2023
The above is the detailed content of Fixed the failure to upload files in Windows Google Chrome. For more information, please follow other related articles on the PHP Chinese website!

Hot AI Tools

Undress AI Tool
Undress images for free

Undresser.AI Undress
AI-powered app for creating realistic nude photos

AI Clothes Remover
Online AI tool for removing clothes from photos.

Clothoff.io
AI clothes remover

Video Face Swap
Swap faces in any video effortlessly with our completely free AI face swap tool!

Hot Article
Hot Tools

Notepad++7.3.1
Easy-to-use and free code editor

SublimeText3 Chinese version
Chinese version, very easy to use

Zend Studio 13.0.1
Powerful PHP integrated development environment

Dreamweaver CS6
Visual web development tools

SublimeText3 Mac version
God-level code editing software (SublimeText3)
Hot Topics


 What is the code number of Bitcoin? What style of code is Bitcoin?
Jul 22, 2025 pm 09:51 PM
What is the code number of Bitcoin? What style of code is Bitcoin?
Jul 22, 2025 pm 09:51 PM
As a pioneer in the digital world, Bitcoin’s unique code name and underlying technology have always been the focus of people’s attention. Its standard code is BTC, also known as XBT on certain platforms that meet international standards. From a technical point of view, Bitcoin is not a single code style, but a huge and sophisticated open source software project. Its core code is mainly written in C and incorporates cryptography, distributed systems and economics principles, so that anyone can view, review and contribute its code.
 Binance Exchange Official Website APP Binance Latest Version Download Tutorial
Jul 24, 2025 pm 10:39 PM
Binance Exchange Official Website APP Binance Latest Version Download Tutorial
Jul 24, 2025 pm 10:39 PM
Binance is a world-renowned digital asset trading platform. Its official APP provides users with a safe and convenient mobile trading experience. Through the Binance APP, you can buy and sell cryptocurrencies anytime, anywhere, manage your digital assets and get the latest market trends.
 How to download the official Dogecoin App? Dogecoin App Use Guide
Jul 22, 2025 pm 11:36 PM
How to download the official Dogecoin App? Dogecoin App Use Guide
Jul 22, 2025 pm 11:36 PM
Dogecoin does not have an official app, and users need to trade through third-party exchanges. This article recommends 6 platforms and provides usage steps. 1. Binance: Large transaction volume and comprehensive functions; 2. Ouyi: Integrated accounts and NFT markets; 3. Huobi: High security; 4. Gate.io: Rich currency types; 5. KuCoin: Fast listing speed; 6. Kraken: Strong compliance. Downloading requires the official channel to complete registration, identity verification, recharge, and transaction of Dogecoin (DOGE) and ensure account security, enable 2FA and set complex passwords.
 How to make PHP container support automatic construction? Continuously integrated CI configuration method of PHP environment
Jul 25, 2025 pm 08:54 PM
How to make PHP container support automatic construction? Continuously integrated CI configuration method of PHP environment
Jul 25, 2025 pm 08:54 PM
To enable PHP containers to support automatic construction, the core lies in configuring the continuous integration (CI) process. 1. Use Dockerfile to define the PHP environment, including basic image, extension installation, dependency management and permission settings; 2. Configure CI/CD tools such as GitLabCI, and define the build, test and deployment stages through the .gitlab-ci.yml file to achieve automatic construction, testing and deployment; 3. Integrate test frameworks such as PHPUnit to ensure that tests are automatically run after code changes; 4. Use automated deployment strategies such as Kubernetes to define deployment configuration through the deployment.yaml file; 5. Optimize Dockerfile and adopt multi-stage construction
 How to build an independent PHP task container environment. How to configure the container for running PHP timed scripts
Jul 25, 2025 pm 07:27 PM
How to build an independent PHP task container environment. How to configure the container for running PHP timed scripts
Jul 25, 2025 pm 07:27 PM
Building an independent PHP task container environment can be implemented through Docker. The specific steps are as follows: 1. Install Docker and DockerCompose as the basis; 2. Create an independent directory to store Dockerfile and crontab files; 3. Write Dockerfile to define the PHPCLI environment and install cron and necessary extensions; 4. Write a crontab file to define timing tasks; 5. Write a docker-compose.yml mount script directory and configure environment variables; 6. Start the container and verify the log. Compared with performing timing tasks in web containers, independent containers have the advantages of resource isolation, pure environment, strong stability, and easy expansion. To ensure logging and error capture
 What is Chainbase (C currency)? How to get airdrops? Introduction to C token economics and price forecasts
Jul 22, 2025 pm 11:09 PM
What is Chainbase (C currency)? How to get airdrops? Introduction to C token economics and price forecasts
Jul 22, 2025 pm 11:09 PM
What is Chainbase(C) in directory? How Chainbase works What is Chainbase token (C)? How to get free C token airdrop? Chainbase (C) Price Forecasts for 2025, 2026 and 2030 Conclusions The cryptocurrency world is generating more data than ever before. Facing hundreds of blockchains, thousands of tokens, and emerging new decentralized applications, navigating this complex pattern is extremely challenging for investors, developers and analysts. Reliable, real-time blockchain data is important for making informed decisions and driving the next generation of crypto products
 The latest version of the official app of Huobi Exchange Huobi.com huobi official app
Jul 24, 2025 am 07:42 AM
The latest version of the official app of Huobi Exchange Huobi.com huobi official app
Jul 24, 2025 am 07:42 AM
Huobi is a world-renowned digital asset service platform, providing users with a safe and reliable trading experience. Huobi App integrates various functions such as market viewing, trading, asset management, etc., making it convenient for users to operate anytime, anywhere.
 How to Securely Erase a Hard Drive on Linux
Jul 24, 2025 am 12:08 AM
How to Securely Erase a Hard Drive on Linux
Jul 24, 2025 am 12:08 AM
Confirm the target hard disk device name (such as /dev/sda) to avoid accidentally deleting the system disk; 2. Use sudoddif=/dev/zeroof=/dev/sdXbs=1Mstatus=progress to overwrite the zero value in full disk, which is suitable for most scenarios; 3. Use sudoshred-v-n3/dev/sdX for three random data overwrites to ensure that it cannot be restored; 4. Optionally execute sudobadblocks-wsv/dev/sdX for destructive write tests; finally use sudohexdump-C/dev/sdX|head to verify whether it is all zero and complete safe erasing.
