

How to Check Your RAM Type in Windows - Make Tech Easier
May 16, 2025 am 02:21 AM
If you plan to upgrade your RAM or test its performance, it is important to know your RAM type. This means that your laptop or PC needs to be evaluated to determine the DDR module it supports, as well as other details like the form, speed and capacity of RAM. This tutorial shows how to check RAM types using various Windows applications and third-party tools in Windows.
Table of contents
- Check RAM type via command prompt
- Check RAM type in Windows via Task Manager
- Check RAM Type in PowerShell
- Check RAM type using CPU-Z
- Check RAM type using Novabench
- Check RAM type by visually checking the motherboard
Check RAM type via command prompt
If you want to check the RAM type in Windows via a command prompt, it usually means determining if your motherboard supports DDR3, DDR4, or DDR5 RAM. Use the following command in administrator mode:
<code>wmic memorychip get SMBIOSMemoryType</code>
A value of "20" or above means that you have DDR memory. "21" refers to DDR2, "24" represents DDR3, "26" represents DDR4, and finally "34" represents DDR5.

There are many other commands that start with wmic memorychip get. For example, running the command wmic memorychip get speed will give the speed in megahertz.
Just remember one extra command to get the remaining RAM details. This will display a complete set of RAM type data:
<code>wmic memorychip list full</code>
In this example, Capacity is 17,179,869,184 bytes (equivalent to 16 GB). The Manufacturer code "859B" corresponds to "Crucial", a brand of Micron. Also listed are PartNumber and Serial Number for each RAM stick.

The RAM configuration runs in Interleaved mode , which means it is the same dual-channel RAM setting. The Form factor value is "12". If you look online, you will find that "12" refers to SODIMM, a type of RAM that is commonly used in laptops. Other common form factors include DIMM, RDIMM and UDIMM.
Another important value is DataWidth , which refers to the number of bits in the memory module interface. This example shows "64", which is a non-ECC memory module. If your motherboard is ECC compatible, the starting value is "72".
Check RAM type in Windows via Task Manager
If you are evaluating a new Windows computer for purchase, you can use Task Manager for quick RAM testing. You can open it by right-clicking on the bottom taskbar or using Ctrl Shift Esc .
Go to Performance -> Memory and check all relevant RAM details. Find out the RAM speed, form, memory type, memory size, and the number of RAM slots used.
In the following example, the RAM speed is 2667 MHz, in the form SODIMM, and both slots are in use.

Tip : Windows Task Manager has many other uses besides checking hardware resources. You can also use it to solve the problem of 100% CPU usage.
Check RAM Type in PowerShell
Since all Windows Command Prompt commands can be run in PowerShell, you can use the wmic memorychip command of any command prompt to detect RAM type details. They will return the same result.
In addition, PowerShell supports its own cmdlets, alias, and Windows environment variables. For example, you can use the "Get-WmiObject" environment variable to get the complete RAM type information.
<code>Get-WmiObject Win32_PhysicalMemory | Format-List *</code>

In addition to detailed information about RAM capacity, manufacturer, part number, and serial number, the PowerShell command provides additional information about your RAM, such as:
- ConfiguredClockSpeed : RAM speed in megahertz
- ConfiguredVoltage : RAM voltage in millivoltages
- SMBIOSMemoryType : DDR type
By the way : PowerShell cmdlets can run powerful script-based tasks. They can even be used to remove bloat software from your Windows computer.
Check RAM type using CPU-Z
In third-party applications, CPU-Z is one of the most reliable applications for checking RAM types in Windows. It is easy to download and install, has a portable version, and does not overheat your CPU.
Whether you use the installer or the ZIP file, once CPU-Z is open, go to its Memory tab. Under the General section, you will find information about Memory Type , such as DDR4 or DDR5. You will also find some interesting details like DRAM frequency and latency, and whether your RAM is single/dual.
For more information, go to the SPD tab to get slot information for each RAM module. Find specific information such as Max bandwidth , Module Manuf. , DRAM Manuf. , and Week/Year to get the manufacturing date. If your RAM supports ECC, you will find additional information under Correction .

By the way : In addition to CPU-Z, there are other RAM performance evaluation tools, such as MemTest64, PassMark Performance Test and AIDA64 Extreme.
Check RAM type using Novabench
When upgrading a computer, our goal is usually to benchmark RAM with the best on the market. This is where tools like Novabench come in handy. It is easy to download and install and provides instant test results for your RAM type. You will find the memory size and memory type (DDR4, DDR5, etc.) on the home screen.
Further, go to Start all Benchmark tests -> Memory Test , which will immediately calculate how your RAM type compares to your best performance.

Check RAM type by visually checking the motherboard
seeing is believing! If you open the Windows motherboard, you can see the supported RAM specifications on the device. If you are using a new laptop, doing so may void the manufacturer’s warranty, but you can’t bypass this if you plan to replace or upgrade your RAM stick.
The motherboard memory slot provides you with supported RAM types (DDR4 in this case) and RAM forms (SODIMM only here). You can also get additional details such as manufacturer name, serial number, part number, and pin type (DIMM B or DIMM A).

It's worth mentioning : Enabled dual-channel RAM on the motherboard requires some precautions, as shown in our guide.
After checking the RAM type in Windows, find out the maximum RAM capacity your device supports, which is closely related to the type of RAM you need. Also learn how to detect RAM health on your PC to avoid configuration errors.
Image source: Unsplash. All images are taken by Sayak Boral.
The above is the detailed content of How to Check Your RAM Type in Windows - Make Tech Easier. For more information, please follow other related articles on the PHP Chinese website!

Hot AI Tools

Undress AI Tool
Undress images for free

Undresser.AI Undress
AI-powered app for creating realistic nude photos

AI Clothes Remover
Online AI tool for removing clothes from photos.

Clothoff.io
AI clothes remover

Video Face Swap
Swap faces in any video effortlessly with our completely free AI face swap tool!

Hot Article
Hot Tools

Notepad++7.3.1
Easy-to-use and free code editor

SublimeText3 Chinese version
Chinese version, very easy to use

Zend Studio 13.0.1
Powerful PHP integrated development environment

Dreamweaver CS6
Visual web development tools

SublimeText3 Mac version
God-level code editing software (SublimeText3)


 Windows 11 slow boot time fix
Jul 04, 2025 am 02:04 AM
Windows 11 slow boot time fix
Jul 04, 2025 am 02:04 AM
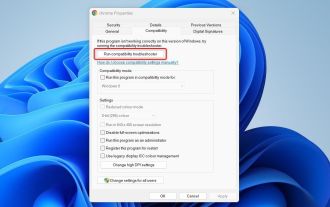
The problem of slow booting can be solved by the following methods: 1. Check and disable unnecessary booting programs; 2. Turn off the quick boot function; 3. Update the driver and check disk health; 4. Adjust the number of processor cores (only for advanced users). For Windows 11 systems, first, the default self-start software such as QQ and WeChat are disabled through the task manager to improve the startup speed; if you use dual systems or old hardware, you can enter the power option to turn off the quick boot function; second, use the device manager to update the driver and run the chkdsk command to fix disk errors, and it is recommended to replace the mechanical hard disk with SSD; for multi-core CPU users, the kernel parameters can be adjusted through bcdedit and msconfig to optimize the startup efficiency. Most cases can be corrected by basic investigation
 How to Change Font Color on Desktop Icons (Windows 11)
Jul 07, 2025 pm 12:07 PM
How to Change Font Color on Desktop Icons (Windows 11)
Jul 07, 2025 pm 12:07 PM
If you're having trouble reading your desktop icons' text or simply want to personalize your desktop look, you may be looking for a way to change the font color on desktop icons in Windows 11. Unfortunately, Windows 11 doesn't offer an easy built-in
 Fixed Windows 11 Google Chrome not opening
Jul 08, 2025 pm 02:36 PM
Fixed Windows 11 Google Chrome not opening
Jul 08, 2025 pm 02:36 PM
Fixed Windows 11 Google Chrome not opening Google Chrome is the most popular browser right now, but even it sometimes requires help to open on Windows. Then follow the on-screen instructions to complete the process. After completing the above steps, launch Google Chrome again to see if it works properly now. 5. Delete Chrome User Profile If you are still having problems, it may be time to delete Chrome User Profile. This will delete all your personal information, so be sure to back up all relevant data. Typically, you delete the Chrome user profile through the browser itself. But given that you can't open it, here's another way: Turn on Windo
 How to fix second monitor not detected in Windows?
Jul 12, 2025 am 02:27 AM
How to fix second monitor not detected in Windows?
Jul 12, 2025 am 02:27 AM
When Windows cannot detect a second monitor, first check whether the physical connection is normal, including power supply, cable plug-in and interface compatibility, and try to replace the cable or adapter; secondly, update or reinstall the graphics card driver through the Device Manager, and roll back the driver version if necessary; then manually click "Detection" in the display settings to identify the monitor to confirm whether it is correctly identified by the system; finally check whether the monitor input source is switched to the corresponding interface, and confirm whether the graphics card output port connected to the cable is correct. Following the above steps to check in turn, most dual-screen recognition problems can usually be solved.
 Want to Build an Everyday Work Desktop? Get a Mini PC Instead
Jul 08, 2025 am 06:03 AM
Want to Build an Everyday Work Desktop? Get a Mini PC Instead
Jul 08, 2025 am 06:03 AM
Mini PCs have undergone
 Fixed the failure to upload files in Windows Google Chrome
Jul 08, 2025 pm 02:33 PM
Fixed the failure to upload files in Windows Google Chrome
Jul 08, 2025 pm 02:33 PM
Have problems uploading files in Google Chrome? This may be annoying, right? Whether you are attaching documents to emails, sharing images on social media, or submitting important files for work or school, a smooth file upload process is crucial. So, it can be frustrating if your file uploads continue to fail in Chrome on Windows PC. If you're not ready to give up your favorite browser, here are some tips for fixes that can't upload files on Windows Google Chrome 1. Start with Universal Repair Before we learn about any advanced troubleshooting tips, it's best to try some of the basic solutions mentioned below. Troubleshooting Internet connection issues: Internet connection

 How to clear the print queue in Windows?
Jul 11, 2025 am 02:19 AM
How to clear the print queue in Windows?
Jul 11, 2025 am 02:19 AM
When encountering the problem of printing task stuck, clearing the print queue and restarting the PrintSpooler service is an effective solution. First, open the "Device and Printer" interface to find the corresponding printer, right-click the task and select "Cancel" to clear a single task, or click "Cancel all documents" to clear the queue at one time; if the queue is inaccessible, press Win R to enter services.msc to open the service list, find "PrintSpooler" and stop it before starting the service. If necessary, you can manually delete the residual files under the C:\Windows\System32\spool\PRINTERS path to completely solve the problem.
