

Win7 to win10 upgrade guide: detailed steps and precautions
May 06, 2024 am 11:40 AM
Upgrading from Windows 7 to Windows 10: Detailed Guide With the rapid development of technology, Microsoft continues to update and optimize the Windows operating system to provide users with a better user experience. Upgrade to Windows 10 to enjoy new features and performance improvements, plus longer-term technical support. This article is carefully written by PHP editor Banana. It will introduce in detail the steps to upgrade from Windows 7 to Windows 10, and highlight the matters that need to be paid attention to during the upgrade process. By following this guide, you will be able to easily upgrade your system and enjoy the benefits of Windows 10.

Tool materials:
System version: Windows 7 (any version), Windows 10 (latest version)
Brand model: any Brand and model of personal computers, such as Lenovo, Dell, HP, etc.
Software version: Windows 10 upgrade tool (latest version) officially provided by Microsoft
1. Preparations before upgrading
1. Check the computer configuration: Before starting the upgrade, please confirm whether your computer hardware configuration meets the minimum system requirements of Windows 10. Generally speaking, if your computer runs Windows 7 smoothly, you shouldn't have a problem upgrading to Windows 10.
2. Back up important data: In order to prevent accidental data loss during the upgrade process, it is recommended that you back up all important personal files, photos, videos and other data to an external storage device or cloud storage service before upgrading.
3. Upgrade license: For already activated Windows 7 systems, Microsoft provides a free digital license to upgrade to Windows 10. You do not need to purchase new licenses to complete the upgrade.
2. Use the Windows 10 upgrade tool
1. Visit Microsoft’s official website and download the latest version of the Windows 10 upgrade tool. This tool helps you upgrade directly from Windows 7 to Windows 10 without installation media.
2. Run the upgrade tool, select the "Upgrade Now" option, and then follow the prompts to complete the upgrade process. The upgrade tool automatically downloads the required files and preserves your personal files, applications, and settings during the installation process.
3. The upgrade process may take some time, depending on your network speed and computer performance. Please make sure to keep your computer connected to a power source during the upgrade process and do not interrupt the upgrade.
3. Operations after the upgrade
1. After the upgrade is completed, your computer will automatically restart and enter Windows 10. When you log in for the first time, you need to complete some initial settings, such as privacy settings, Cortana voice assistant, etc.
2. Check the compatibility of drivers and applications. Most hardware drivers and applications designed for Windows 7 will work properly in Windows 10. If you find that some devices or apps are incompatible, try updating to the latest version or looking for an alternative.
3. Be familiar with the new features and interface of Windows 10. Windows 10 introduces many new features such as Start menu, virtual desktops, Edge browser, and more. Take some time to explore these new features and get the most out of Windows 10.
Content extension:
1. If you are using an older Windows 7 version, such as Windows 7 SP1, it is recommended to update the system to the latest status before upgrading. This helps improve the success rate and stability of upgrades.
2. For some specific software or hardware configurations, direct upgrade may encounter compatibility issues. In this case, you can consider doing a clean installation of Windows 10. Note that a fresh installation will delete all existing files and applications, so be sure to back up your data beforehand.
3. After upgrading to Windows 10, you can enjoy continuous updates and support provided by Microsoft. Windows 10 adopts the Windows as a Service model, regularly launching feature updates and quality updates to continuously improve the system's performance, security, and functionality.
The above is the detailed content of Win7 to win10 upgrade guide: detailed steps and precautions. For more information, please follow other related articles on the PHP Chinese website!

Hot AI Tools

Undress AI Tool
Undress images for free

Undresser.AI Undress
AI-powered app for creating realistic nude photos

AI Clothes Remover
Online AI tool for removing clothes from photos.

Clothoff.io
AI clothes remover

Video Face Swap
Swap faces in any video effortlessly with our completely free AI face swap tool!

Hot Article
Hot Tools

Notepad++7.3.1
Easy-to-use and free code editor

SublimeText3 Chinese version
Chinese version, very easy to use

Zend Studio 13.0.1
Powerful PHP integrated development environment

Dreamweaver CS6
Visual web development tools

SublimeText3 Mac version
God-level code editing software (SublimeText3)


 How to expand the capacity of the c disk if it is too small? 5 solutions for small capacity c disk expansion
May 22, 2025 pm 09:15 PM
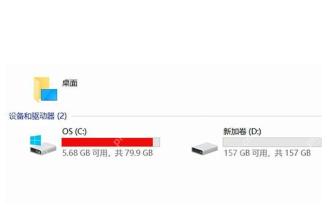
How to expand the capacity of the c disk if it is too small? 5 solutions for small capacity c disk expansion
May 22, 2025 pm 09:15 PM
C drive can expand capacity in five ways: 1. Use Windows disk management tools to expand the volume, but there must be unallocated space; 2. Use third-party software such as EaseUS or AOMEI to adjust the partition size; 3. Use Diskpart command line tools to expand the C drive, suitable for users who are familiar with the command line; 4. Repartition and format the hard disk, but it will cause data loss and data needs to be backed up; 5. Use external storage devices as C drive expansion, transfer folders through symbolic links or modification of the registry.
 How to create a SQLite database in Python?
May 23, 2025 pm 10:36 PM
How to create a SQLite database in Python?
May 23, 2025 pm 10:36 PM
Create a SQLite database in Python using the sqlite3 module. The steps are as follows: 1. Connect to the database, 2. Create a cursor object, 3. Create a table, 4. Submit a transaction, 5. Close the connection. This is not only simple and easy to do, but also includes optimizations and considerations such as using indexes and batch operations to improve performance.
 What does java middleware mean? Definition and typical applications of middleware
May 28, 2025 pm 05:51 PM
What does java middleware mean? Definition and typical applications of middleware
May 28, 2025 pm 05:51 PM
Java middleware is a software that connects operating systems and application software, providing general services to help developers focus on business logic. Typical applications include: 1. Web server (such as Tomcat and Jetty), which handles HTTP requests; 2. Message queue (such as Kafka and RabbitMQ), which handles asynchronous communication; 3. Transaction management (such as SpringTransaction), which ensures data consistency; 4. ORM framework (such as Hibernate and MyBatis), which simplifies database operations.
 Efficient operation method for batch stopping Docker containers
May 19, 2025 pm 09:03 PM
Efficient operation method for batch stopping Docker containers
May 19, 2025 pm 09:03 PM
An efficient way to batch stop a Docker container includes using basic commands and tools. 1. Use the dockerstop$(dockerps-q) command and adjust the timeout time, such as dockerstop-t30$(dockerps-q). 2. Use dockerps filtering options, such as dockerstop$(dockerps-q--filter"label=app=web"). 3. Use the DockerCompose command docker-composedown. 4. Write scripts to stop containers in order, such as stopping db, app and web containers.
 How to update the system's own software
May 19, 2025 pm 06:48 PM
How to update the system's own software
May 19, 2025 pm 06:48 PM
Updating the software that comes with macOS is simple and important because it can fix bugs, improve performance, bring new features and security improvements. You can update through the "Software Update" option in "System Settings" or "System Preferences" and follow the prompts. If you encounter problems, try restarting your Mac or checking your network connection, and the Apple Support page also provides a solution. It is recommended to keep the system up to date, back up data before update, and ensure Wi-Fi and sufficient storage space. Update details can be viewed on Apple's official website.
 The reasons and solutions for editor crash after VSCode plug-in update
May 29, 2025 pm 10:03 PM
The reasons and solutions for editor crash after VSCode plug-in update
May 29, 2025 pm 10:03 PM
The reason why the editor crashes after the VSCode plugin is updated is that there is compatibility issues with the plugin with existing versions of VSCode or other plugins. Solutions include: 1. Disable the plug-in to troubleshoot problems one by one; 2. Downgrade the problem plug-in to the previous version; 3. Find alternative plug-ins; 4. Keep VSCode and plug-in updated and conduct sufficient testing; 5. Set up automatic backup function to prevent data loss.
 Navicat's recovery method for importing database backup files (such as .bak)
Jun 04, 2025 pm 06:51 PM
Navicat's recovery method for importing database backup files (such as .bak)
Jun 04, 2025 pm 06:51 PM
The method of using Navicat to restore .bak files is as follows: 1. Open Navicat and connect to the SQLServer instance. 2. Create a new database or select an existing database. 3. Enter and execute the RESTOREDATABASESQL statement in the query editor to ensure that the path and name are correct. 4. Pay attention to the use of database name, file path, WITHREPLACE and MOVE options to ensure successful recovery.
 Configuring restricting the use of Docker container resources (CPU, memory)
May 19, 2025 pm 08:54 PM
Configuring restricting the use of Docker container resources (CPU, memory)
May 19, 2025 pm 08:54 PM
In modern cloud-native application development, resource management is the key to ensuring efficient and stable operation of the system. Today we will talk about how to limit the CPU and memory usage of containers through Docker configuration. This not only helps us better manage resources, but also prevents a single container from overconsuming system resources and affecting the operation of other services. Configuring the resource limitations of Docker containers is actually an important part of our refined management of containerized applications. Through reasonable configuration, we can ensure that the container makes full use of system resources without affecting other services. First, let's look at a simple configuration example, which will let you get started quickly: #Use Dockerfile to configure resource limits FROMubuntu:late
