

How to disable private browsing mode in Safari on iPhone
Feb 23, 2024 am 08:34 AM
Apple allows iPhone users to browse anonymously using private tabs on the Safari browser. When "Incognito Mode" is enabled, Safari does not save the addresses of websites you visit, your search history, or Autofill information.
If you use private browsing mode frequently in Safari, you may have noticed that the mode operates differently than other browsers. This article will detail how to disable Private Browsing Mode on iPhone and what happens when Private Browsing Mode is enabled when Safari is closed.
How to Disable Private Browsing Mode on Safari
- Required: iPhone running iOS 17 or later.
If you've found a way to enable and use private browsing in Safari but are having trouble trying to disable it, the following instructions may help you.
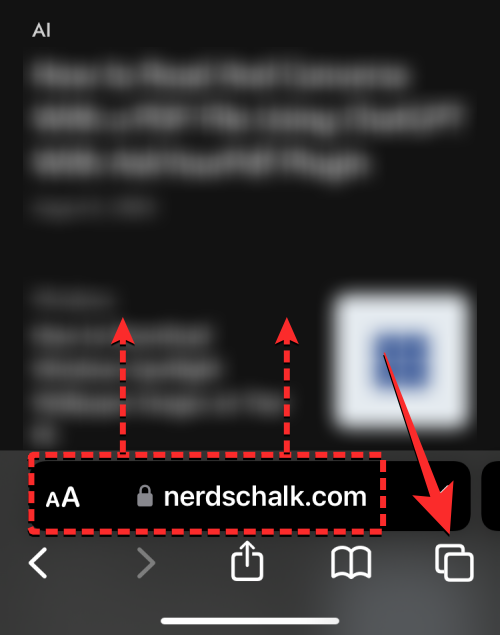
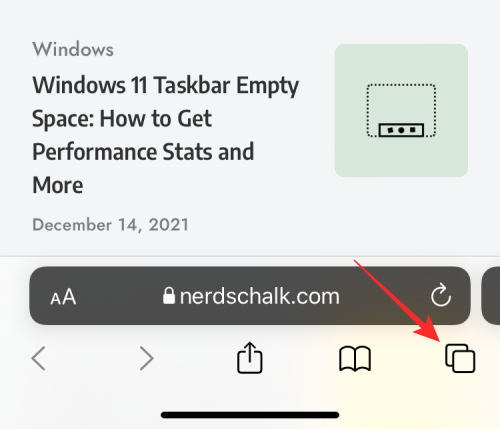
- To switch from private browsing to normal browsing, click the "Tabs" button in the lower right corner or swipe up on the bottom navigation bar.

- Once you do this, you will be able to see all the tabs currently open in Private Browsing in Safari. To disable private browsing, you can switch to the regular tab by clicking on the "x" tab option at the bottom. Here, "x" is the number of tabs currently open in regular browsing mode.
- When Safari switches to a regular tab, you can click "Done" in the lower right corner to open the last tab loaded in normal browsing mode, or you can click any of the top tabs tab to open it.
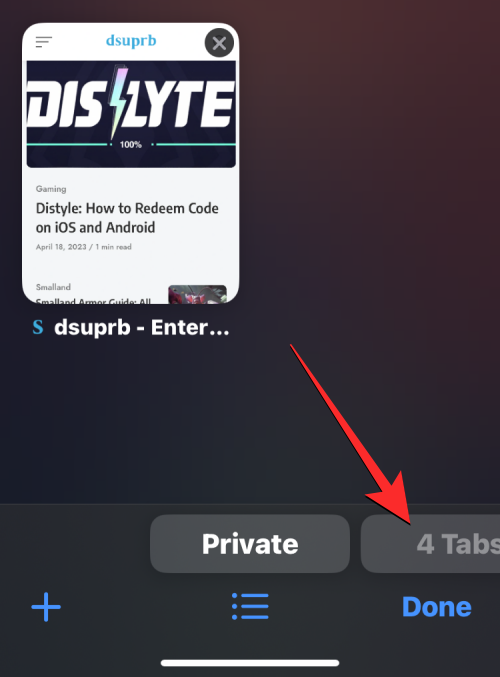
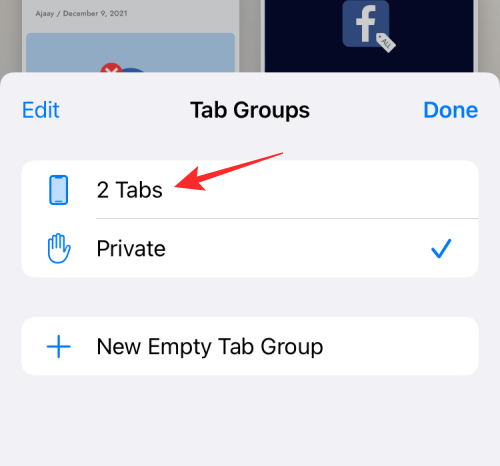
- Another way to disable private browsing on your device is to access the Tab Groups menu in Safari. To do this, click the "Tabs" button in the lower right corner or swipe up on the bottom navigation bar.
- Once you do this, you will be able to see all the tabs currently open in Private Browsing in Safari. To disable private browsing, click the bullet list icon at the bottom center.
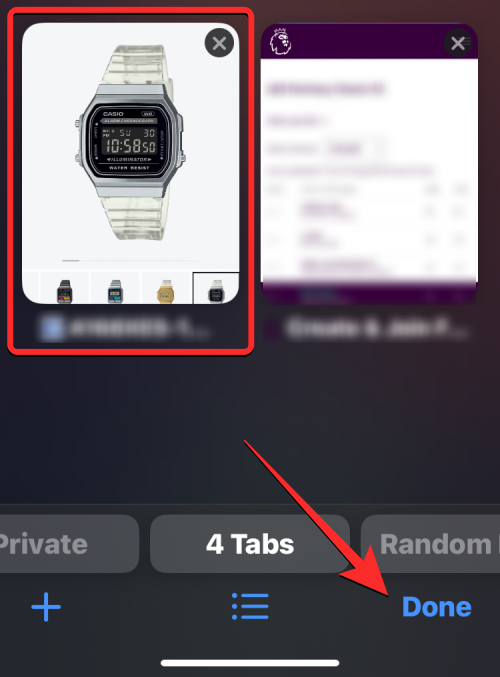
- This will open the Tab Group menu on your screen. Here, click on one of the click groups you created (in this case, "Random browsing" is such an option) or click on the "x" tab option in this menu to open one of the normal browsing tabs.
- From here, you can tap any tab at the top to open it, or tap Done in the bottom right corner to open the last visible tab on the screen.

How to disable private browsing mode on older iOS versions [2 methods]
Since Safari does not close private tabs on iOS by itself , so you can disable private browsing mode on an app by switching from a private tab to a regular active tab. This can be done in two ways – by switching to an open tab in the tab group, or using the shortcut in the Safari tab bar at the bottom.
Method 1: From a tab group
- To disable private browsing mode using a tab group, open the Safari app on your iPhone.
- Now, click on the tab icon in the lower right corner.
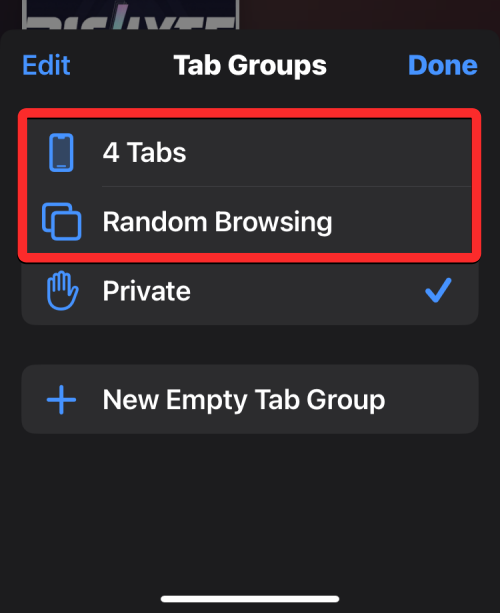
- When the tab overview screen appears, tap the "Private" section at the bottom.
- You will now see the tab group popping up from the bottom. Here, select the "x" tab above the "Private" group. "x" is the number of tabs that may have been open in the last active session.
- You will now switch to the non-private tab that was active before you switched to private browsing on Safari. When you do this, private browsing mode will be disabled.

Method 2: From the tab bar
Another quick way to disable private browsing mode is to switch to a non-private tab from the tab bar.
- Open the Safari browser app on your iPhone.
- Long press the label icon in the lower right corner.
- In the overflow menu that appears, select "x" tabs, where "x" is the number of tabs that may currently be open in a non-private browsing session.
- When you do this, Safari will disable private browsing mode and display the non-private tab you last visited.

How to quickly close Private tabs on Safari
Contrary to what you might expect, disabling private browsing mode on Safari does not necessarily close the tabs open in it . When you switch back to Private tabs from normal tabs, all tabs that were previously loaded in Private Browsing mode will be reloaded on the screen again. This might put you in an awkward position, as turning private browsing mode back on after a few days might cause all the tabs you might have had open before.
To ensure that no one can access your private tabs in the future, be sure to close all private tabs.
- First, open the Safari app on your iPhone and make sure you are currently in private browsing mode.
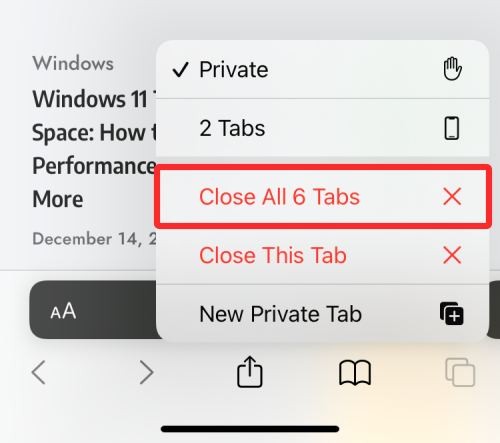
- Now, press and hold the tab icon in the lower right corner.
- In the overflow menu that appears, select Close all "x" tabs.
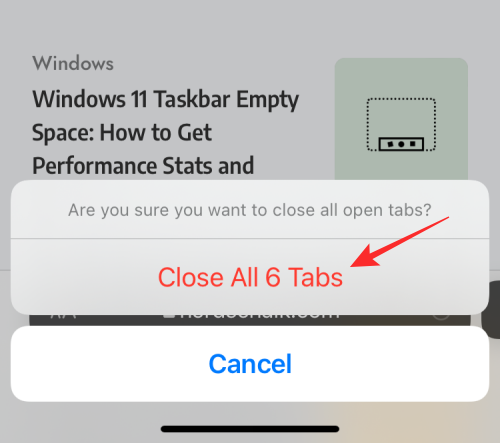
- Now you will see a prompt on the screen asking if you want to continue with the selected action. Here, click to close all “x” tabs.
- Any tabs you have privately open in Safari will be removed and you will only see the Start page on your screen.
- You may still have to disable Private Browsing Mode yourself from here, but you can rest assured that your open private tabs won't show up again.

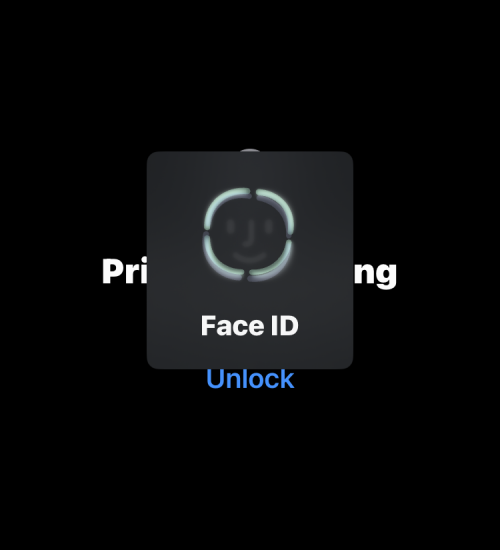
How to Enable Face ID to Unlock Private Browsing on Safari
As we explained above, closing the Safari app with Private Browsing enabled will not cause your next Disable it when opening it. To prevent yourself from embarrassing yourself and prevent others from accessing your active tabs on Private Browsing, iOS lets you lock Private Browsing mode using Face ID on iOS 17 or later. With this extra level of privacy, no one but you will be able to open or view tabs open in Safari’s private browsing mode.
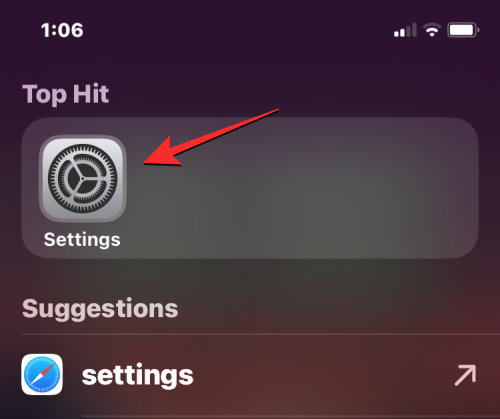
- To enable Face ID to unlock private browsing, open the Settings app on your iPhone.
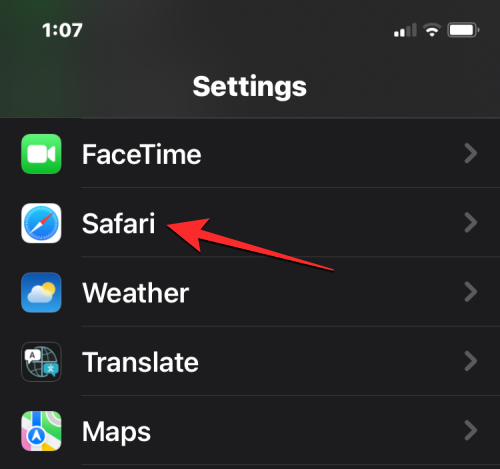
- In Settings, scroll down and tap Safari.
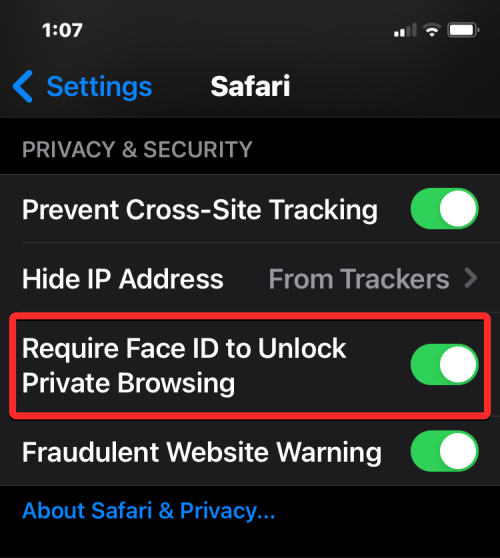
- On the Safari screen, find the "Privacy & Security" section and turn on the "Require Face ID to Unlock Private Browsing" switch.
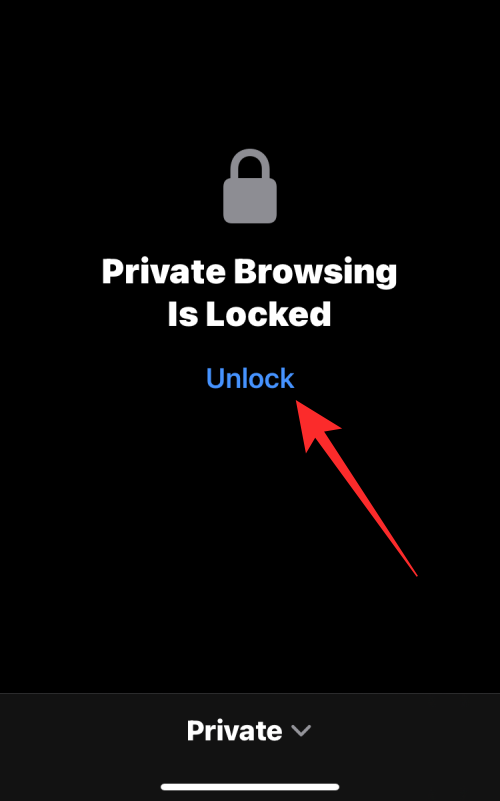
- When you do this, your private browsing session will be locked when you close the Safari app. When you open Safari again, you can exit Private Browsing or access your Private Browsing by clicking Unlock.
- Before entering Private Browsing, you will be asked to verify your identity using Face ID or your device passcode so others cannot gain access without your knowledge it.
What happens when you close Safari with the Privacy tab open?
Unlike other browser apps like Chrome or Brave, Safari doesn't completely close your Private tabs when you terminate the app on iOS. This means that when you close a Safari app by swiping from the Recent Apps screen, the Private tabs that were open before you closed the app will reappear when you launch Safari again on your iPhone.
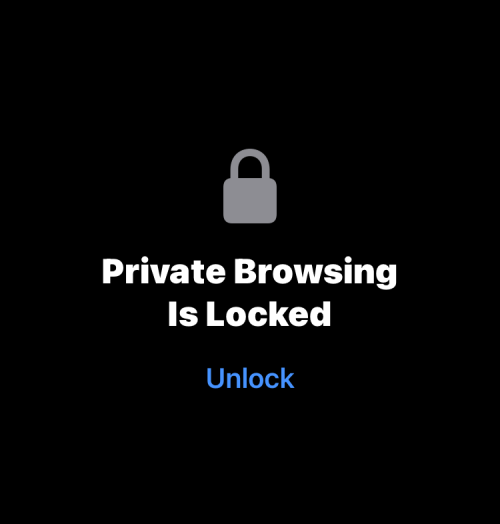
While you'll be asked to "unlock" Private Browsing using Face ID or your device passcode, there's a chance you might accidentally unlock this mode when you unlock your iPhone. This can lead to an awkward situation where you might have forgotten to exit private mode during your last browsing session, because reopening Safari will load all the web pages you might have open as private tabs again.
In contrast, when you close Chrome or the Brave app during private browsing, all private tabs are closed permanently and there is no way to restore them. This way, your private browsing sessions will remain private and anonymous, even if you fail to close tabs that may have been open.
Sadly, Safari on iOS has no such feature. Therefore, the only real way to avoid any future humiliation is to manually disable private browsing every time you browse anonymously on Safari.
The above is the detailed content of How to disable private browsing mode in Safari on iPhone. For more information, please follow other related articles on the PHP Chinese website!

Hot AI Tools

Undress AI Tool
Undress images for free

Undresser.AI Undress
AI-powered app for creating realistic nude photos

AI Clothes Remover
Online AI tool for removing clothes from photos.

Clothoff.io
AI clothes remover

Video Face Swap
Swap faces in any video effortlessly with our completely free AI face swap tool!

Hot Article
Hot Tools

Notepad++7.3.1
Easy-to-use and free code editor

SublimeText3 Chinese version
Chinese version, very easy to use

Zend Studio 13.0.1
Powerful PHP integrated development environment

Dreamweaver CS6
Visual web development tools

SublimeText3 Mac version
God-level code editing software (SublimeText3)
Hot Topics


 How to create a contact group on iPhone
Jul 13, 2025 am 01:17 AM
How to create a contact group on iPhone
Jul 13, 2025 am 01:17 AM
iPhone does not support creating contact groups directly in the address book application, but similar functions can be achieved through the following methods: 1. Use the "Group" function in the address book application, click "Edit" > "Add Group" to create a custom group; 2. Add each contact to the corresponding group by editing it; 3. If you need to send a group message, you can create a new multi-person conversation in the information application; 4. Use iCloud or Gmail to synchronize tagged groups to facilitate the management of a large number of contacts on the computer. These methods are used in conjunction with efficient management of contact groups.
 How to check if an iPhone is unlocked
Jul 15, 2025 am 01:17 AM
How to check if an iPhone is unlocked
Jul 15, 2025 am 01:17 AM
TocheckifaniPhoneisunlocked,1)gotoSettings>Cellular>CellularDataOptionsandlookforlabelslike“Unlocked”or“NoSIMrestrictions,”2)insertadifferentcarrier’sactiveSIMcardandseeifthephoneacceptsit,3)usetheIMEInumberononlinetoolslikeIMEI.infotocheckunlo
 How to check iPhone trade-in value
Jul 13, 2025 am 01:13 AM
How to check iPhone trade-in value
Jul 13, 2025 am 01:13 AM
Determining the depreciation value of iPhone requires multiple factors and comparing different platforms. 2. The first choice is Apple's official replacement plan, which has a simple and transparent process, but the final valuation must be based on the actual condition of the equipment. 3. Third-party websites such as Gazelle, Swappa, etc. may provide higher quotations, but you need to pay attention to describing the real situation and avoiding the charging trap. 4. The core factors affecting value include model and storage capacity, equipment status, operator lock status, etc. Small problems may also affect the quotation. 5. If you pursue higher returns, you can choose to sell privately, but you need to weigh the time cost and transaction risks.
 How to transfer contacts from one iPhone to another
Jul 12, 2025 am 02:36 AM
How to transfer contacts from one iPhone to another
Jul 12, 2025 am 02:36 AM
Migrating contacts can be accomplished in three ways when replacing a new iPhone: First, using iCloud synchronization is the most worry-free, ensuring that the old phone has turned on the iCloud address book backup, and the new phone logs into the same account and enables synchronization; Second, using AirDrop is suitable for a small number of contacts to transmit. After setting up AirDrop visibility on both phones, sending and receiving them through the share button; Third, with the help of computer relay, both Mac or Windows, synchronizing contacts through Finder or iTunes and replacing or merging data. Select the method that suits you and pay attention to your account and permission settings to easily complete the migration.
 How to clear RAM on iPhone
Jul 12, 2025 am 02:30 AM
How to clear RAM on iPhone
Jul 12, 2025 am 02:30 AM
The RAM of iPhone cannot be cleaned manually, but the following methods can be used to free memory to improve smoothness: 1. Close the background application: Double-click the Home button or slide from the bottom to pause and close the card; 2. Restart the phone regularly: Refresh the system status once a week; 3. Reduce background refresh: Enter Settings → General → Backend App Refresh to limit the number of applications; 4. Avoid running multiple high-resource applications at the same time, and use them in stages to reduce memory pressure. These operations can effectively alleviate the lag caused by the tight memory of iPhone.
 How to offload an app on iPhone
Jul 14, 2025 am 01:23 AM
How to offload an app on iPhone
Jul 14, 2025 am 01:23 AM
Uninstalling an app on your iPhone does not mean completely deletion, and users can make room while retaining data. If you want to uninstall the app and keep the data, you can go to "Settings" → "General" → "iPhone Storage Space" → Select App → Click "Uninstall App"; if you want to completely delete the app and data, you can long press the icon on the home screen → click "Delete App" → confirm the deletion. The difference between the two is that after uninstalling, reinstalling can still restore the original content, while deleting will clear all data and you need to start the next installation. Before operation, you should clarify the requirements to avoid accidentally deleting important information.
 How to use the Files app on iPhone
Jul 19, 2025 am 01:48 AM
How to use the Files app on iPhone
Jul 19, 2025 am 01:48 AM
Using the iPhone's file app for file management is very simple and suitable for daily tasks. 1. Organize files and folders: Folders can be created through the "New Folder" function, and supports renaming, moving or copying files. They can also be sorted by name, date, etc. 2. Access iCloud and other cloud services: You can connect to iCloudDrive, GoogleDrive, Dropbox, etc., manage the displayed services through "Browse>Location>Edit", and directly save files to cloud storage. 3. Open and share files from other applications: Select the application to open the file through the share icon at the bottom, or share files through email, message or AirDrop. In short, although its functions are limited, its basic
 What is the 'Shared with You' section in Safari?
Jul 12, 2025 am 12:51 AM
What is the 'Shared with You' section in Safari?
Jul 12, 2025 am 12:51 AM
"SharedwithYou" inSafari shows links shared by others through Apple apps such as iMessage. Its working principle includes: 1. Automatically crawl the links in Messages; 2. Display it in the Safari start page or bookmark menu, including the sharer and time; 3. Recommend relevant content based on browsing behavior; 4. Support cross-device synchronization. The advantage is that it facilitates quick access to important content shared by others, such as recipes, product reviews, etc., and you can directly click to open the link. Management methods include: 5. Turn off the function or clear a single entry. This feature is suitable for iPhone, iPad and Mac.
