


 Ansible working principle
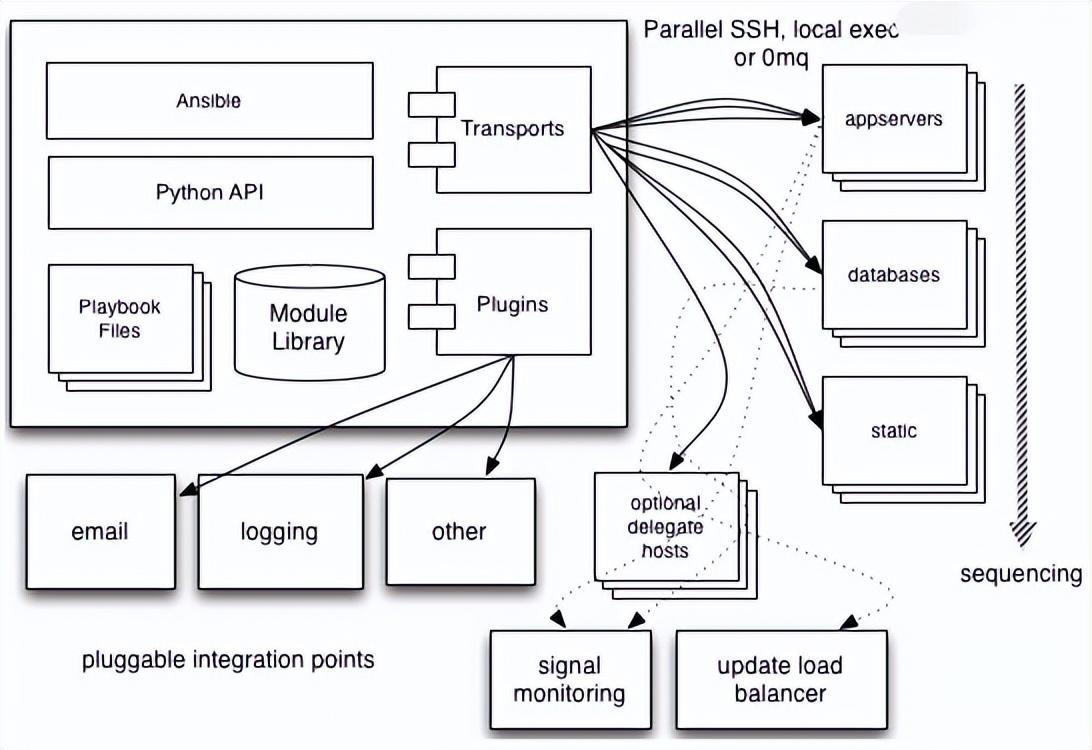
You can understand from the above picture:
- The management terminal supports three ways to connect to the managed terminal: local, ssh, and zeromq. The default connection is based on ssh. This part corresponds to the connection module in the architecture diagram above;
- Host Inventory can be classified by application type and other methods. The management node implements corresponding operations through various modules. A single module and batch execution of a single command can be called ad-hoc;
- The management node can use playbooks to implement a collection of multiple tasks to implement a type of functions, such as the installation and deployment of web services, batch backup of database servers, etc. We can simply understand playbooks as configuration files that the system operates by combining multiple ad-hoc operations.
The above is the detailed content of Detailed explanation of how Ansible works. For more information, please follow other related articles on the PHP Chinese website!

Hot AI Tools

Undress AI Tool
Undress images for free

Undresser.AI Undress
AI-powered app for creating realistic nude photos

AI Clothes Remover
Online AI tool for removing clothes from photos.

Clothoff.io
AI clothes remover

Video Face Swap
Swap faces in any video effortlessly with our completely free AI face swap tool!

Hot Article
Hot Tools

Notepad++7.3.1
Easy-to-use and free code editor

SublimeText3 Chinese version
Chinese version, very easy to use

Zend Studio 13.0.1
Powerful PHP integrated development environment

Dreamweaver CS6
Visual web development tools

SublimeText3 Mac version
God-level code editing software (SublimeText3)


![WLAN expansion module has stopped [fix]](https://img.php.cn/upload/article/000/465/014/170832352052603.gif?x-oss-process=image/resize,m_fill,h_207,w_330) WLAN expansion module has stopped [fix]
Feb 19, 2024 pm 02:18 PM
WLAN expansion module has stopped [fix]
Feb 19, 2024 pm 02:18 PM
If there is a problem with the WLAN expansion module on your Windows computer, it may cause you to be disconnected from the Internet. This situation is often frustrating, but fortunately, this article provides some simple suggestions that can help you solve this problem and get your wireless connection working properly again. Fix WLAN Extensibility Module Has Stopped If the WLAN Extensibility Module has stopped working on your Windows computer, follow these suggestions to fix it: Run the Network and Internet Troubleshooter to disable and re-enable wireless network connections Restart the WLAN Autoconfiguration Service Modify Power Options Modify Advanced Power Settings Reinstall Network Adapter Driver Run Some Network Commands Now, let’s look at it in detail
 WLAN extensibility module cannot start
Feb 19, 2024 pm 05:09 PM
WLAN extensibility module cannot start
Feb 19, 2024 pm 05:09 PM
This article details methods to resolve event ID10000, which indicates that the Wireless LAN expansion module cannot start. This error may appear in the event log of Windows 11/10 PC. The WLAN extensibility module is a component of Windows that allows independent hardware vendors (IHVs) and independent software vendors (ISVs) to provide users with customized wireless network features and functionality. It extends the capabilities of native Windows network components by adding Windows default functionality. The WLAN extensibility module is started as part of initialization when the operating system loads network components. If the Wireless LAN Expansion Module encounters a problem and cannot start, you may see an error message in the event viewer log.
 Python server programming: Using Paramiko to implement SSH remote operation
Jun 18, 2023 pm 01:10 PM
Python server programming: Using Paramiko to implement SSH remote operation
Jun 18, 2023 pm 01:10 PM
With the development of cloud computing and the Internet of Things, remote operation of servers has become increasingly important. In Python, we can use the Paramiko module to easily implement SSH remote operations. In this article, we will introduce the basic usage of Paramiko and how to use Paramiko in Python to remotely manage servers. What is Paramiko Paramiko is a Python module for SSHv1 and SSHv2 that can be used to connect and control SSH clients
 OpenSSH on Windows: Installation, Configuration, and Usage Guide
Mar 08, 2024 am 09:31 AM
OpenSSH on Windows: Installation, Configuration, and Usage Guide
Mar 08, 2024 am 09:31 AM
For most Windows users, Remote Desktop Protocol (RDP) has always been the first choice for remote management because it provides a friendly graphical interface. However, for system administrators who require more granular control, SSH may better suit their needs. Through SSH, administrators can interact with remote devices through the command line, which can make management work more efficient. The advantage of SSH is its security and flexibility, making it easier for administrators to perform remote management and maintenance work, especially when dealing with a large number of devices or performing automated tasks. So while RDP excels in terms of user-friendliness, for system administrators, SSH is superior in terms of power and control. Previously, Windows users needed to borrow
 How to deal with the failure to start the SSH service in Linux systems
Mar 19, 2024 pm 12:15 PM
How to deal with the failure to start the SSH service in Linux systems
Mar 19, 2024 pm 12:15 PM
In Linux systems, the SSH (SecureShell) service is a very important tool for remotely connecting to the server and performing management operations. But sometimes, we may encounter a situation where the SSH service fails to start, which may result in the inability to connect to the server remotely. In this case, we need to take some measures to solve the problem. This article will introduce how to handle the failure to start the SSH service in Linux systems, and provide some specific code examples to help you solve this problem. 1. Confirm
 Install SSH on the Linux Debian11 server, create a new user and allow SSH remote login, and configure SSH secure login!
Mar 01, 2024 pm 07:16 PM
Install SSH on the Linux Debian11 server, create a new user and allow SSH remote login, and configure SSH secure login!
Mar 01, 2024 pm 07:16 PM
The steps to install SSH on your Debian11 server and create a new user to allow SSH remote login are as follows: Step 1: Install SSH In order to install the SSH server, you need to log in to your Debian11 server as the root user or a user with sudo privileges. Execute the following command in the terminal to install the SSH server: sudoaptupdatesudoaptinstallopenssh-server Step 2: Create a new user To create a new user, you can use the adduser command. Replace the following command with your desired username: sudoaddusernew_username You will be prompted to set the new user's password and other
 Linux SSH login mutual trust configuration
Feb 19, 2024 pm 07:48 PM
Linux SSH login mutual trust configuration
Feb 19, 2024 pm 07:48 PM
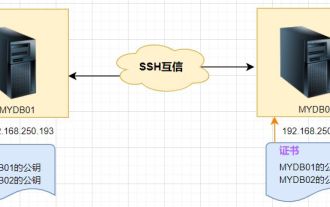
1. The purpose of ssh mutual trust 1. SSH mutual trust is required when building a cluster, which is conducive to convenient operation on another node. 2. When using scp remote copy operation, you need to enter the user name and password of the target server. At this time, you can configure SSH mutual trust between Linux servers, so that you can log in without a password when operating between multiple Linux servers. 2. The principle of ssh mutual trust configuration. In short, the server stores the certificate of the target host so that authentication can be completed automatically without entering a password. 3. SSH mutual trust configuration steps 1. Each node generates its own public key and private key pair. 2. Send your public key file to the other party. 3. Verify whether the mutual trust configuration is successful. 4. Configure ssh mutual trust here with MYDB01 and
 CentOS 7.9 installation and centos 7.9 installation ssh
Feb 13, 2024 pm 10:30 PM
CentOS 7.9 installation and centos 7.9 installation ssh
Feb 13, 2024 pm 10:30 PM
CentOS7.9 is a very commonly used operating system version when building servers or system management. This article will provide you with detailed steps and instructions for installing CentOS7.9 and installing SSH. CentOS7.9 is a free and open source Linux operating system. It is a binary compatible version based on Red Hat Enterprise Linux (RHEL). The following are the steps to install CentOS7.9: 1. You need to download the ISO image file of CentOS7.9. You can download it from Download the latest CentOS7.9 ISO image file from the CentOS official website. 2. Create a new virtual machine or physical machine on your computer and install
