

How to move files and folders on Mac computer? 4 ways to explain!
Feb 05, 2024 pm 06:48 PM
If you want to organize the files and folders on your Apple Mac computer, you may consider moving some content. By moving items, you can create a more organized file structure to work more efficiently or find what you need faster.
We'll show you how to move files and folders on macOS using drag and drop, shortcuts or right-click menus, Terminal, and more so that you can use the method that makes more sense or that you're most comfortable with.
Method 1: Use drag and drop on Mac
On Apple Mac computers, the easiest way to move files and folders is through drag and drop. Whether you're rearranging icons, widgets, and shortcuts on your desktop, or moving items to other locations on macOS, this method is very convenient and easy to use.
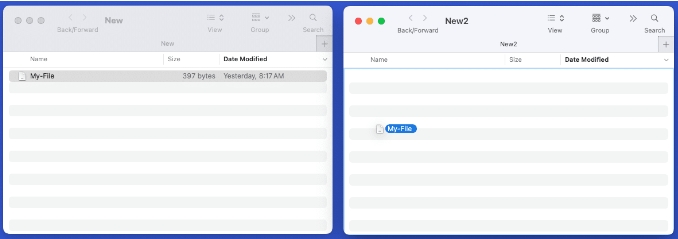
1. Move between two open windows
You can move a file or folder between two open windows by dragging it from the first window to the second window Move files or folders between. When you release it, you will see the item in its new location.
2. Move files and folders in the same window
If you want to move items in the same window, such as moving files into subfolders, you can also Do this.
Drag the item up or down to the desired location → release when the file is above the folder
3. Using tabs in the Finder application
You can also move files or folders using tabs in Finder. Drag an item from the current tab onto another tab and release.

4. Using the Sidebar in the Finder Application
Another way to use drag and drop to move items is in the Finder Sidebar.
Drag the item from its current location to the sidebar location you want to move it to.
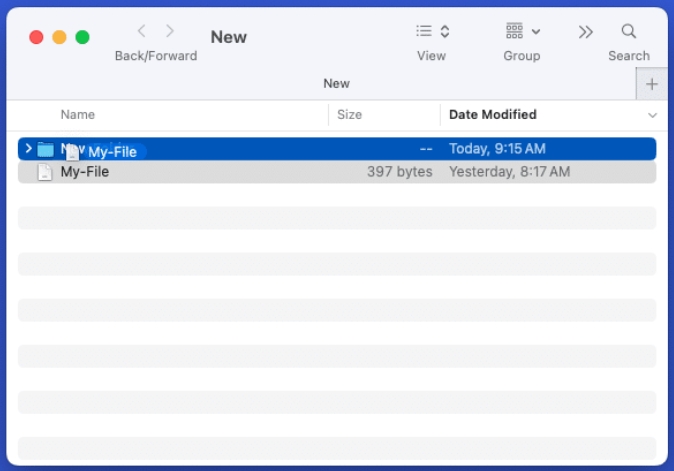
5. Move a file or folder with the same name
If you move a file or folder to a location where a file or folder with the same name already exists, you will receive a message notifying you. From there, you can choose to replace or keep files, or replace or merge folders. Let's see how it works.
Here, we use drag and drop to move the file to a folder where a file with the same name already exists. You'll see a pop-up message asking if you want to replace, keep both, or stop.
Replace: Overwrite existing files with moved files. Keep Two: Keep both files and rename the moved file by adding "copy" to the name. Stop: Do not move files.Although similar, you have another option when moving a folder with the same name. You can choose to replace or stop, just like with files, but you can also merge folders.
Replace: Overwrite the existing folder with the moved folder. Merge: Merge folders into one folder containing all items from both folders. Note: You will only see the Merge option if one folder contains items that are not in the other folder. Stop: Do not move the folder.Method 2: Use the right-click menu on your MacBook
Another way to move files and folders on your Mac is to move to a new folder. If you do this with a folder, the folder you move will become a subfolder within the new folder. You can do this easily by selecting the item and using the shortcut or right-click menu.
Do one of the following to select a file or folder: Select adjacent items by selecting the first item and holding down the Shift key, then selecting the last item in the group. Select non-adjacent items by selecting the first item and holding the Command key while selecting each additional item. Right-click or Control-click to display the menu. Select New Folder (X items). Give the new folder a name and press Return.You will then see your file or folder in the new folder you created.
Method 3: Use Terminal
Maybe you like to use Terminal to manage projects on your Mac. You'll be happy to know that you can move files and folders using Terminal commands.
Use Launchpad as normal or open Terminal from Applications → Utilities. Then, enter the Move command (mv), which includes the current file or folder location and the new location – basically the shortened file or folder path. For example, we will move a file named My-File.rtf from the Desktop folder to the Documents folder using the following command:mv ~/Desktop/My-File.rtf ~/Documents Press Return to run the command , you should see the file in its new location. To move a folder, simply use the location and name of the current folder and the new folder.
Here we will move the folder named New in the Desktop folder to the folder named New2 in the Documents folder using the following command:mv ~/Desktop/New ~/Documents/New2 Press Return to run the command and you should see the first folder moved to the second folder. Method 4: Using Title Bars on Mac
Another way to move items on Mac is to use title bars. This only works for files, but gives you a quick way to select their new location. Let's look at a few examples using different applications.
First, we move the Pages document from its existing location to its new location.
Click the arrow next to the file name in the title bar. Select or enter a new location in the location field. Press Return and your file will be moved to the new location.As another example, we will move a Microsoft Word document.
Click the arrow next to the file name in the title bar. Select or enter a new location in the Location field. Press Return and your file will be moved to the new location.Although the name of the location field may vary from application to application (as shown above), you can easily move the current document using this title bar method.
Move Things Easily
Whether you use one method or a combination of methods, you can move files and folders on your Mac quickly and easily. Create a reasonable file structure, place frequently used folders on the desktop, and find files faster with simple operations. Let us know which method you prefer for moving files or folders!
The above is the detailed content of How to move files and folders on Mac computer? 4 ways to explain!. For more information, please follow other related articles on the PHP Chinese website!

Hot AI Tools

Undress AI Tool
Undress images for free

Undresser.AI Undress
AI-powered app for creating realistic nude photos

AI Clothes Remover
Online AI tool for removing clothes from photos.

Clothoff.io
AI clothes remover

Video Face Swap
Swap faces in any video effortlessly with our completely free AI face swap tool!

Hot Article
Hot Tools

Notepad++7.3.1
Easy-to-use and free code editor

SublimeText3 Chinese version
Chinese version, very easy to use

Zend Studio 13.0.1
Powerful PHP integrated development environment

Dreamweaver CS6
Visual web development tools

SublimeText3 Mac version
God-level code editing software (SublimeText3)


 How to adjust the wordpress article list
Apr 20, 2025 am 10:48 AM
How to adjust the wordpress article list
Apr 20, 2025 am 10:48 AM
There are four ways to adjust the WordPress article list: use theme options, use plugins (such as Post Types Order, WP Post List, Boxy Stuff), use code (add settings in the functions.php file), or modify the WordPress database directly.
 Do I need to use flexbox in the center of the Bootstrap picture?
Apr 07, 2025 am 09:06 AM
Do I need to use flexbox in the center of the Bootstrap picture?
Apr 07, 2025 am 09:06 AM
There are many ways to center Bootstrap pictures, and you don’t have to use Flexbox. If you only need to center horizontally, the text-center class is enough; if you need to center vertically or multiple elements, Flexbox or Grid is more suitable. Flexbox is less compatible and may increase complexity, while Grid is more powerful and has a higher learning cost. When choosing a method, you should weigh the pros and cons and choose the most suitable method according to your needs and preferences.
 How to understand ABI compatibility in C?
Apr 28, 2025 pm 10:12 PM
How to understand ABI compatibility in C?
Apr 28, 2025 pm 10:12 PM
ABI compatibility in C refers to whether binary code generated by different compilers or versions can be compatible without recompilation. 1. Function calling conventions, 2. Name modification, 3. Virtual function table layout, 4. Structure and class layout are the main aspects involved.
 How to elegantly solve the problem of too small spacing of Span tags after a line break?
Apr 05, 2025 pm 06:00 PM
How to elegantly solve the problem of too small spacing of Span tags after a line break?
Apr 05, 2025 pm 06:00 PM
How to elegantly handle the spacing of Span tags after a new line In web page layout, you often encounter the need to arrange multiple spans horizontally...
 How to center images in containers for Bootstrap
Apr 07, 2025 am 09:12 AM
How to center images in containers for Bootstrap
Apr 07, 2025 am 09:12 AM
Overview: There are many ways to center images using Bootstrap. Basic method: Use the mx-auto class to center horizontally. Use the img-fluid class to adapt to the parent container. Use the d-block class to set the image to a block-level element (vertical centering). Advanced method: Flexbox layout: Use the justify-content-center and align-items-center properties. Grid layout: Use the place-items: center property. Best practice: Avoid unnecessary nesting and styles. Choose the best method for the project. Pay attention to the maintainability of the code and avoid sacrificing code quality to pursue the excitement
 How to change the size of a Bootstrap list?
Apr 07, 2025 am 10:45 AM
How to change the size of a Bootstrap list?
Apr 07, 2025 am 10:45 AM
The size of a Bootstrap list depends on the size of the container that contains the list, not the list itself. Using Bootstrap's grid system or Flexbox can control the size of the container, thereby indirectly resizing the list items.
 The latest updates to the oldest virtual currency rankings
Apr 22, 2025 am 07:18 AM
The latest updates to the oldest virtual currency rankings
Apr 22, 2025 am 07:18 AM
The ranking of virtual currencies’ “oldest” is as follows: 1. Bitcoin (BTC), issued on January 3, 2009, is the first decentralized digital currency. 2. Litecoin (LTC), released on October 7, 2011, is known as the "lightweight version of Bitcoin". 3. Ripple (XRP), issued in 2011, is designed for cross-border payments. 4. Dogecoin (DOGE), issued on December 6, 2013, is a "meme coin" based on the Litecoin code. 5. Ethereum (ETH), released on July 30, 2015, is the first platform to support smart contracts. 6. Tether (USDT), issued in 2014, is the first stablecoin to be anchored to the US dollar 1:1. 7. ADA,
 14 common shortcut keys that must be remembered in Win7 system
May 07, 2025 pm 04:39 PM
14 common shortcut keys that must be remembered in Win7 system
May 07, 2025 pm 04:39 PM
When using computers on a daily basis, the application of shortcut keys can significantly improve our productivity, especially when gaming or using specific software. Shortcut keys are not only convenient to operate, but also play an important role in Windows 7 system, helping us complete tasks more efficiently. Ctrl Shift N: Create a new folder. Press Ctrl Shift N in File Explorer to quickly create a new folder. If you use this shortcut key in IE9 browser, the current tab page will be opened in a new window. Ctrl Shift Double-click the left mouse button: Run the program as an administrator In Windows 7, some programs need to be run as an administrator to operate normally. The traditional method is to right-click the program icon and select
