

How to Download Drivers for Universal PnP Monitors: 5 Ways
Apr 21, 2023 pm 08:55 PM
If you recently upgraded to Windows 10 or Windows 11, you may need to download a universal PnP monitor driver on your PC.
So we came up with a tutorial that will tell you more about Universal PnP Monitor and some quick ways to download and install Universal PnP Drivers on Windows.
You may need to download drivers for most monitor brands, including the Acer Generic PnP monitor driver.
When you look for monitor types in Device Manager or under the Monitors tab of the Display Adapter Properties, you may notice Generic PnP Monitor. Chances are you'll find it in dual-monitor setups on both laptops and desktops.
Downloading the correct Generic PnP monitor driver not only helps increase the display resolution but also allows you to change the refresh rate.
So, before we dive into these programs, let’s understand what a universal PnP monitor is and how to download and install the correct monitor driver.
What is a universal PnP monitor?
PnP stands for Plug and Play, which allows you to add or remove external devices without manually configuring or installing appropriate drivers.
So when you connect your device to your PC, the operating system automatically detects the device, eliminating the need to download and install drivers separately. This helps external devices start functioning instantly without any hassle.
Accordingly, when you connect a monitor to a Windows system using a VGA or HDMI cable, the operating system detects the type of monitor, and Generic PnP monitor is one of them.
The job of a universal PnP monitor is to connect an external monitor to your device without any issues, but sometimes it can malfunction and cause errors.
Why do I need to install the Generic PnP monitor driver?
Plug and play system monitors usually do not require a separate monitor driver. However, to add support for higher resolution, refresh rate, or color quality, you may need to download and install the latest drivers.
Therefore, it is best to download and install the appropriate Generic PnP monitor driver for Windows 11 to ensure that your PC monitor always functions properly.
Here are a few ways to download and install universal PnP monitor drivers on Windows 10/11.
How to install a universal PnP monitor driver on a Windows PC?
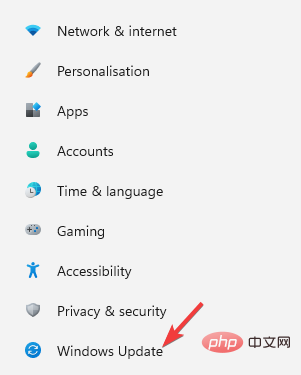
1. Install all available Windows updates
- Simultaneously press the Win I key to launch the Settings application .
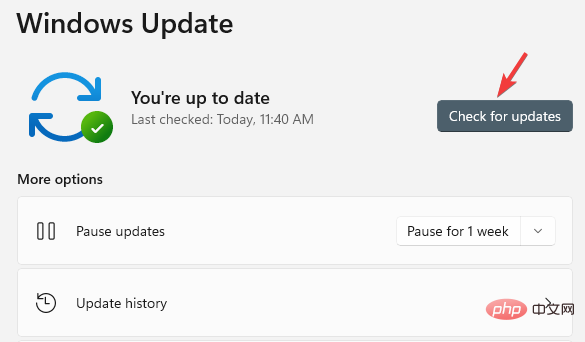
- On the left side of the pane, scroll down and click Windows Update.

- Now, navigate to the right and click on the Check for Updates button.
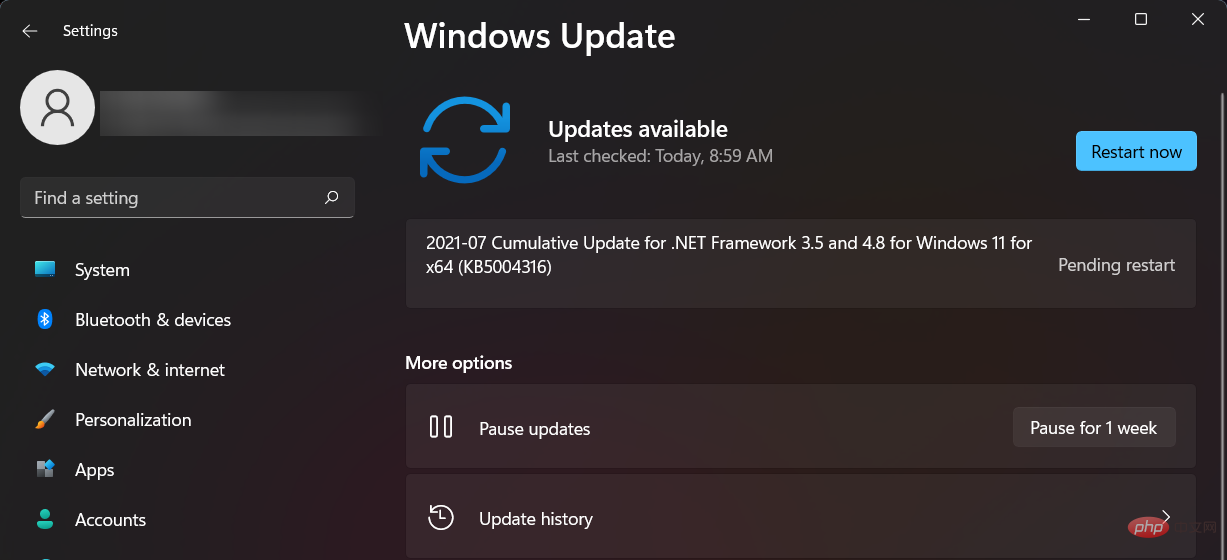
- Windows will now start looking for any available updates.
- If available, it will automatically install them and display a prompt to restart now or later.
- You can choose to restart your PC immediately or after the work is completed.
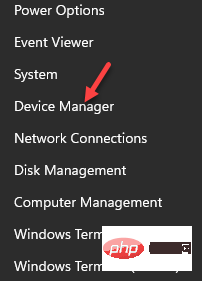
Now, go to Device Manager and check if you downloaded the latest Generic PnP Monitor driver.
2. Update the monitor driver
- Right-click the Start button and select Device Manager.
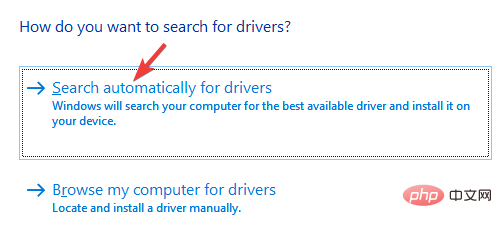
- In the Device Manager window, expand Monitors, right-click the Universal Plug and Play monitor driver, and select Update Driver.
- Click to automatically search for drivers.
- Windows will now begin detecting any latest versions of drivers and, if available, it will automatically install the Universal PnP Monitor driver update.

Restart your PC to complete the driver installation. If you have recently purchased a monitor, in most cases it will come with a driver CD.
So just check the package and it will help you install the latest driver for Generic PnP monitor. Alternatively, you can visit the manufacturer's website and manually download and install the latest drivers.
If you think that manually finding drivers will consume your time and knowledge, we recommend an automated approach.
To ensure that you install the correct Universal PnP latest drivers, driver update software such as DriverFix is ??used to download and install suitable and compatible drivers for your PC.
Additionally, solutions like DriverFix don’t just download and install drivers, they manage them through troubleshooting, backup, and recovery.
3. Update the driver for the display adapter
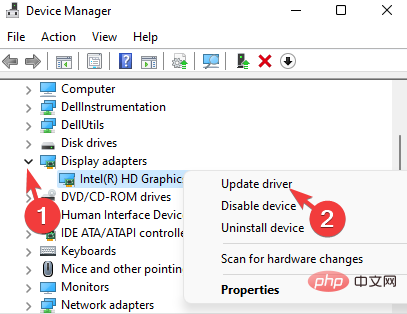
- Right-click the Start button and select Device Manager from the menu.
- Go to the Display Adapters section and click Expand. Right-click on your graphics card and select Update Driver.
- Click to automatically search for drivers.
- Windows will automatically install the driver if available.
Once completed, close Device Manager and restart your PC to check if the monitor is functioning properly.
4. Reinstall the Universal PNP Monitor Driver
- Right-click the Start menu and click Device Manager in the list.
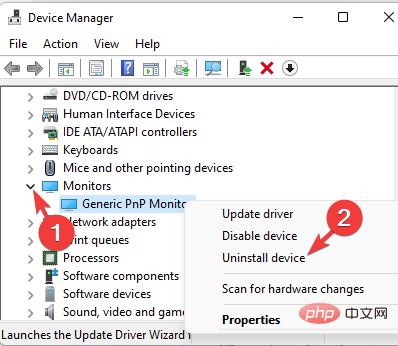
- Here, expand the Monitor section.
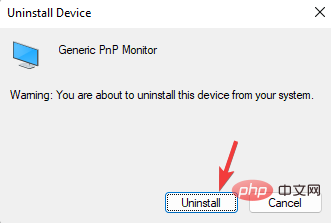
- Next, right-click on the Generic PnP monitor and select Uninstall device.
- Press again to confirm the uninstall.
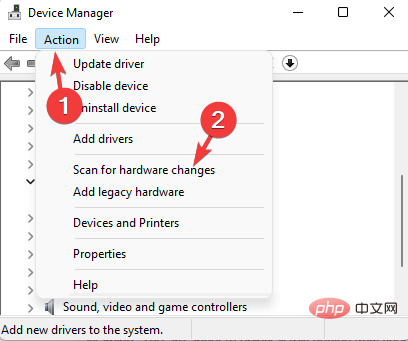
- Now, go to the Actions tab and click on Scan for Hardware Changes.
- Windows will now detect the actual monitor (rather than the generic PnP monitor) and install the driver accordingly.
- Next, turn off the monitor and disconnect it from the PC, then unplug the PC's video cable.
- Wait 2 to 3 minutes, reconnect all cables and monitors, and then restart your PC.
After successfully reinstalling the latest drivers for your Generic PnP monitor, you should now be able to see your real monitor.
Notes You cannot remove the Generic PnP driver because it is integrated with Windows. However, if you face any issues related to your monitor, you can reinstall the driver.Nonetheless, there will be no problem in uninstalling the driver as Windows will install the device on reboot!
5. Install the Universal Non-PnP Monitor Driver
- Right-click Start and select Device Manager.
- Navigate to Monitors and expand that section.
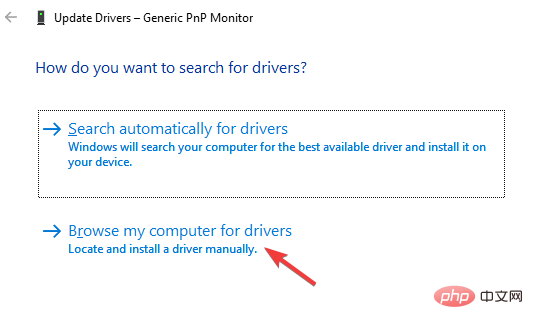
- Right-click the Generic PnP monitoring device and select Update driver.
- Click Browse my computer for drivers.
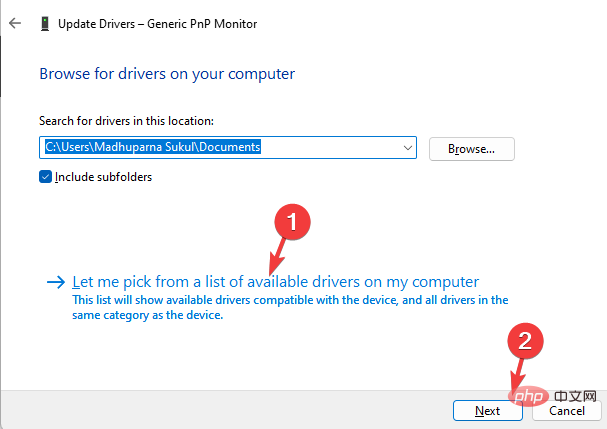
- Next, click Let me choose from a list of drivers available on my computer.
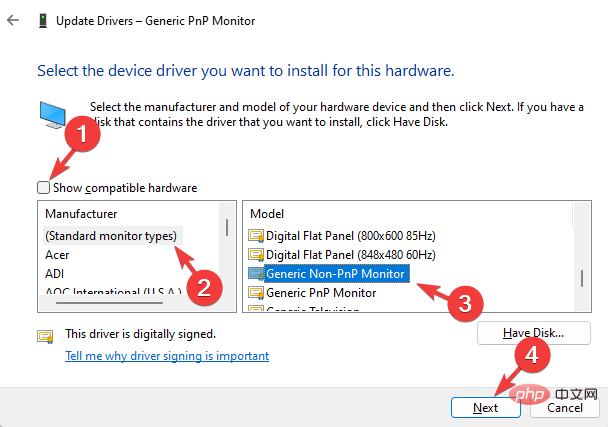
- If you see the Generic Non-PnP monitor driver under Model, select it and press Next.
- After installation, restart your PC and you should now see the Universal Non-Plug and Play Monitor Driver in Device Manager.
- Alternatively, you can uncheck the box next to Show compatible hardware and select the Standard monitor type on the left.
- Now, on the right side, select Generic Non-PnP monitor from the Model list and press Next.
- It takes a few seconds to install the driver.
Once completed, restart your PC and the Generic PnP Monitor Driver on Windows 11 should now download successfully.
What are the frequently asked questions related to the Generic PnP monitor driver?
While you can try the methods above to download the latest version of the Generic PnP monitor driver, you should be aware of common driver-related issues:
You may see:
- Blurry display
- Unable to select native resolution for your PC monitor
- Display resolution limited to 640×480 or 800×600
- Universal PnP Monitor driver, not the actual monitor
In this case, the first thing you must try is to install the correct driver as shown above. Additionally, you can try some of the following basic methods:
? Check Monitor Video Cable
Sometimes, you may see Generic PnP monitors on Windows if the connected video cable is not connected properly .
Cable ports may also have accumulated dirt, so cleaning the ports is recommended.
In this case, please unplug the monitor cable and check if the external monitor is plugged in correctly and the port is clean.
After completing this, connect the monitor cable again and check if you still see the Generic PnP monitor.
? Remove the graphics card and reconnect it
If you have the ability to disassemble the computer, especially a desktop computer, you can try to remove the GPU or graphics card, wait for a while and reconnect it.
After reconnecting the GPU, the graphics card driver will be automatically reinstalled.
Also, if you are using a desktop or a second monitor, shut down your PC, replace the video cable with another video cable that you know will work, and then start your PC.
Now, Windows should detect the monitor and you should be able to set the desired screen resolution and change the refresh rate.
If you are having trouble downloading the Universal PnP monitor driver on Windows 7, you can simply follow the process above to download the correct driver.
The above is the detailed content of How to Download Drivers for Universal PnP Monitors: 5 Ways. For more information, please follow other related articles on the PHP Chinese website!

Hot AI Tools

Undress AI Tool
Undress images for free

Undresser.AI Undress
AI-powered app for creating realistic nude photos

AI Clothes Remover
Online AI tool for removing clothes from photos.

Clothoff.io
AI clothes remover

Video Face Swap
Swap faces in any video effortlessly with our completely free AI face swap tool!

Hot Article
Hot Tools

Notepad++7.3.1
Easy-to-use and free code editor

SublimeText3 Chinese version
Chinese version, very easy to use

Zend Studio 13.0.1
Powerful PHP integrated development environment

Dreamweaver CS6
Visual web development tools

SublimeText3 Mac version
God-level code editing software (SublimeText3)


 Csgo HD blockbusters enter_Csgo HD blockbusters online viewing address
Jun 04, 2025 pm 05:15 PM
Csgo HD blockbusters enter_Csgo HD blockbusters online viewing address
Jun 04, 2025 pm 05:15 PM
Entering CSGO HD blockbuster mode requires four steps: 1. Update the game client to the latest version; 2. Adjust the video settings to the highest parameters; 3. Start the game and enter high-definition mode; 4. Optimize performance and test adjustments. Through these steps, you can improve the gaming experience of CSGO and enjoy a clearer picture and a more immersive gaming environment.
 What to do if the Apple phone cannot be turned on? Solution to the Apple phone cannot be turned on
May 29, 2025 pm 08:24 PM
What to do if the Apple phone cannot be turned on? Solution to the Apple phone cannot be turned on
May 29, 2025 pm 08:24 PM
If the iPhone cannot be turned on, you can solve the following methods: 1. Forced restart: For iPhone 8 and later models, quickly press and release the volume up key, then quickly press and release the volume down key, and finally press and hold the side button until you see the Apple logo. 2. Check the battery level: Connect the phone to the charger for at least 15 minutes, and then try to turn it on. 3. Contact Apple customer service or go to Apple's authorized service center for repairs. 4. Use recovery mode: Connect your computer, use iTunes or Finder, press and hold the side button until the logo connected to iTunes appears, and select "Recover". 5. Check for physical damage: Check for cracks, depressions or other damage to the phone. If so, it is recommended to go to the maintenance center for treatment as soon as possible.
 Memory stick brand ranking
Jun 04, 2025 pm 04:09 PM
Memory stick brand ranking
Jun 04, 2025 pm 04:09 PM
Here are the top 10 well-known memory stick brands on the market: Samsung: Excellent performance and stability Kingston: Durability and reliability Zhiqi: High speed and overclocking capabilities Corsair: High performance, cooling and aesthetics Inruida: High cost performance and reliability Viagra: Wide product line Shadow: Performance and appearance for gamers Avatar: High cost performance Kintech: Innovative design and RGB lighting Bainaohui: Low price and reliable performance
 Top 10 latest rankings for global crypto asset exchanges, rankings of preferred spot trading platforms
May 29, 2025 pm 03:06 PM
Top 10 latest rankings for global crypto asset exchanges, rankings of preferred spot trading platforms
May 29, 2025 pm 03:06 PM
The reliable and safe currency spot trading platforms in 2025 include: 1. Binance, rich trading pairs, low fees, and advanced trading functions; 2. HTX Huobi, multiple trading pairs, low transaction fees, and friendly user interface; 3. OKX, multiple trading pairs, low transaction fees, and multiple trading tools; 4. Coinbase; 5. Kraken...
 Binance's latest Android download web version entrance
Jun 12, 2025 pm 10:27 PM
Binance's latest Android download web version entrance
Jun 12, 2025 pm 10:27 PM
Binance, as the world's leading cryptocurrency trading platform, has attracted the favor of millions of users around the world with its powerful trading functions, rich digital asset types and excellent security performance. To meet the needs of different users, Binance provides a variety of access methods, including Android mobile apps and web versions.
 Solution to the application cannot be installed after iOS system update
May 29, 2025 pm 08:42 PM
Solution to the application cannot be installed after iOS system update
May 29, 2025 pm 08:42 PM
To solve the problem that the app cannot be installed after the iOS system is updated, you can use the following steps: 1. Clean the system cache: Go to "Settings" > "General" > "IPhone Storage", uninstall infrequently used apps and restart the device. 2. Solve through downgrade: Download the previous version of iOS firmware and use iTunes or Finder to downgrade. 3. Contact Apple customer service: provide serial number, seek professional help and backup data.
 Ouyi Exchange App Official Download Ouyi Exchange Official Website Portal
May 29, 2025 pm 06:30 PM
Ouyi Exchange App Official Download Ouyi Exchange Official Website Portal
May 29, 2025 pm 06:30 PM
Official download guide for Ouyi Exchange app: Android users can download it through the Google Play Store, and iOS users can download it through the Apple App Store. Visit the official website www.ouyiex.com to register and log in. Both the application and the official website provide rich transaction and management functions.
 'Memory overflow' error when handling Navicat's database operation
Jun 04, 2025 pm 06:45 PM
'Memory overflow' error when handling Navicat's database operation
Jun 04, 2025 pm 06:45 PM
To handle "memory overflow" errors in Navicat, you can use the following steps: 1. Make sure that the Navicat version is up-to-date; 2. Check and may upgrade system memory; 3. Adjust Navicat settings, such as limiting the size of the query result set and processing data in batches; 4. Optimizing SQL statements and using indexes; 5. Optimizing queries with query analyzer; 6. Exporting data in batches; 7. Monitoring and managing log files. Through these methods, the risk of memory overflow can be effectively reduced and the efficiency and stability of database operations can be improved.