

How do I handle drag events (e.g., dragstart, dragover, drop)?
Jun 19, 2025 pm 09:33 PM
The key to handling drag and drop events is to understand the event flow and correctly set the data delivery and target area response. 1. Drag and drop events include dragstart, drag, dragenter, dragover, drop and dragend. They each trigger and undertake different tasks at different stages. For dragstart, data is set, dragover control allows placement, and drop completes data reception; 2. To make elements draggable, draggable="true" must be set and data is used to pass e.dataTransfer.setData() in dragstart; 3. The common reason why drop does not trigger is that e.preventDefault() is not called in dragover. At the same time, the drag and drop style can be modified through CSS. Restricting drag objects can be achieved by judging element properties in dragstart. Mastering these key points can smoothly realize drag and drop interaction.
Handling drag and drop events (dragstart, dragover, drop) is not complicated, but to make them work together, you need to pay attention to several key points. Let’s start from common scenarios and explain clearly how to use them in steps.
1. Understand the basic drag and drop event process
The browser's drag and drop operations have a fixed event sequence:
-
dragstart: fired when the user starts dragging an element -
drag: Continuously triggered during dragging -
dragenter: Triggered when the dragged element enters the target area -
dragover: Continuously triggered when moving on the target area -
drop: Triggered when the mouse is released and the mouse is finished. -
dragend: drag ends (whether successful or not)
The point is to understand which event should be done. For example, data transmission is mainly completed by dragstart and drop , and dragover is responsible for deciding whether to allow placement.
2. Set draggable elements and data delivery
To make an element draggable, you must first set its draggable="true" property:
<div draggable="true">Drag me to try</div>
Then, set the dragged data in dragstart event:
 element.addEventListener('dragstart', function (e) {
  e.dataTransfer.setData('text/plain', 'This is the data to be passed to the drop');
});
Note: The first parameter of
setData()method is the data type, and generally'text/plain'is enough. For more complex purposes, you can use'text/html'or custom format.
3. Handle dragged into zones (dragover and drop)
Usually we want to drag things into a "container", such as a div or list item. At this time, you need to listen to dragover and drop .
The default behavior must be blocked to trigger drop :
 targetElement.addEventListener('dragover', function (e) {
  e.preventDefault(); // This line must be added, otherwise drop will not trigger});
Then get the data in drop :
 targetElement.addEventListener('drop', function (e) {
  e.preventDefault();
  const data = e.dataTransfer.getData('text/plain');
  console.log('Received data:', data);
});
Tip: You can render the data into DOM elements after drop, or use it to update the state.
4. FAQs and Tips
- Why doesn't drop trigger?
-
e.preventDefault()is not called indragover
-
- How to change the cursor style when dragging?
- Using CSS:
.dragging { opacity: 0.5; }, add class in dragstart and remove in dragend
- Using CSS:
- How to limit only certain elements to be dragged?
- Determine the class or attribute of the event source in
dragstart
- Determine the class or attribute of the event source in
Basically that's it. The drag-and-drop function itself is not difficult, but it is easy to ignore details, such as blocking default behavior, correctly passing data, etc. As long as you follow the process step by step, you can successfully achieve interactive effects.
The above is the detailed content of How do I handle drag events (e.g., dragstart, dragover, drop)?. For more information, please follow other related articles on the PHP Chinese website!

Hot AI Tools

Undress AI Tool
Undress images for free

Undresser.AI Undress
AI-powered app for creating realistic nude photos

AI Clothes Remover
Online AI tool for removing clothes from photos.

Clothoff.io
AI clothes remover

Video Face Swap
Swap faces in any video effortlessly with our completely free AI face swap tool!

Hot Article
Hot Tools

Notepad++7.3.1
Easy-to-use and free code editor

SublimeText3 Chinese version
Chinese version, very easy to use

Zend Studio 13.0.1
Powerful PHP integrated development environment

Dreamweaver CS6
Visual web development tools

SublimeText3 Mac version
God-level code editing software (SublimeText3)


 Python GUI programming: Get started quickly and easily create interactive interfaces
Feb 19, 2024 pm 01:24 PM
Python GUI programming: Get started quickly and easily create interactive interfaces
Feb 19, 2024 pm 01:24 PM
A brief introduction to python GUI programming GUI (Graphical User Interface, graphical user interface) is a way that allows users to interact with computers graphically. GUI programming refers to the use of programming languages ??to create graphical user interfaces. Python is a popular programming language that provides a rich GUI library, making Python GUI programming very simple. Introduction to Python GUI library There are many GUI libraries in Python, the most commonly used of which are: Tkinter: Tkinter is the GUI library that comes with the Python standard library. It is simple and easy to use, but has limited functions. PyQt: PyQt is a cross-platform GUI library with powerful functions.
 How to manage a complete circular queue of events in C++?
Sep 04, 2023 pm 06:41 PM
How to manage a complete circular queue of events in C++?
Sep 04, 2023 pm 06:41 PM
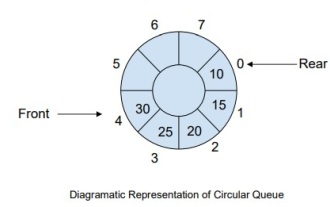
Introduction CircularQueue is an improvement on linear queues, which was introduced to solve the problem of memory waste in linear queues. Circular queues use the FIFO principle to insert and delete elements from it. In this tutorial, we will discuss the operation of a circular queue and how to manage it. What is a circular queue? Circular queue is another type of queue in data structure where the front end and back end are connected to each other. It is also known as circular buffer. It operates similarly to a linear queue, so why do we need to introduce a new queue in the data structure? When using a linear queue, when the queue reaches its maximum limit, there may be some memory space before the tail pointer. This results in memory loss, and a good algorithm should be able to make full use of resources. In order to solve the waste of memory
 Event processing library in PHP8.0: Event
May 14, 2023 pm 05:40 PM
Event processing library in PHP8.0: Event
May 14, 2023 pm 05:40 PM
Event processing library in PHP8.0: Event With the continuous development of the Internet, PHP, as a popular back-end programming language, is widely used in the development of various Web applications. In this process, the event-driven mechanism has become a very important part. The event processing library Event in PHP8.0 will provide us with a more efficient and flexible event processing method. What is event handling? Event handling is a very important concept in the development of web applications. Events can be any kind of user row
 Analysis of v-on directive in Vue: how to handle form submission events
Sep 15, 2023 am 09:12 AM
Analysis of v-on directive in Vue: how to handle form submission events
Sep 15, 2023 am 09:12 AM
Analysis of the v-on directive in Vue: How to handle form submission events In Vue.js, the v-on directive is used to bind event listeners and can capture and process various DOM events. Among them, processing form submission events is one of the common operations in Vue. This article will introduce how to use the v-on directive to handle form submission events and provide specific code examples. First of all, it is necessary to clarify that the form submission event in Vue refers to the event triggered when the user clicks the submit button or presses the Enter key. In Vue, you can pass
 What is the meaning of bubbling events
Feb 19, 2024 am 11:53 AM
What is the meaning of bubbling events
Feb 19, 2024 am 11:53 AM
Bubbling events mean that in web development, when an event is triggered on an element, the event will propagate to upper elements until it reaches the document root element. This propagation method is like a bubble gradually rising from the bottom, so it is called a bubbling event. In actual development, knowing and understanding how bubbling events work is very important to handle events correctly. The following will introduce the concept and usage of bubbling events in detail through specific code examples. First, we create a simple HTML page with a parent element and three children
 Using $listeners to pass event handling functions in Vue
Jun 11, 2023 pm 03:09 PM
Using $listeners to pass event handling functions in Vue
Jun 11, 2023 pm 03:09 PM
In Vue, there are often some nested components, and events need to be passed between these nested components. In Vue, the $emit event is used for event communication between components. However, in some cases, we need to pass the event handler of a parent component to a nested child component. In this case, using the $emit event is not appropriate. At this time, you can use the $listeners provided by Vue to pass the event processing function. So, what are $listeners?
 In-depth study of the key code implementation of PHP and Vue in the brain map function
Aug 27, 2023 pm 12:15 PM
In-depth study of the key code implementation of PHP and Vue in the brain map function
Aug 27, 2023 pm 12:15 PM
In-depth study of the key code implementation of PHP and Vue in the brain map function Summary: This article will delve into the key code implementation of PHP and Vue in the realization of the mind map function. Brain mapping is a graphical tool commonly used to display thinking structures and relationships. It is widely used in fields such as project planning, knowledge management, and information organization. By learning the relevant knowledge of PHP and Vue, we can implement a simple yet powerful brain mapping application. Understand PHPPHP is a commonly used server-side scripting language. It is easy to learn and highly scalable
 Practical applications of event bubbling and applicable event types
Feb 18, 2024 pm 04:19 PM
Practical applications of event bubbling and applicable event types
Feb 18, 2024 pm 04:19 PM
Application scenarios of event bubbling and the types of events it supports. Event bubbling means that when an event on an element is triggered, the event will be passed to the parent element of the element, and then to the ancestor element of the element until it is passed to the root node of the document. It is an important mechanism of the event model and has a wide range of application scenarios. This article will introduce the application scenarios of event bubbling and explore the types of events it supports. 1. Application scenarios Event bubbling has a wide range of application scenarios in web development. Here are several common application scenarios. form validation in form
