

How to use check-ins with home, different locations, and timers
Mar 24, 2024 am 09:31 AM
How to let others know that you have arrived at your destination
Informing others that you have arrived at your destination safely is the most common way of "checking in" and it is easy to operate. Here are the steps to set up before you’re ready to embark on the next leg of your journey.
- Open the message
- Have a conversation with the person you want to send the check-in to
- Click the plus sign ( ) icon next to the message field
- Click Sign in
- Click Edit at the bottom of the prompt
- Enter the destination you want to go to
- Select "Done" in the upper right corner and send "Check in"
When entering your destination, you can choose different modes of travel depending on your needs, whether that's driving, taking public transportation, or walking. Make sure you choose the device you're using correctly so your device can accurately estimate how long it will take to get to your destination. This allows you to better plan your trip and get you to your destination more conveniently.
If you realize that your arrival time may be later than your scheduled "check-in" time, you can add extra time to your plan yourself. You can choose to add an extra 15 minutes, 30 minutes or an hour in case you need it. Once scheduled, you can delete these extra hours at any time to better organize your schedule.
If you enter the recipient's location instead of your home address, it will let them know you have arrived to meet them, rather than when you arrive home. This is useful when you want to notify them of your arrival without sending an ETA in Maps.
 Comparison of ETA in Maps and Check-in in iMessage
Check-ins can only be sent to individuals, not in group chats, and you can only send them to individuals at a time There can be one active. If you want other users to know you've arrived at your location, use an ETA in Google Maps.
How to send a check-in timer
Check-ins are not only necessary to send location-based alerts; they can also be sent after a set time. This is useful when you're in a strange place or meeting new people, and your loved ones want to make sure you're safe.
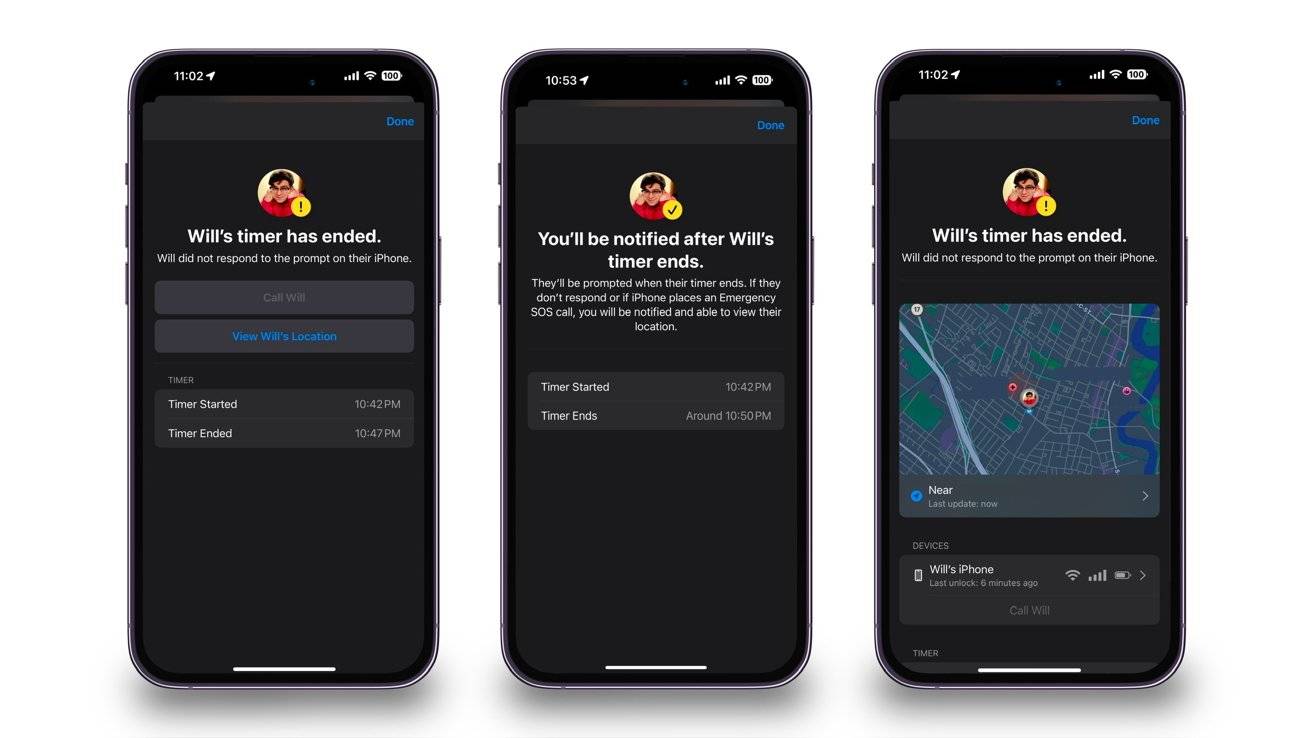
You will receive multiple notifications when the timer is nearing completion. When the time is up, you must manually close the check-in, otherwise the recipient will receive a notification that you have not responded.
 Send check-in when preset timer completes
Here's how to toggle the check-in timer and send it to a friend or family member.
- Open the message
- Have a conversation with the person you want to send the check-in to
- Click the plus sign ( ) icon next to the message field
- Click Sign in
- Click Edit at the bottom of the prompt
- Switch to "After Timer"
- Select the amount of time to pass before the notification is sent
The timer quantity can only be placed in five-minute intervals, which means you cannot place it for 23 minutes. So you can set the timer from 5 minutes to 23 hours and 55 minutes.
You will have 15 minutes to respond to the prompt. After the timer ends, you can end the check-in completely or add another time and be prompted again.
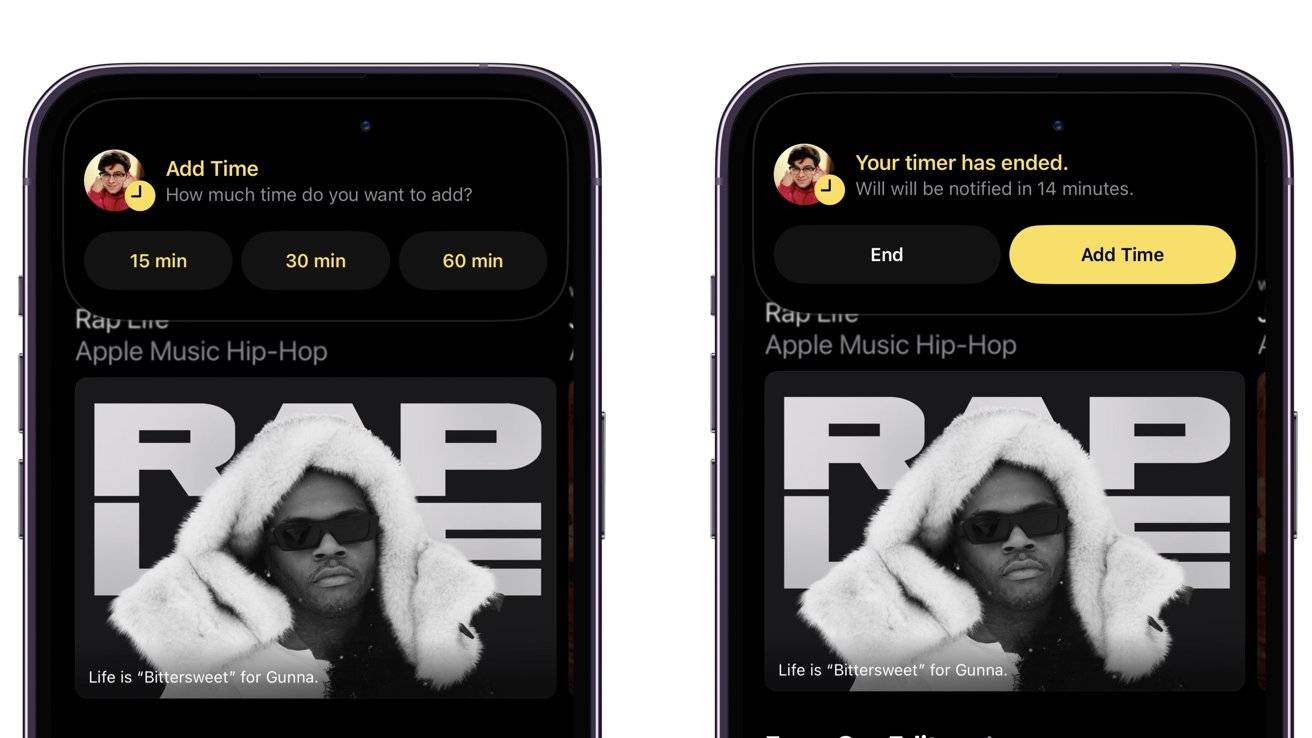 Add time when check-in timer ends
If you do not respond to the prompt within 15 minutes, the recipient will be notified and will have access to the amount of information you originally granted them.
How to change the amount of information granted to recipients
Whether you are going home or to another location, if you do not respond to the check-in timer or do not arrive at your destination on time, the system will send a message to the recipient. Send notification to recipient. This will allow them to access the information you originally granted them.
 Options available when checking in when timer expires without confirmation
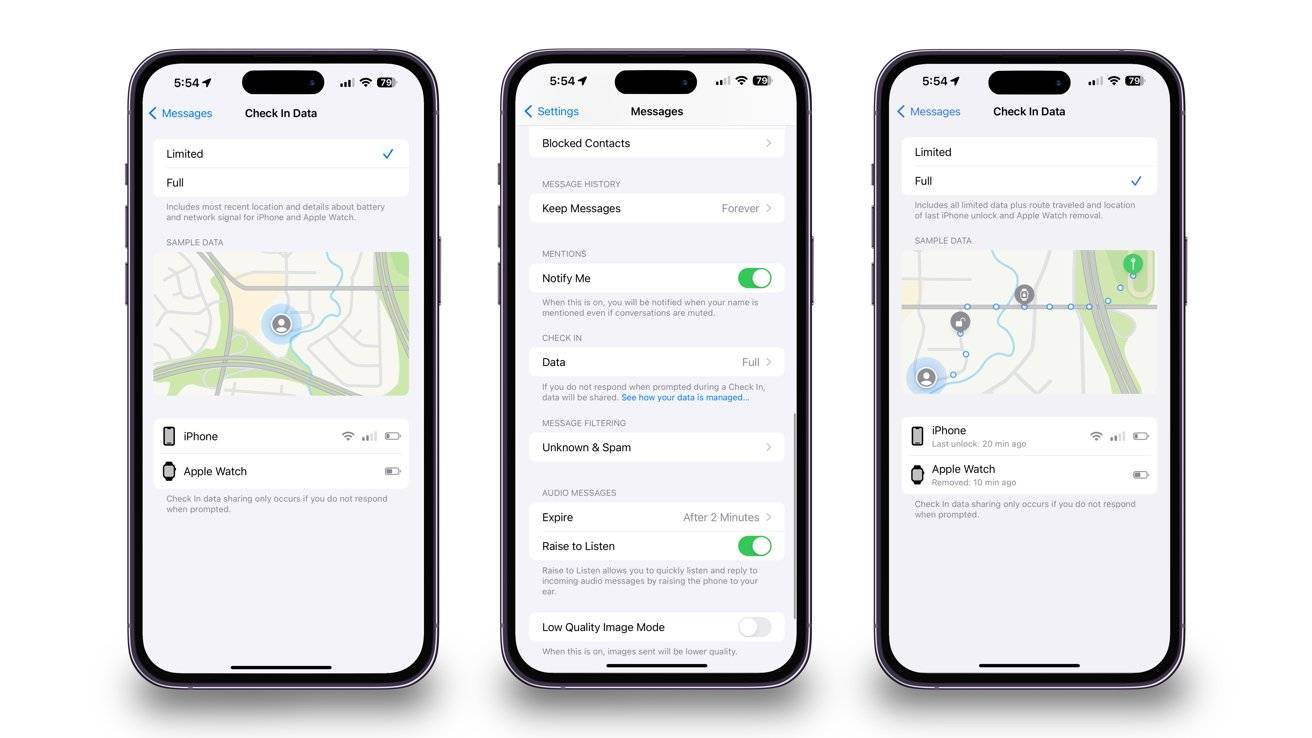
 The information they can access ranges from "Limited" to "Full". Depending on which one you choose will determine how much information the recipient gets.
Limited will let recipients view your recent location, battery and network signal details. These details will apply to your iPhone and Apple Watch.
 Options in Messages settings for how much information to provide to recipients
Full Messages will provide the same information, along with your recent travel routes and the last time you unlocked your iPhone or took off your Apple Watch s position.
Please note that these settings will apply to every check-in you send, no matter who you send it to. However, you can change the amount of information that is accessible.
Here's how to change the amount of information granted when you don't respond to check-in notifications.
- Open settings
- Scroll down to "Messages" and click on it
- Scroll down to the "Data" option under the "Check-in" section
- Choose "Limited" or "Full"
When you send a check-in, the options you selected will be appended. However, you can change it at any time.
When customizing a check-in, you can also be directed to the check-in settings by clicking "Message Settings" under the check-in data.
CHECK EACH OTHER
Checking in is a great way to notify others that you have arrived at your destination or have been delayed by traffic. It also sends important information if you don't respond to check-in notifications.
 Send a check-in notification to the recipient to let them know the send has ended. Check-in
 This is a basic feature that replaces typing a text message or calling someone to check in with them. It does all the necessary work automatically and notifies you and the recipient when you check-in.
You must be on an iPhone running iOS 17 or later to use Check-In. Additionally, both devices must be running at least iOS 17 to send check-ins to each other.
The above is the detailed content of How to use check-ins with home, different locations, and timers. For more information, please follow other related articles on the PHP Chinese website!

Hot AI Tools

Undress AI Tool
Undress images for free

Undresser.AI Undress
AI-powered app for creating realistic nude photos

AI Clothes Remover
Online AI tool for removing clothes from photos.

Clothoff.io
AI clothes remover

Video Face Swap
Swap faces in any video effortlessly with our completely free AI face swap tool!

Hot Article
Hot Tools

Notepad++7.3.1
Easy-to-use and free code editor

SublimeText3 Chinese version
Chinese version, very easy to use

Zend Studio 13.0.1
Powerful PHP integrated development environment

Dreamweaver CS6
Visual web development tools

SublimeText3 Mac version
God-level code editing software (SublimeText3)
Hot Topics


 OEX official website entrance ios directly enter OEX platform official website Apple login portal
Jul 03, 2025 pm 02:06 PM
OEX official website entrance ios directly enter OEX platform official website Apple login portal
Jul 03, 2025 pm 02:06 PM
The OEX platform is a highly-watched digital asset trading platform, providing users with a safe, convenient and efficient trading experience. Here, you can conveniently buy, sell and trade various mainstream digital currencies such as Bitcoin and Ethereum, and enjoy the rich financial derivative services provided by the platform.
 How to create a contact group on iPhone
Jul 13, 2025 am 01:17 AM
How to create a contact group on iPhone
Jul 13, 2025 am 01:17 AM
iPhone does not support creating contact groups directly in the address book application, but similar functions can be achieved through the following methods: 1. Use the "Group" function in the address book application, click "Edit" > "Add Group" to create a custom group; 2. Add each contact to the corresponding group by editing it; 3. If you need to send a group message, you can create a new multi-person conversation in the information application; 4. Use iCloud or Gmail to synchronize tagged groups to facilitate the management of a large number of contacts on the computer. These methods are used in conjunction with efficient management of contact groups.
 How to download the iOS version of Ethereum App? Instructions for use of Ethereum official website app
Jul 04, 2025 am 11:48 AM
How to download the iOS version of Ethereum App? Instructions for use of Ethereum official website app
Jul 04, 2025 am 11:48 AM
The official Ethereum app does not exist, iOS users can manage ETH through cryptocurrency wallets or exchange apps. Recommended mainstream apps include: 1. Binance, powerful and integrated Web3 wallet, suitable for trading and DeFi; 2. OkX, with smooth experience and Web3 integration, supporting DeFi and NFT; 3. MetaMask, as the core non-custodial wallet, is a necessary tool for connecting DeFi and NFT platforms; 4. Huobi (HTX), provides rich trading pairs and financial derivatives, suitable for old users; 5. Trust Wallet, simple interface, suitable for new non-custodial wallets; 6. Gate.io, suitable for exploring emerging currencies
 Sending different types of notifications with Laravel
Jul 06, 2025 am 12:52 AM
Sending different types of notifications with Laravel
Jul 06, 2025 am 12:52 AM
Laravelprovidesacleanandflexiblewaytosendnotificationsviamultiplechannelslikeemail,SMS,in-appalerts,andpushnotifications.Youdefinenotificationchannelsinthevia()methodofanotificationclass,andimplementspecificmethodsliketoMail(),toDatabase(),ortoVonage
 How to check if an iPhone is unlocked
Jul 15, 2025 am 01:17 AM
How to check if an iPhone is unlocked
Jul 15, 2025 am 01:17 AM
TocheckifaniPhoneisunlocked,1)gotoSettings>Cellular>CellularDataOptionsandlookforlabelslike“Unlocked”or“NoSIMrestrictions,”2)insertadifferentcarrier’sactiveSIMcardandseeifthephoneacceptsit,3)usetheIMEInumberononlinetoolslikeIMEI.infotocheckunlo
 How to check iPhone trade-in value
Jul 13, 2025 am 01:13 AM
How to check iPhone trade-in value
Jul 13, 2025 am 01:13 AM
Determining the depreciation value of iPhone requires multiple factors and comparing different platforms. 2. The first choice is Apple's official replacement plan, which has a simple and transparent process, but the final valuation must be based on the actual condition of the equipment. 3. Third-party websites such as Gazelle, Swappa, etc. may provide higher quotations, but you need to pay attention to describing the real situation and avoiding the charging trap. 4. The core factors affecting value include model and storage capacity, equipment status, operator lock status, etc. Small problems may also affect the quotation. 5. If you pursue higher returns, you can choose to sell privately, but you need to weigh the time cost and transaction risks.
 How to create a Personal Voice on iPhone
Jul 11, 2025 am 02:19 AM
How to create a Personal Voice on iPhone
Jul 11, 2025 am 02:19 AM
To create PersonalVoice in iOS17, you first need to enable the feature in the settings and record a sound model for about five minutes. The specific steps are as follows: 1. Open "Settings" > "Assistance Functions" > "Narration", click "PersonalVoice" and select "Create PersonalVoice"; 2. Read the text provided by the system in a quiet environment to keep the speech speed stable; 3. After creation, you can use your personalized voice to read messages, notifications, etc. in "Narration", or switch back to the default voice; 4. Currently, only English and some languages ??are supported, and Chinese is not supported at the moment; 5. Pay attention to environmental noise, intonation consistency and storage space when recording, and re-record unsatisfactory content. Voice mode
 How to transfer contacts from one iPhone to another
Jul 12, 2025 am 02:36 AM
How to transfer contacts from one iPhone to another
Jul 12, 2025 am 02:36 AM
Migrating contacts can be accomplished in three ways when replacing a new iPhone: First, using iCloud synchronization is the most worry-free, ensuring that the old phone has turned on the iCloud address book backup, and the new phone logs into the same account and enables synchronization; Second, using AirDrop is suitable for a small number of contacts to transmit. After setting up AirDrop visibility on both phones, sending and receiving them through the share button; Third, with the help of computer relay, both Mac or Windows, synchronizing contacts through Finder or iTunes and replacing or merging data. Select the method that suits you and pay attention to your account and permission settings to easily complete the migration.
