

Why macros still cannot be enabled after wps installs vba
Mar 21, 2024 am 08:30 AM
php editor Xinyi has an answer for you: After installing WPS, many users try to use VBA macros but find that they cannot be enabled. This may be caused by WPS not enabling macro functions by default. The method of enabling macro functions in WPS is not complicated. You only need to follow certain steps to set up to solve this problem. Next, we will introduce in detail the reasons and solutions for why WPS still cannot enable macros after installing VBA, so that you can easily solve this problem.
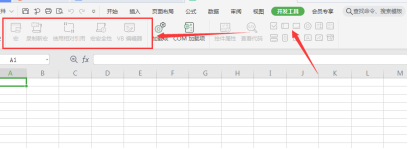
In the past few days, friends have always asked me why I still can't enable macros after installing VBA. The "macro" function is still gray and cannot be opened, as shown below. What's going on? The editor will find out the reasons for you.
This situation occurs mainly for three reasons:
1. Does your wps support vba? Some versions do not support it.
2. Confirm that you have enabled macros and whether the operation is correct.
3. WPS currently requires membership to use macros.
We won’t go into too much detail about the second reason. The possibility is still relatively small. Generally, as long as the "macro" function is basically started after installing the VBA compressed package, it can be used.
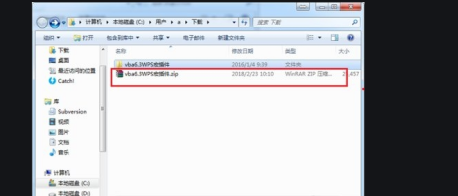
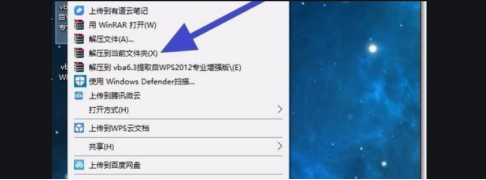
Below we mainly talk about the downloaded version of VBA. Since some versions are not supported, we must find out whether this version is supported during installation. Also, sometimes you download This may be just a simple template without any VBA code, so even if you enable macros, it will be useless, as shown below:
The above is the detailed content of Why macros still cannot be enabled after wps installs vba. For more information, please follow other related articles on the PHP Chinese website!

Hot AI Tools

Undress AI Tool
Undress images for free

Undresser.AI Undress
AI-powered app for creating realistic nude photos

AI Clothes Remover
Online AI tool for removing clothes from photos.

Clothoff.io
AI clothes remover

Video Face Swap
Swap faces in any video effortlessly with our completely free AI face swap tool!

Hot Article
Hot Tools

Notepad++7.3.1
Easy-to-use and free code editor

SublimeText3 Chinese version
Chinese version, very easy to use

Zend Studio 13.0.1
Powerful PHP integrated development environment

Dreamweaver CS6
Visual web development tools

SublimeText3 Mac version
God-level code editing software (SublimeText3)
Hot Topics


 Solutions to the errors reported by MySQL on a specific system version
Apr 08, 2025 am 11:54 AM
Solutions to the errors reported by MySQL on a specific system version
Apr 08, 2025 am 11:54 AM
The solution to MySQL installation error is: 1. Carefully check the system environment to ensure that the MySQL dependency library requirements are met. Different operating systems and version requirements are different; 2. Carefully read the error message and take corresponding measures according to prompts (such as missing library files or insufficient permissions), such as installing dependencies or using sudo commands; 3. If necessary, try to install the source code and carefully check the compilation log, but this requires a certain amount of Linux knowledge and experience. The key to ultimately solving the problem is to carefully check the system environment and error information, and refer to the official documents.
 What to do if nginx restart fails
Apr 14, 2025 am 11:27 AM
What to do if nginx restart fails
Apr 14, 2025 am 11:27 AM
Reasons and solutions for the failure of nginx restart: Configuration file error: Check nginx configuration file to ensure that the syntax is correct and the instructions are valid. Open port conflict: Check whether the port is occupied, close the occupied process or change the nginx port configuration. Process is running: manually terminate or stop nginx process using service command. Missing dependencies: Install or update required nginx dependencies such as openssl, zlib, pcre. File permissions issue: Grant nginx users to read and write permissions to files and directories. Memory leak or high load: monitor memory and CPU usage of nginx processes, upgrade nginx version or reconfigure worker processes. External factors: Check for prevention
 How to check Debian OpenSSL configuration
Apr 12, 2025 pm 11:57 PM
How to check Debian OpenSSL configuration
Apr 12, 2025 pm 11:57 PM
This article introduces several methods to check the OpenSSL configuration of the Debian system to help you quickly grasp the security status of the system. 1. Confirm the OpenSSL version First, verify whether OpenSSL has been installed and version information. Enter the following command in the terminal: If opensslversion is not installed, the system will prompt an error. 2. View the configuration file. The main configuration file of OpenSSL is usually located in /etc/ssl/openssl.cnf. You can use a text editor (such as nano) to view: sudonano/etc/ssl/openssl.cnf This file contains important configuration information such as key, certificate path, and encryption algorithm. 3. Utilize OPE
 Huobi Digital Currency Trading App Download Official Website. Correct Address. Domestic
Apr 30, 2025 pm 07:21 PM
Huobi Digital Currency Trading App Download Official Website. Correct Address. Domestic
Apr 30, 2025 pm 07:21 PM
Huobi Digital Currency Trading App is one of the world's leading digital asset trading platforms and is favored by the majority of users. In order to facilitate users to quickly and safely download and install Huobi app, this article will provide you with detailed download and installation tutorials. Please note that this article provides a download link to Huobi official app. Use the download link to this article to download safely to avoid mistakenly entering a copycat website or downloading to unofficial versions. Next, let us download and install Huobi app step by step.
 How to update phpstorm in centos
Apr 14, 2025 pm 03:33 PM
How to update phpstorm in centos
Apr 14, 2025 pm 03:33 PM
Updating PhpStorm on CentOS system, follow these steps: Prepare to back up existing configurations: Before updating, be sure to back up PhpStorm's configuration files and plug-ins to prevent data loss due to failure. Download the latest version: Download the latest version of PhpStorm for Linux system from the official website of JetBrains. Update step Unzip the installation package: Unzip the downloaded installation package to the specified directory (for example, /opt/). Command example: tar-zxvfPhpStorm-2024.1.tar.gz-C/opt/(Please replace PhpStorm-2024.1.tar.gz
 How to create a project in git
Apr 17, 2025 pm 04:18 PM
How to create a project in git
Apr 17, 2025 pm 04:18 PM
Creating a project using Git requires the following steps: 1. Install the official website of Git to download the corresponding version of Git and install it; 2. Initialize the project to create a repository using git init; 3. Add files to add files to the temporary storage area with git add; 4. Submit changes to commit and add instructions; 5. Push changes to push them with git push; 6. Pull changes to use git pull to get the latest changes from the remote repository using git pull.
 Things to note when upgrading weblogic on centos
Apr 14, 2025 pm 05:51 PM
Things to note when upgrading weblogic on centos
Apr 14, 2025 pm 05:51 PM
The key points of WebLogic update and upgrade under CentOS system are explained in detail. Perform WebLogic updates or upgrade operations on CentOS system. Be sure to pay attention to the following key things to ensure the smooth upgrade process and the system runs stably: System compatibility verification: Before upgrading, please carefully verify whether the target WebLogic version is compatible with your CentOS system version. For example, the CentOS7.9 system needs to match the corresponding WebLogic installation package. Dependency checking: Make sure that all WebLogic dependencies (including Java runtime environment, necessary library files, etc.) are correctly installed and version compatible. Configuration file adjustment: During the upgrade process, WebLogic
 How to upgrade Hongmeng system with p40 and p40Pro
May 16, 2025 pm 07:09 PM
How to upgrade Hongmeng system with p40 and p40Pro
May 16, 2025 pm 07:09 PM
Recently, the first list of Hongmeng system upgrades has been announced, and p40 and p40Pro are also among them. However, many users reported that they could not upgrade smoothly. Next, let’s discuss how to upgrade p40 and p40Pro to the Hongmeng system. How to upgrade p40 and p40Pro to the Hongmeng system and install the APP First, make sure that the "My Huawei" and "Pollen Club" APP have been updated to the latest version. You can search and download these two apps in the app market. If it has been uninstalled before, it needs to be reinstalled. Before upgrading the public beta version, it is recommended to back up all important data on your phone or tablet and confirm that the backup is complete and valid to prevent data loss after the upgrade or other unexpected situations. Open the activity portal to take "My Huawei" APP as an example
