
 Computer Tutorials
Computer Knowledge
Secure boot can be enabled when the system is in user mode
Computer Tutorials
Computer Knowledge
Secure boot can be enabled when the system is in user mode
Secure boot can be enabled when the system is in user mode
Mar 10, 2024 am 09:34 AM
Secure Boot is a security standard developed by members of the PC industry to ensure that devices can only boot and run software trusted by the original equipment manufacturer (OEM). In Windows 11, secure boot is a basic requirement. When you enable Secure Boot, if you encounter the error SYSTEM in setup mode, this may indicate that the system is currently in user mode. In this case, the solutions provided in this article will help you.
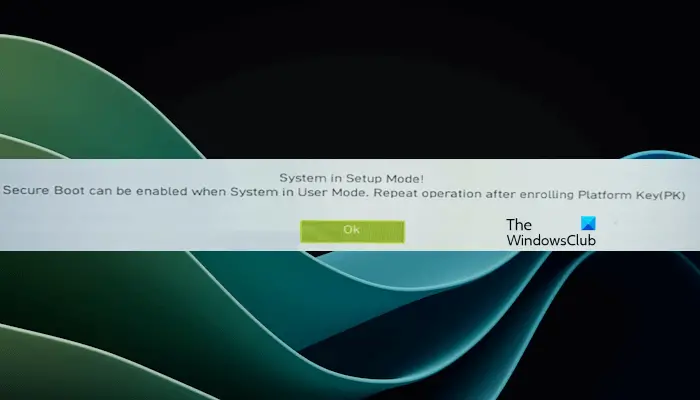
Secure Boot can be enabled when the system is in user mode
After enabling Secure Boot on your device, you may receive the error "Secure Boot can be enabled when the system is in user mode." To install Windows 11, Secure Boot must be enabled on the system. Nonetheless, other methods exist to install Windows 11 without Secure Boot.
Some games may require the Secure Boot option to be enabled to run properly. If you successfully installed Windows 11 by bypassing the Secure Boot option, these games may not play properly. Therefore, it is important to fix this problem. Here are a few suggestions to help you resolve this error.
Let's look at all the fixes in detail.
1]Check your hard drive partition style
The first step is to check the partition type of the hard disk. To do this, follow these steps:
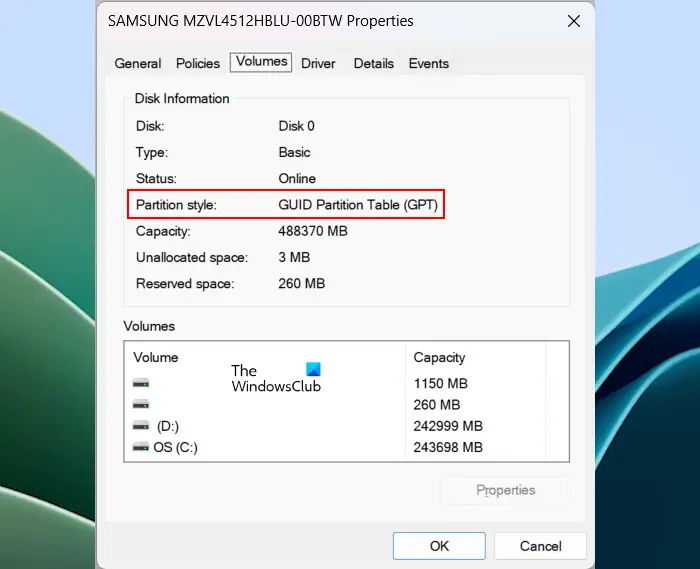
If your hard drive adopts MBR partition type, please consider converting it to GPT. Normally, converting MBR to GPT will result in data loss, but there are some special tools and methods that can help you complete this conversion without losing data. Therefore, before performing this operation, be sure to back up important data in case something unexpected happens. Doing so ensures that your data is fully protected and no important information is lost during the conversion of partition type.
Now, try to enable secure boot. If Secure Boot cannot be enabled, try other fixes.
2]Close CSM
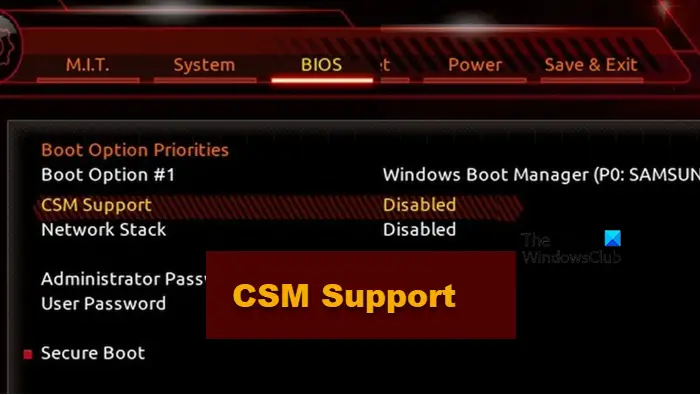
Modern computer systems come with UEFI support. In such computer systems, CSM support is not required. So, if CSM is enabled on your system, you can disable it. Different brands of motherboards may have different methods of disabling CSM in the BIOS. You need to visit your computer motherboard manufacturer's official website to learn the exact method of disabling CSM in the BIOS.
3]Change system mode to user
The error message states that Secure Boot can be enabled when the system is in user mode. Therefore, if your system is in setup mode, Secure Boot cannot be enabled. Change setup mode to user mode and you will be able to enable secure boot.
Different brands of motherboards may switch between system mode and user mode differently. Please refer to the motherboard's user manual or refer to its official website for specific operation methods.
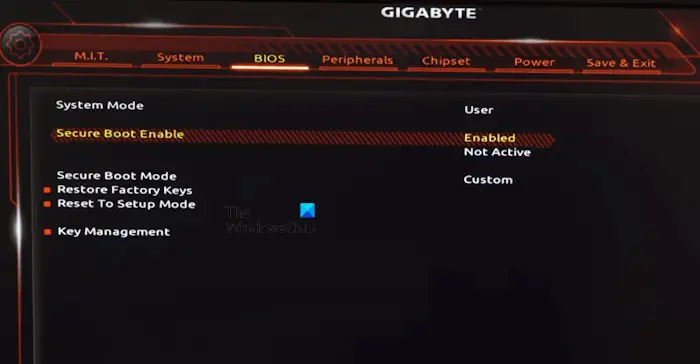
For example, in MSI and GB motherboards, you must install the default factory key. Here are the steps to do this:
You may receive a pop-up message about resetting your system. Click No. You should now be able to enable secure boot. After enabling Secure Boot, change the Secure Boot mode back to Standard. Save BIOS settings and exit.
4]Generate platform key (for ASUS Phantom gaming motherboard users)
This solution is for ASUS Phantom gaming motherboard users. If your system has this motherboard and you are unable to install the default Secure Boot key, you can generate a platform key.
To do this, enter your computer's BIOS and go to the Security tab. There, you will see an option called Key Management. Select it and then choose Build Options or something similar to Build Options.
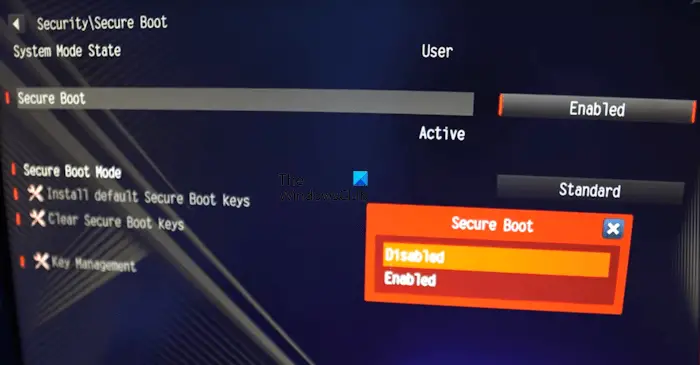
Now, go back to the Secure Boot page in BIOS and switch the Secure Boot mode from Standard to Custom. This will enable the option to install the default Secure Boot key. Click on the Install Default Secure Boot Keys option. Once this is done, enable secure boot.
After enabling Secure Boot, change the Secure Boot mode back to Standard. Save changes and exit.
5]Restore BIOS settings to default settings
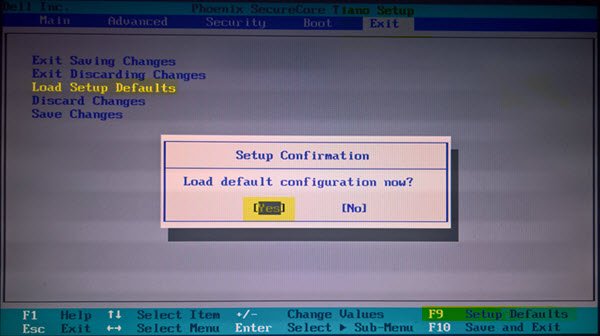
If none of the above fixes solve your problem, you can restore all BIOS settings to their default settings. After doing this, you should be able to enable secure boot. Before resetting your BIOS settings to default, we recommend that you write down all the changes you have made in the BIOS so that you can make all these changes again after enabling Secure Boot.
I hope this helps.
How to enable secure boot in system configuration?
There is no option to enable secure boot in the system configuration or message configuration. Therefore, it is necessary to enter your BIOS settings to enable Secure Boot on your device. Visit your computer manufacturer's official website to learn the private key to enter the BIOS.
Why can't I enable Secure Boot?
There may be many reasons why Secure Boot cannot be enabled or the Secure Boot option is grayed out on your system. You may have changed the settings to disable the secure boot option. The easiest way to fix this problem is to reset the BIOS to factory default settings.
Read next: Windows computer won’t boot after enabling Secure Boot.
The above is the detailed content of Secure boot can be enabled when the system is in user mode. For more information, please follow other related articles on the PHP Chinese website!

Hot AI Tools

Undress AI Tool
Undress images for free

Undresser.AI Undress
AI-powered app for creating realistic nude photos

AI Clothes Remover
Online AI tool for removing clothes from photos.

Clothoff.io
AI clothes remover

Video Face Swap
Swap faces in any video effortlessly with our completely free AI face swap tool!

Hot Article
Hot Tools

Notepad++7.3.1
Easy-to-use and free code editor

SublimeText3 Chinese version
Chinese version, very easy to use

Zend Studio 13.0.1
Powerful PHP integrated development environment

Dreamweaver CS6
Visual web development tools

SublimeText3 Mac version
God-level code editing software (SublimeText3)


 How to uninstall MySQL and clean residual files
Apr 29, 2025 pm 04:03 PM
How to uninstall MySQL and clean residual files
Apr 29, 2025 pm 04:03 PM
To safely and thoroughly uninstall MySQL and clean all residual files, follow the following steps: 1. Stop MySQL service; 2. Uninstall MySQL packages; 3. Clean configuration files and data directories; 4. Verify that the uninstallation is thorough.
 How to build a website for wordpress host
Apr 20, 2025 am 11:12 AM
How to build a website for wordpress host
Apr 20, 2025 am 11:12 AM
To build a website using WordPress hosting, you need to: select a reliable hosting provider. Buy a domain name. Set up a WordPress hosting account. Select a topic. Add pages and articles. Install the plug-in. Customize your website. Publish your website.
 Detailed explanation of the installation steps of MySQL on macOS system
Apr 29, 2025 pm 03:36 PM
Detailed explanation of the installation steps of MySQL on macOS system
Apr 29, 2025 pm 03:36 PM
Installing MySQL on macOS can be achieved through the following steps: 1. Install Homebrew, using the command /bin/bash-c"$(curl-fsSLhttps://raw.githubusercontent.com/Homebrew/install/HEAD/install.sh)". 2. Update Homebrew and use brewupdate. 3. Install MySQL and use brewinstallmysql. 4. Start MySQL service and use brewservicesstartmysql. After installation, you can use mysql-u
 Steps to add and delete fields to MySQL tables
Apr 29, 2025 pm 04:15 PM
Steps to add and delete fields to MySQL tables
Apr 29, 2025 pm 04:15 PM
In MySQL, add fields using ALTERTABLEtable_nameADDCOLUMNnew_columnVARCHAR(255)AFTERexisting_column, delete fields using ALTERTABLEtable_nameDROPCOLUMNcolumn_to_drop. When adding fields, you need to specify a location to optimize query performance and data structure; before deleting fields, you need to confirm that the operation is irreversible; modifying table structure using online DDL, backup data, test environment, and low-load time periods is performance optimization and best practice.
 How to return the previous version of win11 win11 system rollback operation guide
May 07, 2025 pm 04:21 PM
How to return the previous version of win11 win11 system rollback operation guide
May 07, 2025 pm 04:21 PM
Starting the rollback function on Windows 11 must be performed within 10 days after the upgrade. The steps are as follows: 1. Open "Settings", 2. Enter "System", 3. Find the "Recover" option, 4. Start rollback, 5. Confirm the rollback. After rollback, you need to pay attention to data backup, software compatibility and driver updates.
 How to expand the capacity of the c disk if it is too small? 5 solutions for small capacity c disk expansion
May 22, 2025 pm 09:15 PM
How to expand the capacity of the c disk if it is too small? 5 solutions for small capacity c disk expansion
May 22, 2025 pm 09:15 PM
C drive can expand capacity in five ways: 1. Use Windows disk management tools to expand the volume, but there must be unallocated space; 2. Use third-party software such as EaseUS or AOMEI to adjust the partition size; 3. Use Diskpart command line tools to expand the C drive, suitable for users who are familiar with the command line; 4. Repartition and format the hard disk, but it will cause data loss and data needs to be backed up; 5. Use external storage devices as C drive expansion, transfer folders through symbolic links or modification of the registry.
 How to configure the character set and collation rules of MySQL
Apr 29, 2025 pm 04:06 PM
How to configure the character set and collation rules of MySQL
Apr 29, 2025 pm 04:06 PM
Methods for configuring character sets and collations in MySQL include: 1. Setting the character sets and collations at the server level: SETNAMES'utf8'; SETCHARACTERSETutf8; SETCOLLATION_CONNECTION='utf8_general_ci'; 2. Create a database that uses specific character sets and collations: CREATEDATABASEexample_dbCHARACTERSETutf8COLLATEutf8_general_ci; 3. Specify character sets and collations when creating a table: CREATETABLEexample_table(idINT
 How to create a SQLite database in Python?
May 23, 2025 pm 10:36 PM
How to create a SQLite database in Python?
May 23, 2025 pm 10:36 PM
Create a SQLite database in Python using the sqlite3 module. The steps are as follows: 1. Connect to the database, 2. Create a cursor object, 3. Create a table, 4. Submit a transaction, 5. Close the connection. This is not only simple and easy to do, but also includes optimizations and considerations such as using indexes and batch operations to improve performance.
