

Using WordPress' Drag and Drop Form Builder
Sep 04, 2023 am 09:01 AM
Forms have always been an integral part of the Internet. As a WordPress website owner, you have no choice but to use them if you want your users to communicate with you. However, creating modern forms that follow best practices and match the look and feel of your website can be a daunting task, especially if you're not good at coding.
Fortunately, there are now several powerful WordPress form builders available on CodeCanyon that offer an intuitive WYSIWYG interface and drag-and-drop support. FormCraft, developed by CodeCanyon Elite Author nCrafts, is one such form builder.
FormCraft is a premium GDPR compliant WordPress plugin that allows you to create beautiful forms for your website in minutes. It has a ton of advanced features built-in, including support for AJAX requests, triggers, pop-up messages and even conditional logic. Through add-ons, it offers additional functionality such as integration with MailChimp and reCAPTCHA.
In this tutorial, I will show you how to install the plugin and use some of its most important features.
1. Install FormCraft
Log in to your Envato account and head to CodeCanyon so you can purchase a license to use FormCraft. With over 16,000 units sold, it is one of the most popular items out there.

After a successful purchase, you will have access to a ZIP file that can be used to install the plugin.
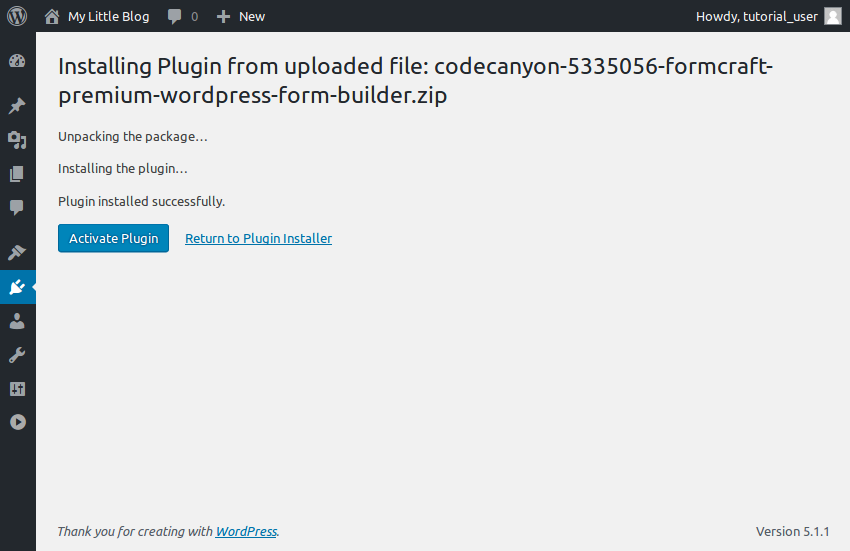
Log in to the admin panel of your WordPress instance and navigate to Plugins > Add New Plugin. Then press the Upload plugin button. On the next screen, first press the Browse... button to select the ZIP file and then press the Install Now button to start the installation.
Please note that the size of the plugin is 2.3MB. If your WordPress instance complains that the size of the plugin exceeds the maximum size allowed for uploaded files, you must increase the value of the php.ini中的 upload_max_filesize variable > files.
After installing the plugin, press the Activate plugin button to start using it.
2.Create a form using a template
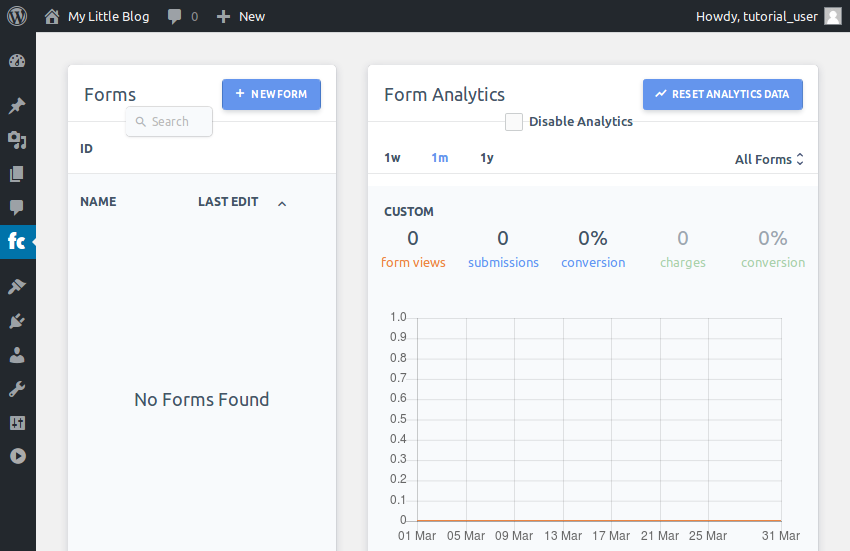
Your WordPress admin panel should now have a new section called FormCraft. Open it and press the New Form button so you can start creating your first form.
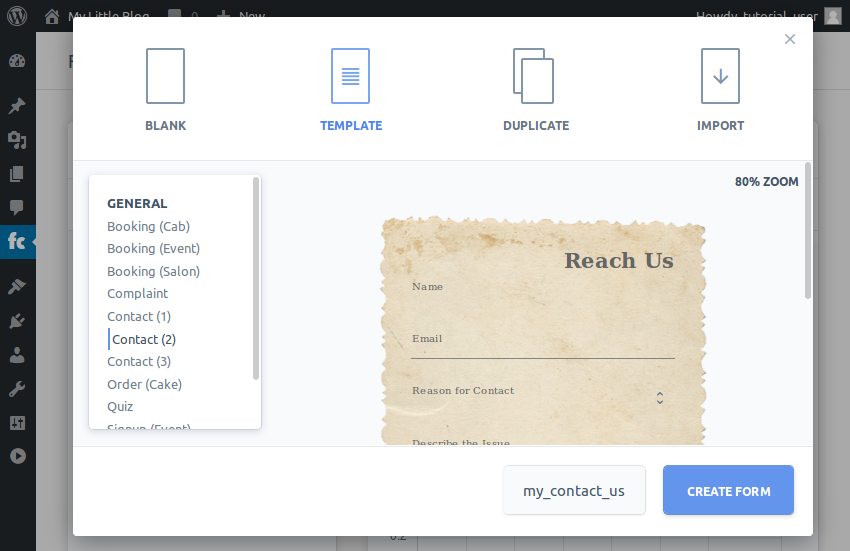
In the pop-up dialog box, select the Template option. Since FormCraft comes with nearly a dozen carefully designed templates for common form types, using templates is the easiest and fastest way to create forms.
Now, let’s create a contact form. So, select any Contact template, give the form a name and press the Create Form button. I will use the Contact (2) template.
Once the form is ready, you will automatically be redirected to the interface where you can edit the form.
Editing a form with FormCraft is very easy. Typically, all you have to do is click on the form field you want to change and update its properties. For example, if you want to change the label of the Name field, click it and then update the value of the Label property in the pop-up dialog box.

To close the dialog box, click anywhere outside the dialog box.
Finally, when you are happy with all the changes, you can press the Save button to make them permanent.
3.Display form
You can use two different methods to display a form created with FormCraft. The first method involves using a dedicated form page that has its own unique URL and displays no content other than the form. This method requires minimal effort and also allows you to easily share the form.
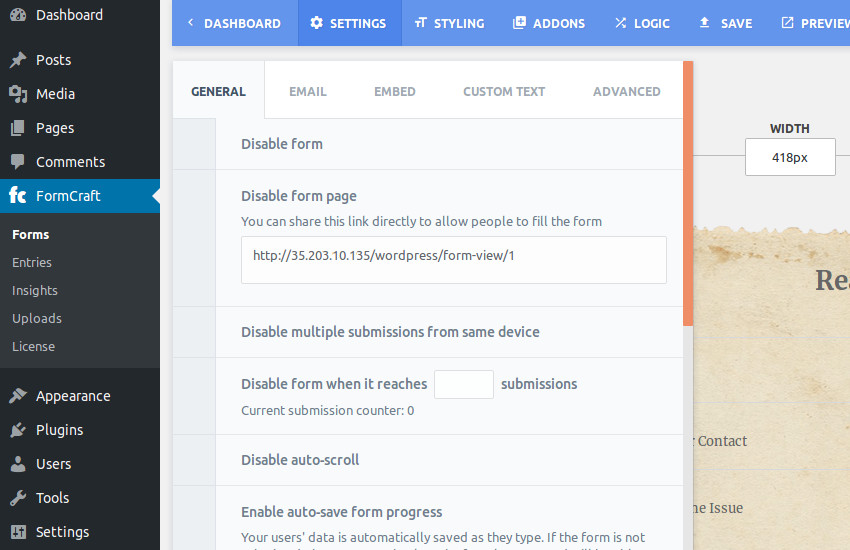
By default, FormCraft will automatically create a dedicated form page for each form. To determine the URL of the form you created in the previous step, click the Settings button and switch to the General tab.
The second method is to embed the form into a post or page. This method is more flexible because it allows you to display additional text or images along with the form.
To embed a FormCraft form, you need its shortcode. To find out what it is, go to Settings > Embed > Shortcodes.
 Every form you create with FormCraft will have its own unique and easy-to-remember shortcode.
At this point, you can create a new post and enter the shortcode to embed the form. Here is a sample post containing a FormCraft form:

Processing form submission After the user fills out your form, he or she will of course submit it. You can receive completed forms in two different ways. The first method is to receive emails from the WordPress server. It requires no programming and is great for handling low-volume form submissions.
To receive form submissions as email, go to
Settings > Email > Email Settings. FormCraft can send emails using the default WordPress mail settings or using a custom SMTP configuration. Usually, the default settings are sufficient. So, switch to the
WP Mailtab and fill in the Sender Name and Sender Email fields according to your preference. As you may have guessed, the email address you provide here will be the email address where you receive all form submissions.
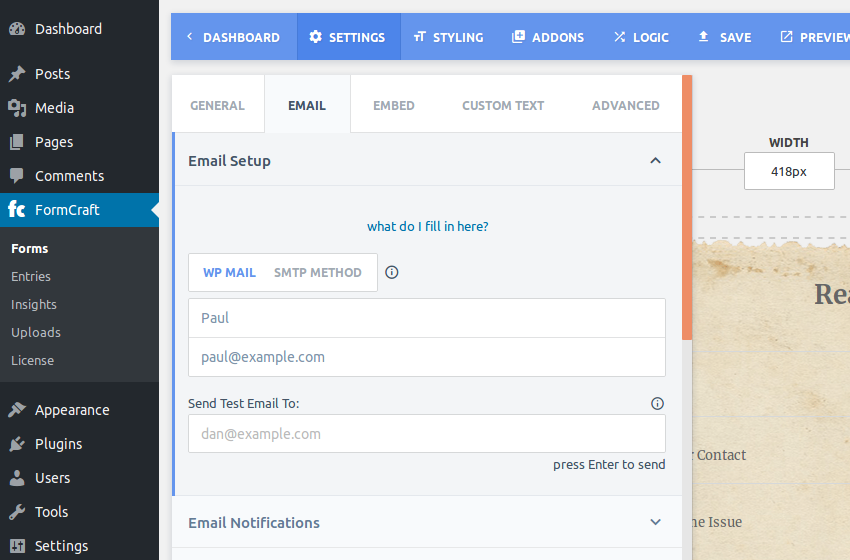 Next, expand the
section. Here you must provide the email address to which all filled forms must be sent. Please feel free to use the same email address you entered previously. Leave the rest of the configuration unchanged and press the
Savebutton. Your first form submission handler is ready. From now on, you will receive an email every time a user submits your form.
However, if you think you will receive thousands of form submissions, a more programmatic approach will be better. FormCraft can send submitted form data to any custom URL you specify. If you'd like to use this method, go to
Settings > Generaland enter your custom URL. Additionally, if you wish to receive form submissions as a JSON document, enable the POST (JSON) option.
 It's up to you what logic you use to handle form submissions on custom URLs. The following example code shows you how to save each commit as a file with a unique name on the server's file system:
<?php
$file_name = 'wp-content/submissions/' . md5(uniqid(rand(), true));
file_put_contents($file_name, file_get_contents('php://input'));
Using the code above, each form submission will be saved in a file with the content as shown below:
{
    "": "1",
    "Describe the Issue": "This is awesome!",
    "Email": "alice@example.com",
    "Entry ID": 4,
    "Full Name": "Alice K.",
    "Reason for Contact": "Feedback",
    "Text Field": ""
}
5.
Create a custom form If you decide that none of the built-in templates meet your requirements, you can go ahead and create a new form from scratch. To give a practical example, let's now create a form that allows users to submit movie reviews.
First go to the FormCraft dashboard and press the
New Formbutton again. This time, select the
Blankoption, give the form a name, and press the Create Form button. You will now see a blank canvas with no form fields. By default, its width is set to
420 px. If you don't want it to have a fixed width, you can feel free to change it to a percentage value.
Next, press the
button to add your first form field.
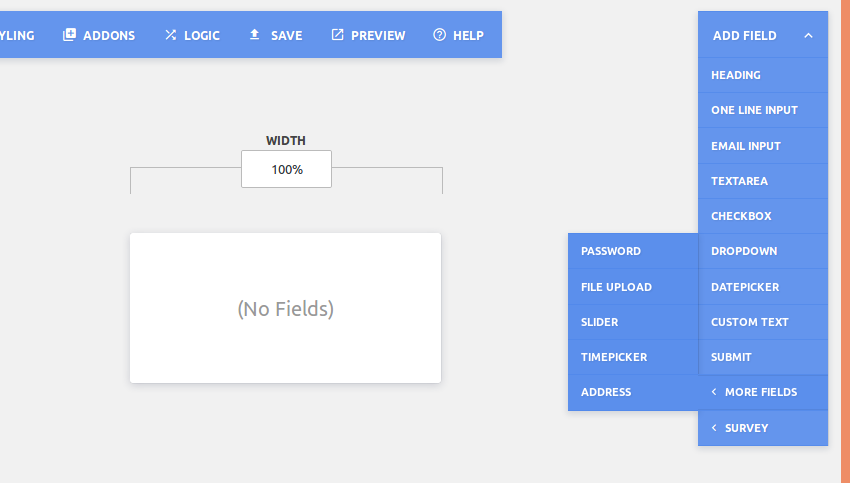 As you can see, FormCraft offers over 15 different types of form fields for you to choose from.
To add a title to the form, click the
Titlefield. After adding a title, click on it to modify its properties. In the dialog box that pops up, you can change the text displayed by the field, adjust its fill, change its font, and even specify a background color for it.
Next, to accept the movie title, click the
Add Fieldbutton and select the Single Line Entry option. Click on the newly added field to open its properties dialog box. Here, provide appropriate labels and sub-labels for the field. If desired, you can click the
Iconproperty to display an icon next to the field. To ensure that your users do not leave this field blank, check the
Required fieldattribute. Additionally, since movie names can contain spaces, check the Allow Spaces field. Using the
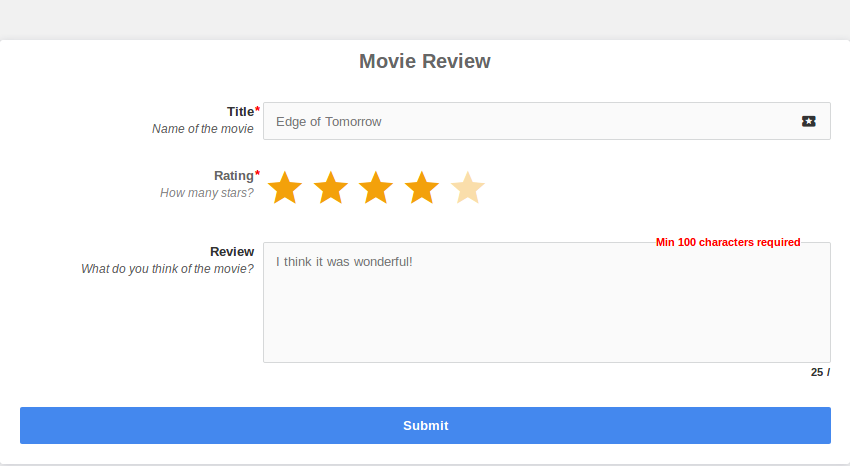
Minimum Number of Characters and Maximum Number of Characters properties, you can also control the length of user input text. Click anywhere outside the Properties dialog box to close it. Then selectAdd Field > Survey > Stars. As the name suggests, this field will allow your users to rate movies. Similarly, to allow users to enter their thoughts on the movie, add a textarea form. Finally, select Add Field > Submit to add a submit button to the form. If you want the button to be wider, check the Wide Button option. At this point, your custom form is ready. Click the Save button to save. To view it, you can directly access its dedicated form page, whose URL you can determine via Settings > General . The form looks like this: In this tutorial, you learned how to use the FormCraft WordPress plugin to create template-based and custom forms for your WordPress website. With a little creativity, you can now quickly create forms to perform basic tasks like collecting email addresses, conducting surveys or quizzes, and accepting reservations. FormCraft comes with six months of free support from its author. If you encounter any problems while using it, please use the comments page on CodeCanyon to get help. If you want to learn more about form plugins, check out some of Envato Tuts’ other posts about WordPress form plugins. 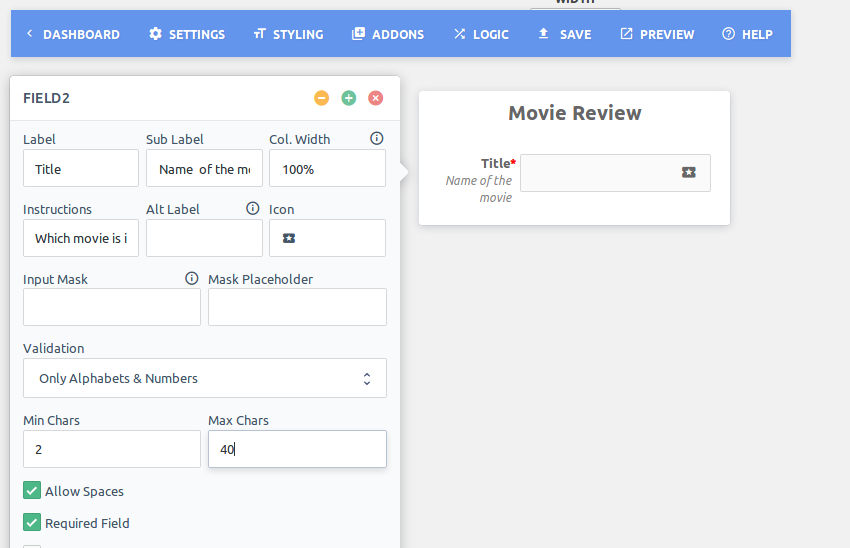

in conclusion
The above is the detailed content of Using WordPress' Drag and Drop Form Builder. For more information, please follow other related articles on the PHP Chinese website!

Hot AI Tools

Undress AI Tool
Undress images for free

Undresser.AI Undress
AI-powered app for creating realistic nude photos

AI Clothes Remover
Online AI tool for removing clothes from photos.

Clothoff.io
AI clothes remover

Video Face Swap
Swap faces in any video effortlessly with our completely free AI face swap tool!

Hot Article
Hot Tools

Notepad++7.3.1
Easy-to-use and free code editor

SublimeText3 Chinese version
Chinese version, very easy to use

Zend Studio 13.0.1
Powerful PHP integrated development environment

Dreamweaver CS6
Visual web development tools

SublimeText3 Mac version
God-level code editing software (SublimeText3)
Hot Topics


 How to adjust the wordpress article list
Apr 20, 2025 am 10:48 AM
How to adjust the wordpress article list
Apr 20, 2025 am 10:48 AM
There are four ways to adjust the WordPress article list: use theme options, use plugins (such as Post Types Order, WP Post List, Boxy Stuff), use code (add settings in the functions.php file), or modify the WordPress database directly.
 10 latest tools for web developers
May 07, 2025 pm 04:48 PM
10 latest tools for web developers
May 07, 2025 pm 04:48 PM
Web development design is a promising career field. However, this industry also faces many challenges. As more businesses and brands turn to the online marketplace, web developers have the opportunity to demonstrate their skills and succeed in their careers. However, as demand for web development continues to grow, the number of developers is also increasing, resulting in increasingly fierce competition. But it’s exciting that if you have the talent and will, you can always find new ways to create unique designs and ideas. As a web developer, you may need to keep looking for new tools and resources. These new tools and resources not only make your job more convenient, but also improve the quality of your work, thus helping you win more business and customers. The trends of web development are constantly changing.
 How to import the source code of wordpress
Apr 20, 2025 am 11:24 AM
How to import the source code of wordpress
Apr 20, 2025 am 11:24 AM
Importing WordPress source code requires the following steps: Create a sub-theme for theme modification. Import the source code and overwrite the files in the sub-topic. Activate the sub-theme to make it effective. Test the changes to make sure everything works.
 How to build a website for wordpress host
Apr 20, 2025 am 11:12 AM
How to build a website for wordpress host
Apr 20, 2025 am 11:12 AM
To build a website using WordPress hosting, you need to: select a reliable hosting provider. Buy a domain name. Set up a WordPress hosting account. Select a topic. Add pages and articles. Install the plug-in. Customize your website. Publish your website.
 How to add your WordPress site in Yandex Webmaster Tools
May 12, 2025 pm 09:06 PM
How to add your WordPress site in Yandex Webmaster Tools
May 12, 2025 pm 09:06 PM
Do you want to connect your website to Yandex Webmaster Tools? Webmaster tools such as Google Search Console, Bing and Yandex can help you optimize your website, monitor traffic, manage robots.txt, check for website errors, and more. In this article, we will share how to add your WordPress website to the Yandex Webmaster Tool to monitor your search engine traffic. What is Yandex? Yandex is a popular search engine based in Russia, similar to Google and Bing. You can excel in Yandex
 How to set, get and delete WordPress cookies (like a professional)
May 12, 2025 pm 08:57 PM
How to set, get and delete WordPress cookies (like a professional)
May 12, 2025 pm 08:57 PM
Do you want to know how to use cookies on your WordPress website? Cookies are useful tools for storing temporary information in users’ browsers. You can use this information to enhance the user experience through personalization and behavioral targeting. In this ultimate guide, we will show you how to set, get, and delete WordPresscookies like a professional. Note: This is an advanced tutorial. It requires you to be proficient in HTML, CSS, WordPress websites and PHP. What are cookies? Cookies are created and stored when users visit websites.
 How to fix HTTP image upload errors in WordPress (simple)
May 12, 2025 pm 09:03 PM
How to fix HTTP image upload errors in WordPress (simple)
May 12, 2025 pm 09:03 PM
Do you need to fix HTTP image upload errors in WordPress? This error can be particularly frustrating when you create content in WordPress. This usually happens when you upload images or other files to your CMS using the built-in WordPress media library. In this article, we will show you how to easily fix HTTP image upload errors in WordPress. What is the reason for HTTP errors during WordPress media uploading? When you try to upload files to Wo using WordPress media uploader
 How to register a wordpress account
Apr 20, 2025 am 11:45 AM
How to register a wordpress account
Apr 20, 2025 am 11:45 AM
To create an account on WordPress, simply visit its website, select the registration option, fill in the registration form, and verify your email address. Other ways to register include using a Google account or Apple ID. The benefits of signing up include creating a website, gaining features, joining the community, and gaining support.
