

0xc0000218 BSoD error: How to fix it on Windows 10 and 11
Jul 11, 2023 pm 10:50 PM
Some Windows 10 and 11 users have recently complained about 0xc0000218 BSoD error, which prevents their systems from starting properly. Error code 0xc0000218 indicates a registry file failure, usually caused by incorrectly configured system settings.
If you see this post or are experiencing similar issues, please check out some potential fixes to resolve the issue seamlessly.
What causes 0xc0000218 BSoD error?
0xc0000218 There may be several reasons behind the BSoD error. Here are some potential factors:
- Incorrect Registry Editing – If you make incorrect changes using registry editing tools or manually modifying values, it can lead to registry corruption. Such misconfiguration may trigger 0xc0000218 error during system startup.
- System Setting Conflict – Certain system settings, such as incompatible driver configurations, may cause registry or system stability issues.
- Corrupted or Missing Registry Hive Files – If the registry hive files are corrupted or accidentally deleted, they will become inaccessible during startup and trigger this error.
Unlike other BSOD errors, you can still access your computer. However, you will experience processing failures in different instances.
How to fix 0xc0000218 BSoD error?
Before doing any advanced troubleshooting or setting adjustments, you should consider performing the following preliminary checks:
- Restart your computer to fix any temporary issues that prompt the error.
- Perform a complete malware scan using Windows Defender or reliable antivirus software.
- Uninstall recently installed programs.
- Use a dedicated and effective BSoD bug fix.
- Check for window updates.
After confirming the above checks, if the issue still persists, you can use any of the advanced solutions provided below.
1. Perform startup repair
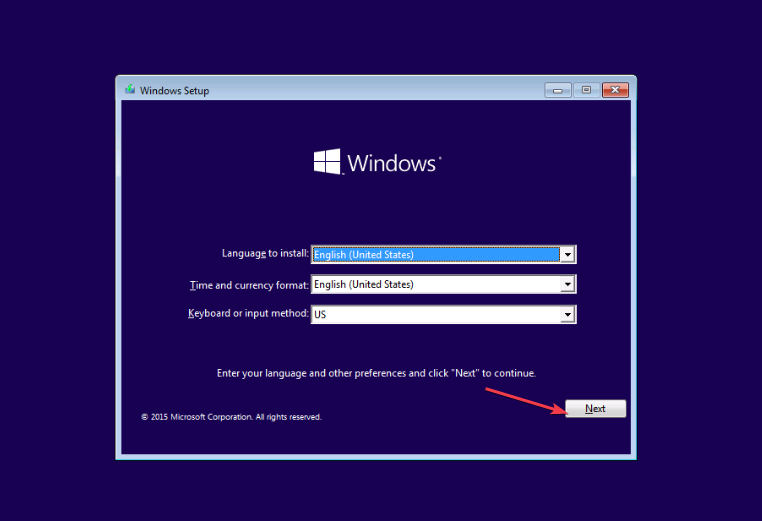
- Insert a bootable USB or DVD, start the computer, and then press any key to boot from the DVD or USB drive.
- Select your language preference and press Next.

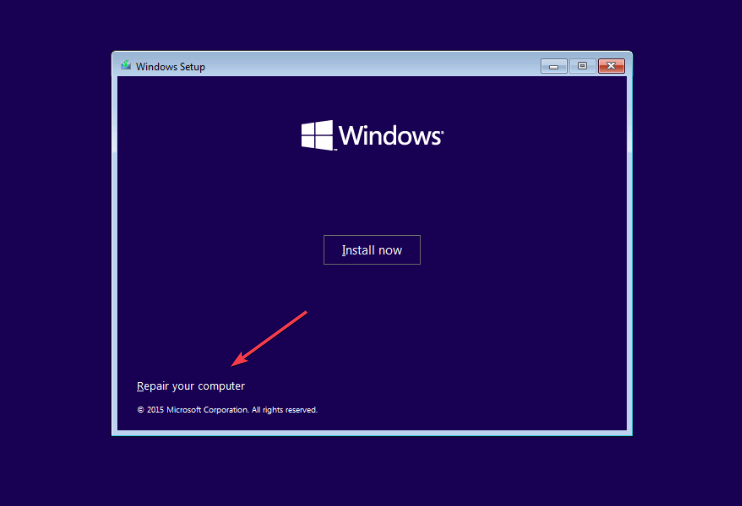
- Then, select Repair your computer option in the lower left corner of the screen.
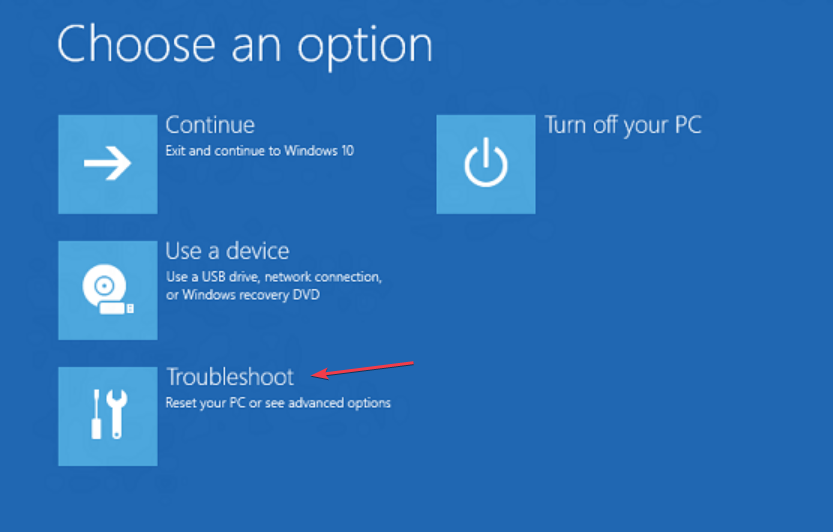
- Select Troubleshooting options and click Advanced options.
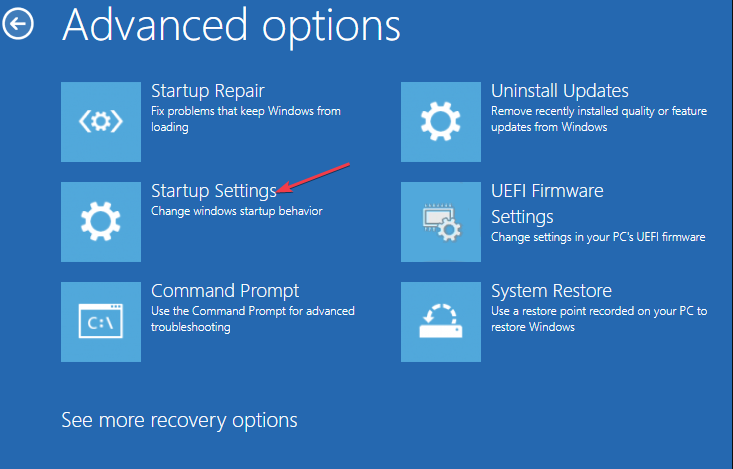
- Select the startup repair option.
- Next, select the target operating system to be repaired and Windows will initiate the repair.
- Finally, remove the bootable drive and restart your PC.
Please check whether the 0xc0000218 blue screen error has been resolved after restarting. If the error persists, you may want to try other troubleshooting methods.
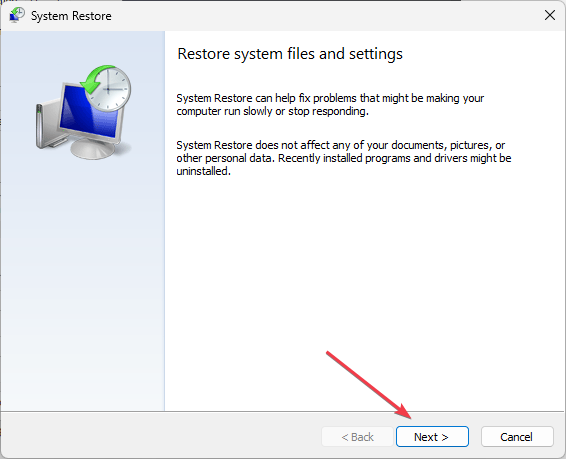
2. Restore the system to its previous state
- Press the key to open the "RunCommand" dialog box. Type rstrui in the text field and press . WindowsREnter
- Select "System Restore" under "System Protection".
- Click Next to continue.
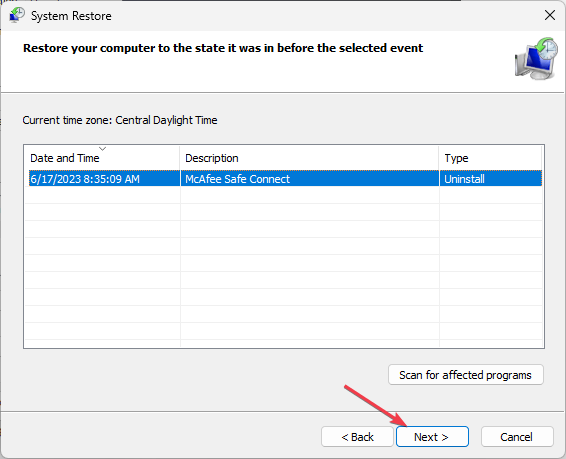
- Select the desired restore point and click Next.
- Click the "Finish" button to confirm your choice and restart your PC.
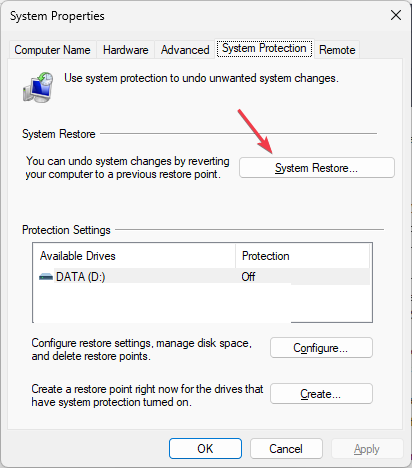
System Restore can help you restore your PC to its original state before the 0xc0000218 BSOD error code, making it perfect. Although Windows creates restore points automatically, you can learn how to create a system restore point manually by reading our article.
You can fix several system problems by restoring the system to its previous state. A direct alternative to safely restoring your system is a dedicated program.Fortect will thoroughly scan your PC for faulty components and automatically replace all critical Windows system files with new versions in its database. To put it bluntly - you will get a fresh set of important Windows system files that will run as needed after a clean Windows installation.
Here's how to restore your system using Forect:
- Download and install Forect.
- Launch the application to start the scanning process.
- Wait for it to detect any stability issues.
- Press the "Start Repair" button to resolve all issues.
- Restart your computer to see if all changes have been applied.
Fortect's System Restore feature can restore your Windows to its previous state. So, you may lose important data saved after the restore point, but you can restore the system to its pre-repair settings.
3. Manually repair the registry
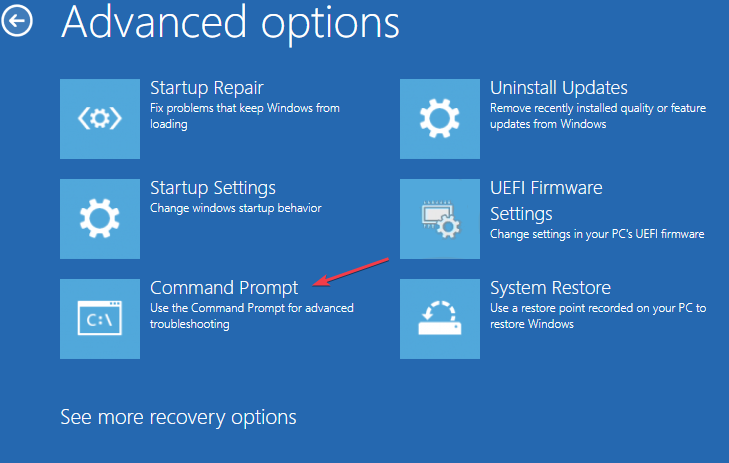
- Follow the instructions provided in Solution 1 to boot from the bootable drive.
- In the Windows Setup screen, click Repair your computer and select Troubleshoot.
- Next, select Command Prompt.
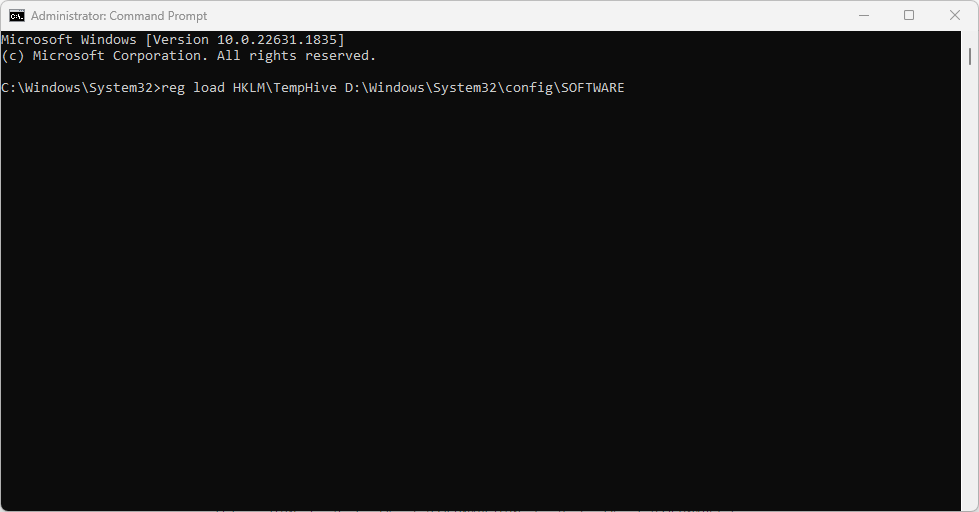
- Type the following command and press (replace D with the drive letter of your bootable drive): Enter
<strong>reg load HKLM\TempHive D:\Windows\ System32\config\SOFTWARE</strong>##Next, type the following command to check the registry files and press: - Enter
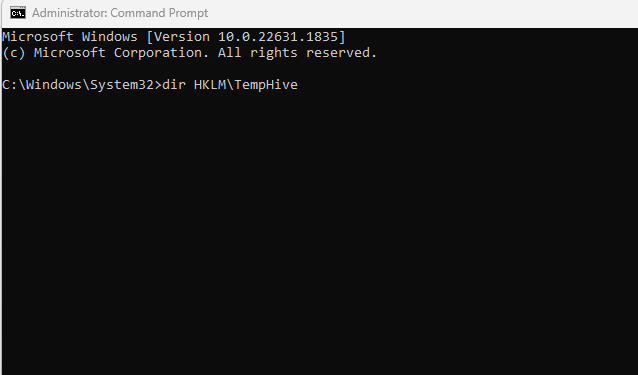
dir HKLM \TempHive<strong></strong>Type the following command and press (make sure the output shows software files): - Enter
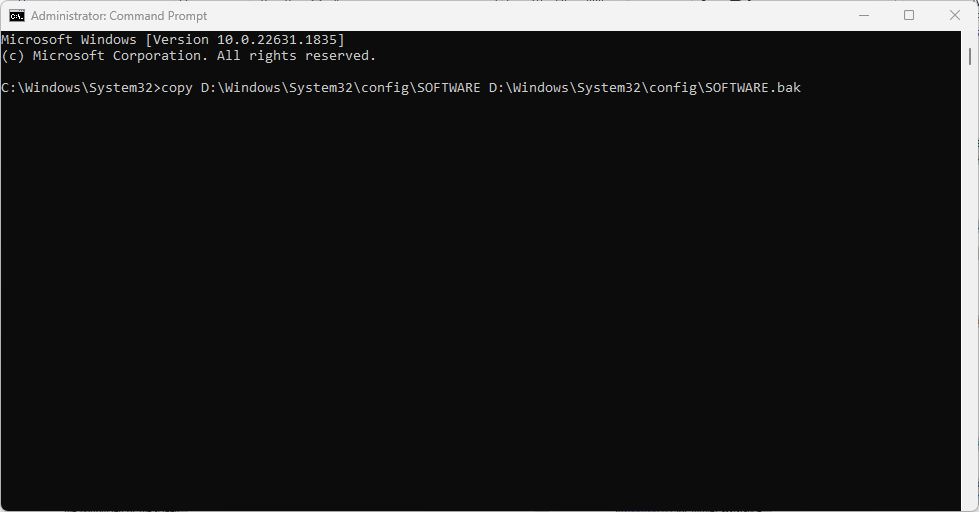
copy D:\Windows\System32 \config\SOFTWARE D:\Windows\System32\config\SOFTWARE.bak<strong></strong>Rename the registry file by entering the following command: -
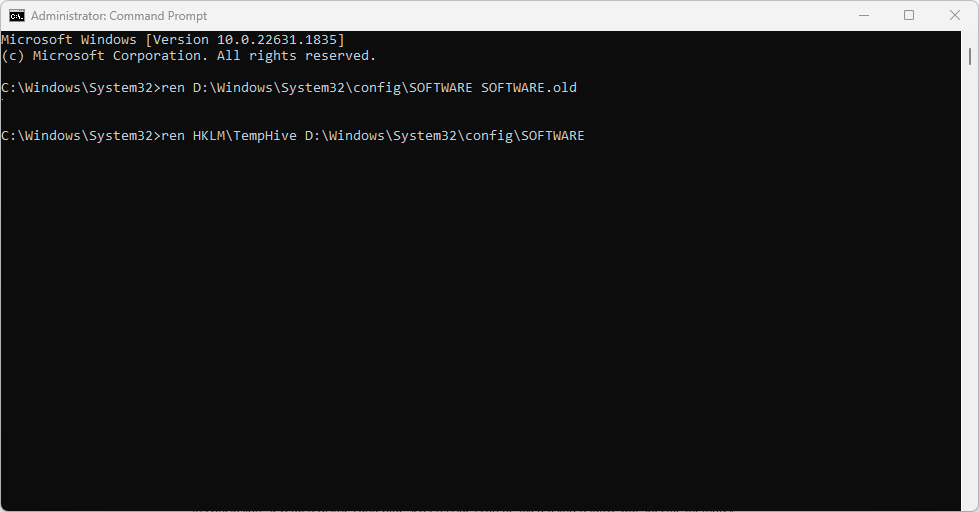
ren D: \Windows\System32\config\SOFTWARE SOFTWARE.old<strong></strong>ren HKLM\TempHive D:\Windows\System32\config\SOFTWARE<strong></strong>Type the following into the text field and press to close the command prompt: - Enter
exit<strong></strong>Finally, remove the bootable drive and restart the PC.
The above is the detailed content of 0xc0000218 BSoD error: How to fix it on Windows 10 and 11. For more information, please follow other related articles on the PHP Chinese website!

Hot AI Tools

Undress AI Tool
Undress images for free

Undresser.AI Undress
AI-powered app for creating realistic nude photos

AI Clothes Remover
Online AI tool for removing clothes from photos.

Clothoff.io
AI clothes remover

Video Face Swap
Swap faces in any video effortlessly with our completely free AI face swap tool!

Hot Article
Hot Tools

Notepad++7.3.1
Easy-to-use and free code editor

SublimeText3 Chinese version
Chinese version, very easy to use

Zend Studio 13.0.1
Powerful PHP integrated development environment

Dreamweaver CS6
Visual web development tools

SublimeText3 Mac version
God-level code editing software (SublimeText3)
Hot Topics


 This Apple ID is not yet in use in the iTunes Store: Fix
Jun 10, 2024 pm 05:42 PM
This Apple ID is not yet in use in the iTunes Store: Fix
Jun 10, 2024 pm 05:42 PM
When logging into iTunesStore using AppleID, this error saying "This AppleID has not been used in iTunesStore" may be thrown on the screen. There are no error messages to worry about, you can fix them by following these solution sets. Fix 1 – Change Shipping Address The main reason why this prompt appears in iTunes Store is that you don’t have the correct address in your AppleID profile. Step 1 – First, open iPhone Settings on your iPhone. Step 2 – AppleID should be on top of all other settings. So, open it. Step 3 – Once there, open the “Payment & Shipping” option. Step 4 – Verify your access using Face ID. step
 Comprehensive Guide to PHP 500 Errors: Causes, Diagnosis and Fixes
Mar 22, 2024 pm 12:45 PM
Comprehensive Guide to PHP 500 Errors: Causes, Diagnosis and Fixes
Mar 22, 2024 pm 12:45 PM
A Comprehensive Guide to PHP 500 Errors: Causes, Diagnosis, and Fixes During PHP development, we often encounter errors with HTTP status code 500. This error is usually called "500InternalServerError", which means that some unknown errors occurred while processing the request on the server side. In this article, we will explore the common causes of PHP500 errors, how to diagnose them, and how to fix them, and provide specific code examples for reference. Common causes of 1.500 errors 1.
 What should I do if wps cannot start the source application of this object?
Mar 13, 2024 pm 09:13 PM
What should I do if wps cannot start the source application of this object?
Mar 13, 2024 pm 09:13 PM
WPS is a very widely used office software, including documents, forms and PPT, and supports multi-terminal synchronization. If the prompt "The source application for this object cannot be launched" appears when editing wps, how to solve it? This problem may occur because you are trying to open a link or file, but its source application no longer exists or has been deleted. Here are some fixes: 1. Reinstall WPS software: Try reinstalling WPSOffice to fix the problem and make sure you are using the latest version. 2. Manually change the default program: Try to change the default program to WPS. You can right-click the file you want to open, select "Open with", and then
 How to fix the volume cannot be adjusted in WIN10
Mar 27, 2024 pm 05:16 PM
How to fix the volume cannot be adjusted in WIN10
Mar 27, 2024 pm 05:16 PM
1. Press win+r to open the run window, enter [regedit] and press Enter to open the registry editor. 2. In the opened registry editor, click to expand [HKEY_LOCAL_MACHINESOFTWAREMicrosoftWindowsCurrentVersionRun]. In the blank space on the right, right-click and select [New - String Value], and rename it to [systray.exe]. 3. Double-click to open systray.exe, modify its numerical data to [C:WindowsSystem32systray.exe], and click [OK] to save the settings.
 Which one to choose when starting wallpaperengine?
Mar 19, 2024 am 08:49 AM
Which one to choose when starting wallpaperengine?
Mar 19, 2024 am 08:49 AM
When wallpaperengine starts, there are 4 different options. Many users don't know which one to choose when starting wallpaperengine. Generally, when wallpaperengine starts, choose the first one: start 32-bit. Which one to choose when starting wallpaperengine? Answer: Start 32-bit. 1. Generally, when wallpaperengine starts, select the first one: start 32-bit. 2. When wallpaperengine starts, there are 4 different options: start 32-bit; start 64-bit. 3. Start 32-bit: This is a generally recommended option and suitable for most users. 4. Start 64-bit: If the system supports 64-bit, you can choose this option
 iPhone stuck in airplane mode: How to fix it
Jun 15, 2024 pm 02:16 PM
iPhone stuck in airplane mode: How to fix it
Jun 15, 2024 pm 02:16 PM
Airplane mode is very convenient in some situations. However, the same airplane mode may give you a headache if your iPhone suddenly gets stuck on it. In this article, we have designed this set of solutions to get your iPhone out of airplane mode. Quick fix – 1. Try disabling Airplane Mode directly from Control Center. 2. If you are unable to disable Airplane Mode from Control Center, you can disable Airplane Mode directly from the Settings tab – If these tips don’t work, follow the fixes below to resolve the issue. Fix 1 – Force Restart Your Device The process of force restarting your device is very simple. All you have to do is follow these step-by-step instructions. Step 1 – You can start the process by pressing and releasing the Volume Up button. step
 How to fix unresponsive edge browser
Mar 13, 2024 pm 01:10 PM
How to fix unresponsive edge browser
Mar 13, 2024 pm 01:10 PM
Recently, some Win11 users have reported to the editor that when opening the edge browser, there will always be no response, making the browser unusable. What should I do? How to fix this problem? The editor below will bring you the solution to the problem that the edge browser is unresponsive and cannot be used. Come and try it. The method is as follows: 1. Click Start in the lower left corner of Windows 11 and open "Settings". 2. After entering Windows settings, click "Apply". 3. Then click "Apps and Features" in the left taskbar. 4. Find the browser in the open list and click "Advanced Options"
 iPhone stuck in Do Not Disturb mode: How to fix it
May 03, 2024 pm 09:07 PM
iPhone stuck in Do Not Disturb mode: How to fix it
May 03, 2024 pm 09:07 PM
Is your iPhone stuck in Do Not Disturb mode? It can be troublesome if you can't toggle Do Not Disturb mode. You won't receive any alerts at all. It won't take much effort to fix this DND issue on iPhone. So, no need to waste any more time and just follow these simple solutions to solve your problem. Fix 1 – Remove the Do Not Disturb schedule If you have any Do Not Disturb schedule on your phone, it may force the device to automatically go into Do Not Disturb mode. Step 1 – Go to your iPhone’s Settings. Step 2 – Next, turn on Focus mode. Step 3 – You will find “Do Not Disturb” at the top of the chart. Step 4 – Open it. Step 5 – On the next page, if you go to the Schedule tab, you