


Press Win Ctrl D to create a new virtual desktop and use Win Ctrl Left/Right Arrow to switch between them. 2. Rename desktops via Task View by hovering and selecting Rename to label them like “Work” or “Gaming.” 3. Close a desktop in Task View by clicking the X on its thumbnail, with apps automatically moved to another desktop. 4. Move apps between desktops by right-clicking app windows in Task View and choosing Move to > [Desktop Name] or dragging them between thumbnails. 5. Use shortcuts like Win Tab to open Task View and Win Ctrl F4 to close the current desktop for faster navigation. 6. Assign apps to specific desktops via the taskbar right-click menu to maintain consistency. 7. Set different wallpapers using third-party tools like Wallpaper Engine since Windows 11 doesn’t support per-desktop wallpapers natively. 8. Utilize multiple monitors with virtual desktops to display different content on each screen. Virtual desktops enhance multitasking by organizing work, apps, and personal tasks into separate spaces, improving focus and reducing clutter without needing extra hardware.

Windows 11 makes multitasking easier with virtual desktops, letting you organize your work, apps, and personal tasks into separate spaces. Whether you're juggling work projects, gaming, or browsing, virtual desktops help reduce clutter and boost focus. Here’s how to set up and use them effectively.
How to Create and Switch Between Virtual Desktops
Creating a new virtual desktop is quick and intuitive:
- Press Win Ctrl D to create a new desktop.
- Press Win Ctrl Left/Right Arrow to switch between existing desktops.
- Or, open Task View by clicking the Task View button on the taskbar (two overlapping rectangles) or pressing Win Tab, then click New desktop at the top.
Each desktop acts independently — you can have different apps open on each one. For example, use Desktop 1 for email and Office apps, Desktop 2 for web research, and Desktop 3 for entertainment.
Customizing and Managing Desktops
You’re not stuck with generic names or thumbnails. Here’s how to keep things organized:
- Rename desktops: In Task View, hover over a desktop thumbnail, click the three dots (?), and choose Rename. Give it a label like “Work,” “School,” or “Gaming.”
- Close a desktop: In Task View, hover over the desktop you want to close and click the X in the top-right corner. Apps on that desktop will move to another one.
- Move apps between desktops: In Task View, right-click any app window and choose Move to > [Desktop Name]. You can also drag and drop app windows between desktop thumbnails.
Tip: Dragging an app window to the edge of the screen doesn’t move it between desktops — you must use Task View or right-click the app in the taskbar.


Using Virtual Desktops Effectively
To get the most out of virtual desktops, try these practical tips:
- Assign apps to specific desktops: Right-click an app in the taskbar > Show this window on all desktops (if you want it everywhere), or choose Move to > [Desktop] to place it where it belongs.
- Set different wallpapers (optional): While Windows doesn’t support unique wallpapers per desktop by default, third-party tools like Wallpaper Engine or VirtuaWin can enable this.
-
Use keyboard shortcuts for speed:
- Win Ctrl D → New desktop
- Win Ctrl F4 → Close current desktop
- Win Tab → Open Task View
- Win Ctrl Left/Right → Switch desktops
This setup is especially useful if you use multiple monitors — each monitor can display content from different virtual desktops.
Final Thoughts
Virtual desktops in Windows 11 are a powerful but underused feature. Once you get used to creating separate spaces for different tasks, you’ll likely find your workflow becoming cleaner and more focused.
It doesn’t require any third-party software, and the learning curve is minimal. Just start with two desktops — one for work, one for everything else — and build from there.
Basically, it’s like having multiple monitors without buying any extra hardware.
The above is the detailed content of How to Set Up and Use Virtual Desktops in Windows 11. For more information, please follow other related articles on the PHP Chinese website!

Hot AI Tools

Undress AI Tool
Undress images for free

Undresser.AI Undress
AI-powered app for creating realistic nude photos

AI Clothes Remover
Online AI tool for removing clothes from photos.

Clothoff.io
AI clothes remover

Video Face Swap
Swap faces in any video effortlessly with our completely free AI face swap tool!

Hot Article
Hot Tools

Notepad++7.3.1
Easy-to-use and free code editor

SublimeText3 Chinese version
Chinese version, very easy to use

Zend Studio 13.0.1
Powerful PHP integrated development environment

Dreamweaver CS6
Visual web development tools

SublimeText3 Mac version
God-level code editing software (SublimeText3)


 How to use Win11 virtual desktop? Win11 virtual desktop tutorial
Feb 14, 2024 pm 04:40 PM
How to use Win11 virtual desktop? Win11 virtual desktop tutorial
Feb 14, 2024 pm 04:40 PM
The Win11 system comes with a virtual desktop function, which allows multiple desktops to run different software, greatly improving user work efficiency. So how to use Win11 virtual desktop? Next, the editor will introduce to you the detailed use of virtual desktop. 1. Open the Win11 virtual desktop and click the [Task View] icon (shortcut key [WIN+TAB]) and [New Desktop] (shortcut key [WIN+CTRL+D]) on the Win11 system desktop in sequence to create a new desktop based on the original desktop. , create a new desktop. You can right-click an empty space on the taskbar, select [Taskbar Settings], and turn on the [Task View] option. 2. Personalized virtual desktop After creating a new desktop, we can set a different name and wallpaper for each desktop
 Windows 11 vs. Windows 10: What's the difference?
May 02, 2023 pm 09:01 PM
Windows 11 vs. Windows 10: What's the difference?
May 02, 2023 pm 09:01 PM
Highlights and Differences: Windows 11 vs. Windows 10 Windows 11 is the new face of Microsoft's operating system, and it will begin a phased rollout in October 2021. According to Microsoft, it will end support for Microsoft 10 after 2025, so you still have plenty of time to have a great time. Your favorite Win10 operating system. If you already have Windows 10 and are ready to update, you can get Windows 11 for free. But, until then, what should you expect from this new operating system from Microsoft? The bottom line is, Windows 11 compares to its predecessor
 How does Kirin OS provide virtual desktop and remote connection functions?
Aug 04, 2023 am 11:17 AM
How does Kirin OS provide virtual desktop and remote connection functions?
Aug 04, 2023 am 11:17 AM
How does Kirin OS provide virtual desktop and remote connection functions? Introduction: Kirin operating system is an operating system independently developed in China for desktop and server applications. It has stability, security and performance advantages. It provides rich functions, including virtual desktop and remote connection functions, providing users with a more convenient and flexible working environment. This article will introduce how Kirin operating system implements virtual desktops and remote connections, and provide relevant code examples. 1. Virtual desktop function Realizing virtual desktop means running multiple desktop environments at the same time
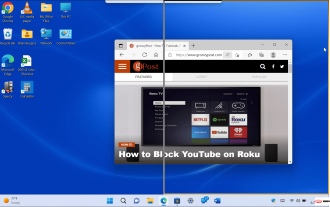 How to use split screen in Windows 11
May 12, 2023 pm 03:16 PM
How to use split screen in Windows 11
May 12, 2023 pm 03:16 PM
Split screen using WindowsSnap Microsoft introduced the WindowsSnap feature in Windows 7, which allows you to snap open windows to the left and right sides of the screen. You can then view the screens side by side. To use Windows Snap, do the following: Drag an open screen (a browser, an open file, or an app) and drag it from the title bar to the left or right side of the screen until you see a translucent outline . When you let it go, you'll have a split screen with the item you dragged and the other open apps on the other side. When both windows are open, you can resize them by hovering your cursor between the screens and dragging and dropping to resize. You can also
 How to use Mission Control in macOS
Apr 14, 2023 am 09:25 AM
How to use Mission Control in macOS
Apr 14, 2023 am 09:25 AM
What is mission control? If you've used virtual desktops on a Windows computer, Mission Control is essentially the same. This feature displays all open windows on your desktop in a single page. You can have multiple desktops on your machine, and these virtual desktops are called Spaces. How to use Mission Control on macOS? There are several ways to invoke Mission Control. The easiest way is to swipe up on the trackpad with three fingers. Swipe down to exit Mission Control. You can also enter Mission Control by pressing the F3 key on your MacBook, pressing F3 again will
 How to create a virtual desktop in win11
Jul 03, 2023 am 08:33 AM
How to create a virtual desktop in win11
Jul 03, 2023 am 08:33 AM
How to create a virtual desktop in win11? The win11 version of the operating system has accounted for half of the current computer usage. As a particularly popular system operating version, there are certainly not a few users. Many friends also need to perform computer desktop modifications when using the win11 system for computer work. Work more to improve your computer operation efficiency, but how to do this specifically? Many friends don’t know how to operate in detail. The editor below has compiled a guide to creating multiple desktops in win11. If you are interested, follow the editor and read on! Introduction to tips for creating multiple desktops in win11 1. Right-click the blank space of the taskbar and click the pop-up [Taskbar Settings] 2. Open "Task View"
 Is the performance of win10 improved compared to win7? Detailed introduction
Dec 23, 2023 am 09:04 AM
Is the performance of win10 improved compared to win7? Detailed introduction
Dec 23, 2023 am 09:04 AM
The more popular system now is the win10 system. Of course, there are also users who are preparing to upgrade. What these users are most concerned about is whether the performance of win10 is improved compared to win7? In fact, overall there are still some improvements, and the compatibility is also good. Is the performance of win10 improved compared to win7? Answer: The performance of win10 is improved compared to win7. The overall improvement is not very big, because the performance is mainly linked to the hardware. However, the win10 system has undergone a lot of optimizations so it can provide better assistance. Moreover, Microsoft no longer supports win7 updates, so win10 will be the most common system in the future. Comparative features of win10 compared to win7: 1. Configuration: win7 has been launched for more than ten years and has gone through a lot.
 What are some useful hidden functions in win11?
Jul 01, 2023 am 11:29 AM
What are some useful hidden functions in win11?
Jul 01, 2023 am 11:29 AM
What useful hidden features does win11 have? As the latest version of Microsoft's operating system, win11 has been optimized and upgraded with many awesome features. If you are installing and using this operating system for the first time, be sure not to miss this article. We will introduce you to the awesome hidden functions of win11 in detail. Get up and take a look. Introduction to the awesome hidden functions of win11 1. Restore the classic menu of win10. Win11 introduces a new start menu. One of the biggest changes is the cancellation of live tiles. However, perhaps due to the preview version, there are still many problems with this menu. The most obvious one is that users are not allowed to adjust the size by themselves. So how to restore the previous start menu? 1) Open the registry editor; 2) Enter HKEY_CURREN
