


In the Edge browser, you can take screenshots and add notes through the built-in Web Capture tool. 1. Click the scissors icon on the right side of the address bar to start the tool, select to intercept the entire web page or the currently visible part, drag the mouse to select the area and enter the editing interface; 2. Use "Pen" and "Highlighter" to mark it in the editing interface, "Eraser" to clear the excess content, and click the "Text" button to add text descriptions, which can adjust the font size and color to improve readability; 3. After the editing is completed, click "Download" to save it as PNG format, or use the "Copy" and "Share" options to directly send it to others, which is convenient and fast.

In the Edge browser, adding notes to screenshots is actually a very practical feature, especially when you want to quickly label a certain web page content and share it with others. Edge's own "web page capture" tool not only supports screenshots, but also allows you to mark and add text descriptions directly on the screenshots.

How to use Edge's screenshot feature
The Edge browser has a built-in tool called "Web Capture". Click the scissors icon on the right side of the address bar at the top to start. You can choose to intercept the entire web page or only the currently visible part.
- After clicking the scissors icon, the mouse will become a cross cursor
- Drag to select the area you want to take
- After releasing the mouse, the screenshot will automatically open the editing interface.
This feature does not require additional plug-ins to be installed, and is suitable for most daily use scenarios.

How to mark and add text in screenshots
After entering the screenshot editing interface, you will see several commonly used editing tools:
- Use the "Pen" tool to draw lines or mark them freely
- "Highlighter" is suitable for highlighting key content
- "Eraser" can remove tags you don't want
- The most important thing is the "Text" button. After clicking, you can add text descriptions anywhere in the screenshot.
When adding text, it is recommended to adjust the font size and color appropriately so that others look clearer. This method is very intuitive if you simply label a link or button position.

Save and share screenshots
After completing the editing, click the "Download" button in the upper right corner to save the screenshot locally. The default is PNG format, with sufficient clarity for document or chat window sharing.
If you want to copy the screenshot directly to the clipboard or send it to others, you can choose the "Copy" or "Share" option. This is very convenient for temporary communication, customer service feedback and other scenarios.
Basically these are the operations. Although the functions are not complicated, many people may not know that Edge natively supports such a complete screenshot annotation function. Next time you need to quickly add notes and share web page screenshots, you might as well give it a try.
The above is the detailed content of How to add notes to a screenshot in Edge. For more information, please follow other related articles on the PHP Chinese website!

Hot AI Tools

Undress AI Tool
Undress images for free

Undresser.AI Undress
AI-powered app for creating realistic nude photos

AI Clothes Remover
Online AI tool for removing clothes from photos.

Clothoff.io
AI clothes remover

Video Face Swap
Swap faces in any video effortlessly with our completely free AI face swap tool!

Hot Article
Hot Tools

Notepad++7.3.1
Easy-to-use and free code editor

SublimeText3 Chinese version
Chinese version, very easy to use

Zend Studio 13.0.1
Powerful PHP integrated development environment

Dreamweaver CS6
Visual web development tools

SublimeText3 Mac version
God-level code editing software (SublimeText3)
Hot Topics


 iPhone screenshots not working: How to fix it
May 03, 2024 pm 09:16 PM
iPhone screenshots not working: How to fix it
May 03, 2024 pm 09:16 PM
Screenshot feature not working on your iPhone? Taking a screenshot is very easy as you just need to hold down the Volume Up button and the Power button at the same time to grab your phone screen. However, there are other ways to capture frames on the device. Fix 1 – Using Assistive Touch Take a screenshot using the Assistive Touch feature. Step 1 – Go to your phone settings. Step 2 – Next, tap to open Accessibility settings. Step 3 – Open Touch settings. Step 4 – Next, open the Assistive Touch settings. Step 5 – Turn on Assistive Touch on your phone. Step 6 – Open “Customize Top Menu” to access it. Step 7 – Now you just need to link any of these functions to your screen capture. So click on the first
 How to use shortcut keys to take screenshots in Win8?
Mar 28, 2024 am 08:33 AM
How to use shortcut keys to take screenshots in Win8?
Mar 28, 2024 am 08:33 AM
How to use shortcut keys to take screenshots in Win8? In our daily use of computers, we often need to take screenshots of the content on the screen. For users of Windows 8 system, taking screenshots through shortcut keys is a convenient and efficient operation method. In this article, we will introduce several commonly used shortcut keys to take screenshots in Windows 8 system to help you take screenshots more quickly. The first method is to use the "Win key + PrintScreen key" key combination to perform full
 What are the shortcut keys for taking screenshots in Win8?
Mar 27, 2024 pm 05:18 PM
What are the shortcut keys for taking screenshots in Win8?
Mar 27, 2024 pm 05:18 PM
What are the shortcut keys for taking screenshots in Win8? The Windows 8 operating system provides a variety of shortcut keys for the screenshot function, allowing users to take screenshots conveniently and quickly. The following are some commonly used Win8 screenshot shortcut keys: Win+PrtScn: Press the Windows key (Win) and press the PrtScn key at the same time to quickly take a full-screen screenshot and automatically save it to the "Screenshot" subfolder in the "Photos" folder . Alt+PrtScn: Press the Alt key
 Windows 10 screenshot shortcut keys quick start tutorial
Mar 28, 2024 am 11:33 AM
Windows 10 screenshot shortcut keys quick start tutorial
Mar 28, 2024 am 11:33 AM
With the continuous development of technology, people's lifestyles are also constantly changing. In modern society, we often need to use computers to handle various tasks. For some common operations, mastering shortcut keys can improve efficiency. Among them, the screenshot shortcut keys in Windows 10 system are a tool that cannot be ignored. This article will introduce in detail the screenshot shortcut keys of Windows 10 system to help everyone quickly master this practical skill. Windows 10 system provides a variety of screenshot shortcut keys, which can easily and quickly capture the screen.
 How to take screenshots on Apple 13 promax
Mar 28, 2024 am 09:50 AM
How to take screenshots on Apple 13 promax
Mar 28, 2024 am 09:50 AM
Taking screenshots is a convenient function on the iPhone 13promax. Some users don’t know how to take screenshots on the iPhone 13promax. You can use shortcut keys or tap the back to complete the screenshot. Next is the editor’s introduction to how to take screenshots on the Apple 13promax. Interested users come and take a look! Apple mobile phone usage tutorial: How to take a screenshot of Apple 13 Promax? Answer: You can use shortcut keys or tap the back to complete the screenshot. Details: [Shortcut key screenshot]: Press the [Power button] and [Volume Up button] on the side of the phone at the same time to succeed. screenshot. [Tap the back to take a screenshot]: 1. Enter settings and select [Accessibility]. 2. Click [Touch]. 3. Enter [tap the back]. 4. Select the number of touches. 5
 Comprehensive analysis and application of Windows 10 screenshot shortcut keys
Mar 27, 2024 pm 08:30 PM
Comprehensive analysis and application of Windows 10 screenshot shortcut keys
Mar 27, 2024 pm 08:30 PM
The Windows 10 operating system is one of the systems currently widely used on personal computers. Its powerful functions and convenient operation methods are welcomed by users. Among them, the screenshot function is one of the commonly used operations, which allows users to quickly capture the content on the screen. It is very convenient whether it is to save important information or share content with others. This article will comprehensively analyze the shortcut keys for taking screenshots in Windows 10 and their applications to help readers make better use of this feature. 1. Windows 10 screenshot shortcut key to capture the entire screen content: Press
 How to take a screenshot in word software? Word software screenshot usage tutorial
Mar 28, 2024 pm 06:01 PM
How to take a screenshot in word software? Word software screenshot usage tutorial
Mar 28, 2024 pm 06:01 PM
How to take screenshots in word software? Many friends who edit word documents want to know how to directly take screenshots and put them into the document. It is a bit troublesome to use other software to take screenshots. Here, the editor will bring you a tutorial on how to use word software to take screenshots. You can directly take screenshots of other windows or desktops. The picture is inserted into the middle of the document, and everyone can learn about it. Tutorial on how to use word software screenshots. In the Word page, we click "Insert" in the toolbar, and then you can find the "Screenshot" tool among the functions inside. It is a camera and cross icon. Click to open the tool on the right. Drop down arrow. 2. After opening, we click in the drop-down list to select a window that we want to take a screenshot of. These are what my current computer is typing
 What causes the black screen in win10 computer screenshots_Solutions to the black screen in win10 computer screenshots
Mar 27, 2024 pm 07:30 PM
What causes the black screen in win10 computer screenshots_Solutions to the black screen in win10 computer screenshots
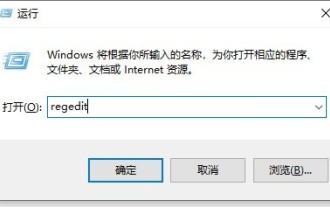
Mar 27, 2024 pm 07:30 PM
1. Press the win key + r key at the same time on the computer, enter regedit to confirm, and enter the registry editor. 2. Click [HKEY_LOCAL_MACHINESYSTEMCurrentControlSetControlGraphicsDriversDCI] in sequence. 3. Find and double-click to open Timeout, change the numerical data to 0, and click OK to exit. 4. If you use a third-party software to take screenshots, you can try to uninstall the software and then reinstall it or change other screenshot software to solve the problem.
