

How to enable virtualization in Windows 11
Jul 20, 2025 am 01:48 AM
To enable the virtualization function of Windows 11, you need to confirm hardware support and complete the BIOS settings and system function activation in turn. 1. First, confirm that the CPU supports virtualization through tools such as Task Manager or CPU-Z; 2. Enter the BIOS (press F2, F10, Del, etc. when powering on) and enable Intel Virtualization Technology or SVM mode; 3. Check Hyper-V and virtual machine platform components in Windows 11 by "Enable or Turn Off Windows Functions"; 4. You can further configure and ensure that WSL2 is running normally using the PowerShell command line tool; 5. Restart the system according to the prompts after each modification to ensure that the settings take effect. During the entire process, you need to note that the BIOS portal and option locations of different brands of devices may be different, and some functions are not enabled by default and must be turned on manually.

It is actually not difficult to enable the virtualization function of Windows 11, but many people are stuck in the BIOS setting step. The key is to confirm hardware support, enter the motherboard settings to enable virtualization, and turn on related functions in the system.
Confirm that your CPU supports virtualization
Not all processors support virtualization technology by default, especially older models or some low-power devices. You can check it by:
- Press
Ctrl Shift Escto open Task Manager → “Performance” tab → Check whether there is “Virtualization: Enabled” at the bottom of the CPU page. - If "Virtualization: Disabled" is displayed, it means you need to turn on in the BIOS.
- If you cannot see the "virtualization", your CPU may not support it or be hidden (such as some ARM devices).
If you are not sure whether your CPU model supports virtualization, you can check the specific specifications on Intel or AMD official website, or use a tool such as CPU-Z to view detailed information.
Enter BIOS to enable virtualization support
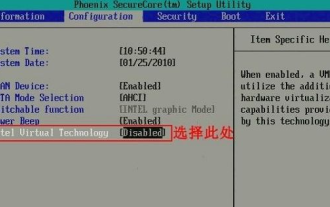
The shortcut keys for entering the BIOS of different brands of computers are different. Generally, press F2 , F10 , Del or Esc when powering on. After entering, find the virtualization settings option, usually called:

- Intel Virtualization Technology
- SVM mode (for AMD processors)
These options may be hidden under the Advanced, Security, or System Configuration menus. Set it to Enabled when found.
Note: Some laptop manufacturers (such as Dell and HP) will hide this option in the BIOS and turn it off by default. At this time, you may need to update the BIOS or switch to "Advanced Mode".
After saving and exiting, the system will restart, and the virtualization will be turned on.
Enable Hyper-V or virtual machine platform components in Windows 11
Even if you enable virtualization in the BIOS, Windows 11 will not automatically enable related features by default. You need to manually open Hyper-V or virtual machine platform components:
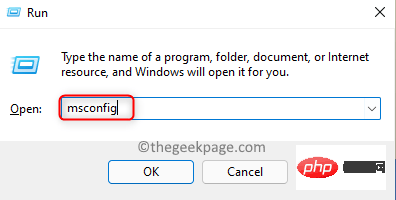
- Press
Win Sto search for "Enable or Turn off Windows Features" - Check:
- Hyper-V
- Virtual Machine Platform
- Optional: Windows Sandbox (if you need a lightweight test environment)
After clicking OK, the system will install components. After completion, you need to restart the computer.
This step is especially important if you are a developer and want to run WSL2 (Windows Subsystem for Linux 2), because WSL2 relies on virtualization capabilities.
Quick check and configuration using the command line (optional)
If you like to use the command line, you can also use PowerShell with administrator permissions to check and enable related features:
 # Check whether virtualization enables core isolation memory integrity disabled

# Enable virtual machine platform dism.exe /online /enable-feature /featurename:VirtualMachinePlatform /all /norestart

# Enable WSL2 required components wsl --install
If the prompt needs to restart, remember to execute it.
Basically these are the steps. The whole process is not complicated, but there are several things that are easy to ignore: the BIOS settings are different, the Hyper-V and virtual machine platform components need to be manually checked, and WSL2 has strong dependence on virtualization. As long as you do it step by step, it should be done.
The above is the detailed content of How to enable virtualization in Windows 11. For more information, please follow other related articles on the PHP Chinese website!

Hot AI Tools

Undress AI Tool
Undress images for free

Undresser.AI Undress
AI-powered app for creating realistic nude photos

AI Clothes Remover
Online AI tool for removing clothes from photos.

Clothoff.io
AI clothes remover

Video Face Swap
Swap faces in any video effortlessly with our completely free AI face swap tool!

Hot Article
Hot Tools

Notepad++7.3.1
Easy-to-use and free code editor

SublimeText3 Chinese version
Chinese version, very easy to use

Zend Studio 13.0.1
Powerful PHP integrated development environment

Dreamweaver CS6
Visual web development tools

SublimeText3 Mac version
God-level code editing software (SublimeText3)
Hot Topics


 How to enable vt virtualization in Lenovo win7 ultimate version
Jul 22, 2023 am 10:49 AM
How to enable vt virtualization in Lenovo win7 ultimate version
Jul 22, 2023 am 10:49 AM
To enable win7vt virtualization, you must set it in the BIOS. Many friends don’t know how to enable it. Let’s talk about how to enable vt virtualization in win7 system. Method 1: 1. After entering the BIOS settings, switch to the "Configuration" option, move the cursor to "IntelVirtualTechnology" and press Enter. If the VT option is not found or cannot be changed, it means that VT technology is not supported. 2. After opening the options, select "Enabled" and press Enter. 3. At this time, the option will change to Enabled. Press the F10 hotkey to save and exit to enable the VT function. Method two: 1. After entering the bios settings, switch to "Adv
 How to solve BlueStacks stuck on loading screen issue in Windows 11/10?
Apr 21, 2023 pm 12:07 PM
How to solve BlueStacks stuck on loading screen issue in Windows 11/10?
Apr 21, 2023 pm 12:07 PM
Wouldn’t it be great if you could play most of the great Android mobile games on your Windows system? Yes. Bluestacks is an Android emulator application that allows users to play Android games if installed on a Windows system. There have been recent reports that many users are facing issues while using the Bluestacks app. The problem is when the user tries to launch the app, it gets stuck on the initial loading screen and fails to open the home screen of the Bluestacks app. This could be due to one of the issues like certain compatibility mode issues, outdated windows, old versions of Bluestacks, etc. In this article we have collected some solutions that will
 win10vt virtualization enablement guide
Jan 03, 2024 pm 08:09 PM
win10vt virtualization enablement guide
Jan 03, 2024 pm 08:09 PM
After the vt virtualization function is turned on, the mobile game emulator can be run very well, but many friends do not know how to turn it on. Today, we will bring you how to turn on win10vt virtualization for these players. If you like it, come and learn it. How to turn on win10vt virtualization: 1. Press "win+i" to open settings and click "Update and Security". 2. Then click "Recover" in the left taskbar. 3. Click "Restart now" under Advanced startup. 4. After restarting, click "Advanced Options". 5. Enter the advanced options and click "uefi firmware settings". 6. Click "Restart" on the lower right. 7. After restarting, enter the motherboard interface and select "advanced" to confirm and enter. 8. Adjust to vt-d, and then adjust to enable.
 What are the virtualization software?
Feb 23, 2024 pm 02:42 PM
What are the virtualization software?
Feb 23, 2024 pm 02:42 PM
What are the virtualization software? With the continuous development of technology, virtualization technology has become an important concept in the field of modern computer science. The goal of virtualization is to logically divide physical resources such as CPU, memory and storage to form multiple virtual environments so that multiple operating systems and applications can run on the same physical computer at the same time. As a key tool to achieve this goal, virtualization software has received increasing attention and application. This article will introduce some common virtualization software. VMwarevSphere: VMw
 How to install Win11 on a virtual machine
Jul 03, 2023 pm 12:17 PM
How to install Win11 on a virtual machine
Jul 03, 2023 pm 12:17 PM
How to install Win11 on a virtual machine? Recently, some users want to try to use VirtualBox virtual machine to install Win11, but they are not sure about the specific operation method. In response to this situation, the editor will demonstrate how to use VirtualBox to install Win11. Many friends do not know how to operate in detail. The editor below has compiled the steps to install Win11 using VirtualBox. If you are interested, follow the editor and read on! Steps to install Win11 using VirtualBox 1. To download VirtualBox, please go to the official VirtualBox download page and download the .exe file for Windows. if you
 How to use virtualization and container technology on Kirin OS?
Aug 05, 2023 am 10:16 AM
How to use virtualization and container technology on Kirin OS?
Aug 05, 2023 am 10:16 AM
How to use virtualization and container technology on Kirin OS? Virtualization and container technologies are widely used in modern computer systems, and they can provide more efficient resource utilization and flexible system management. Kirin operating system is a domestic operating system based on Linux. It has always adhered to the open source concept and provided powerful and stable platform support. This article will introduce how to use virtualization and container technology on Kirin OS. 1. Virtualization technology installation KVM virtualization tool KVM is a virtualization based on the Linux kernel
 What are the virtualization software
Dec 20, 2023 pm 02:03 PM
What are the virtualization software
Dec 20, 2023 pm 02:03 PM
Virtualization software includes VMware, VirtualBox, Hyper-V, Parallels Desktop, Oracle VirtualBox, etc. Detailed introduction: 1. VMware is a mainstream virtualization software that provides virtual machines, virtualization solutions and cloud services; 2. VirtualBox is a free open source virtualization software that supports multiple operating systems, including Windows , Linux, macOS, etc.; 3. Hyper-V, etc.
 What are the three methods of gpu virtualization?
Dec 19, 2023 am 10:38 AM
What are the three methods of gpu virtualization?
Dec 19, 2023 am 10:38 AM
Three methods of GPU virtualization: 1. Hardware virtualization: Use hardware virtualization technology, such as Intel VT-d or AMD-Vi, to create a direct communication channel between the physical GPU and the virtual machine; 2. Software virtualization : Use software virtualization technology, such as VMware or Citrix, to simulate the physical GPU in the host operating system; 3. GPU pass-through: This method directly assigns the physical GPU to the virtual machine, and the virtual machine can directly access the resources of the physical GPU.
