
 Software Tutorial
Office Software
How to find archived emails in Outlook & change archive location
Software Tutorial
Office Software
How to find archived emails in Outlook & change archive location

If you need to locate archived emails or change where they are stored, Outlook provides several options. This guide will guide you through both tasks, ensuring easy access to your archived messages and other items.
Microsoft Outlook offers various ways to archive emails. Although all of them share the same name, they function differently and move items to different locations. Depending on how your emails were archived – through Auto Archive, Clean Up tool, or using the Archive button – you might find them in different folders.
Where to find Outlook Archive folder ------------------------------------If you used the Archive button in the ribbon, the same option in the right-click menu, or the Backspace key, Outlook moves the emails to the built-in Archive folder within your mailbox. This folder is always available alongside other inbuilt folders such as Inbox and Sent Items, even if you've never used it before. It exists by default in all Outlook versions – classic, new, and web.
To find your archived emails, follow these steps:
- Open Outlook.
- Look for the Archive folder in the left-hand pane.
- Click on it to view all archived emails.
- If needed, use the Search bar at the top to locate specific messages.

If you don't see the folder list in Outlook, check your folder pane settings.
To display folders in classic Outlook:
- Go to the View tab.
- In the Layout group, click Folder Pane, and select Normal.

To show folders in the new Outlook and web:
- Go to the View tab.
- Click Folder Pane > Folder list > Show.

Where to find auto archive in Outlook
When archiving emails using Auto Archive or Clean Up tool, they are stored in a separate Outlook Data File (.pst). In Outlook, these items appear under the Archives mailbox, which contains all archived folders.
If you enabled Show archive folder in folder list when setting up auto archive, the archive folders should appear automatically in the folder pane.
In case you saved different folders in separate archive .pst files, you may see multiple Archives mailboxes in your Outlook, as shown in the image below:

Note. This kind of archiving is only available in classic (old) Outlook; it is not supported in the new Outlook and web app.
How to add Archive mailbox to Outlook
If the Archives mailbox doesn't show up in Outlook automatically, you can open it manually by following these steps:
- Click File > Open & Export > Open Outlook Data File.

- In the dialog box that opens, navigate to the default location of the archive file or the folder where you saved it. Select your archive.pst file (or whatever name you gave to it) and click OK.


Once opened, the Archives mailbox will appear in your folder list. Now, you can search for and access your archived items as usual.
Default Outlook archive location
The archive.pst file is created automatically the first time AutoArchive runs or when you manually archive emails using the Clean Up tool.
The location of the archive file depends on your Outlook version. By default, it is stored in one of the following places on Windows 10 and Windows 11:
Outlook 365 - 2010:C:\Users\
Outlook 2007 and earlier:C:\Users\
If you cannot find the archive.pst file in the default location, you may have chosen a different folder when setting up auto-archive.
Here's how to quickly find the location of the Outlook archive file on your machine:
1. Right-click the Archives mailbox in your Outlook folder list. 2. Click Open File Location to go directly to the folder where the archive.pst file is stored.

Find the location of multiple archive files
If you've created multiple archives, you can quickly check their locations by following these steps:
1. Click File > Account Settings > Account Settings. 2. In the Account Settings dialog, switch to the Data Files tab. 3. In the list of files, look for Archives and check their location paths. 4. Select the desired file and click Open File Location to access its storage folder.

How to change Outlook archive location --------------------------------------
If you need to move your Outlook archive to a different location, simply copying or moving its PST file won't work – Outlook will create a new archive file in the default location when auto archive runs again. To properly relocate your archive, follow these steps:
Step 1. Disconnect archive.pst from Outlook
To remove archived emails from Outlook, right-click on the Archives mailbox in the list of folders, and then click Close Archive.

If the Archives mailbox does not appear in your list of folders, do this:
1. Go to File > Account Settings > Account Settings > Data Files tab. 2. Select the archive.pst file. 3. Click Remove to disconnect it from Outlook (this will not delete the file itself).

Step 2. Move the archive file to where you want it
Close Outlook, go to the location of your archive file, and copy it to the desired folder. Once copied, you can delete the original file or rename it to archive-old.pst as a backup until you confirm the new file is working.
Step 3. Add the moved archive to Outlook
To reconnect the moved archive file to Outlook, do this:
1. Open Outlook. 2. Click File > Open & Export > Open Outlook Data File. 3. Browse to the new location of your archive.pst file, select it, and click OK.

The Archives mailbox will reappear in your folder list.
Step 4. Change Auto Archive settings
The key step is to change the path in the Auto Archive settings so that Outlook knows where to store archived items. If you don't update this, Outlook will create a new archive.pst file in the original location.
1. Click File > Options > Advanced > AutoArchive Settings. 2. In the AutoArchive dialog box, make sure the Move old items to option is selected. 3. Click Browse, navigate to the new location of the archive file, and select it. 4. Click OK to save the changes.

This ensures that Outlook archives messages to the new location instead of creating a new file in the old location.
In summary, finding emails archived in Outlook is simple, whether they're stored in the default Archive folder or a separate PST file. If needed,
The above is the detailed content of How to find archived emails in Outlook & change archive location. For more information, please follow other related articles on the PHP Chinese website!

Hot AI Tools

Undress AI Tool
Undress images for free

Undresser.AI Undress
AI-powered app for creating realistic nude photos

AI Clothes Remover
Online AI tool for removing clothes from photos.

Clothoff.io
AI clothes remover

Video Face Swap
Swap faces in any video effortlessly with our completely free AI face swap tool!

Hot Article
Hot Tools

Notepad++7.3.1
Easy-to-use and free code editor

SublimeText3 Chinese version
Chinese version, very easy to use

Zend Studio 13.0.1
Powerful PHP integrated development environment

Dreamweaver CS6
Visual web development tools

SublimeText3 Mac version
God-level code editing software (SublimeText3)
Hot Topics


 Time formatting in Excel: 12/24 hour, custom, default
May 07, 2025 am 10:42 AM
Time formatting in Excel: 12/24 hour, custom, default
May 07, 2025 am 10:42 AM
This tutorial explains the basics and beyond of the Excel time format. Microsoft Excel has a handful of time features and knowing them in depth can save you a lot of time. To leverage powerful time functions, it helps to know how Excel st
 I Use Custom Number Formatting Instead of Conditional Formatting in Excel
May 06, 2025 am 12:56 AM
I Use Custom Number Formatting Instead of Conditional Formatting in Excel
May 06, 2025 am 12:56 AM
Detailed explanation of custom number formats: Quickly create personalized number formats in Excel Excel provides a variety of data formatting tools, but sometimes built-in tools are not able to meet specific needs or are inefficient. At this point, custom digital formats can come in handy to quickly create digital formats that meet your needs. What is a custom number format and how it works? In Excel, each cell has its own number format, which you can view by selecting the cell and in the Number group on the Start tab of the ribbon. Related: Excel's 12 digital format options and their impact on data Adjust the number format of the cell to match its data type. You can click on the "Number Format" dialog launcher and then
 WEEKDAY formula in Excel to get day of week, weekends and workdays
May 09, 2025 am 10:25 AM
WEEKDAY formula in Excel to get day of week, weekends and workdays
May 09, 2025 am 10:25 AM
If you are looking for an Excel function to get day of week from date, you've landed on the right page. This tutorial will teach you how to use the WEEKDAY formula in Excel to convert a date to a weekday name, filter, highlight and count
 Excel WORKDAY and NETWORKDAYS functions to calculate working days
May 08, 2025 am 10:49 AM
Excel WORKDAY and NETWORKDAYS functions to calculate working days
May 08, 2025 am 10:49 AM
This tutorial demonstrates how to use Excel's WORKDAY, WORKDAY.INTL, NETWORKDAYS, and NETWORKDAYS.INTL functions to efficiently calculate weekdays, considering custom weekend settings and holidays. Microsoft Excel offers specialized functions for wor
 5 Excel Tips for Power Users
May 07, 2025 am 12:55 AM
5 Excel Tips for Power Users
May 07, 2025 am 12:55 AM
Excel efficiency improvement: Five practical tips to help you process tables quickly Even users who have been using Microsoft Excel for decades can always discover new techniques to improve efficiency. This article shares five practical Excel tips I have accumulated over the years to help you speed up your spreadsheet workflow. 1. No need to freeze the first line: Use Excel tables cleverly When working with Excel tables containing a lot of data, you may get used to freezing the first row through the View tab so that the header is always visible when scrolling. But in fact, if you format the data as an Excel table, you don't need this step. First, make sure that the first row of the data contains the column title. Then, select the data and click "Table" in the "Insert" tab. 2.
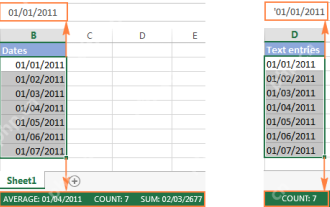 Excel: convert text to date and number to date
May 09, 2025 am 09:36 AM
Excel: convert text to date and number to date
May 09, 2025 am 09:36 AM
This tutorial demonstrates various Excel techniques for converting text and numbers into dates, including both formula-based and non-formula methods. You'll learn to efficiently transform text strings into usable date formats. Often, dates imported
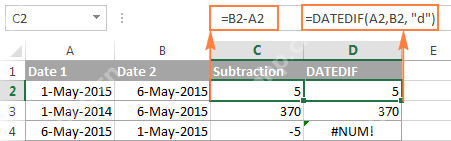
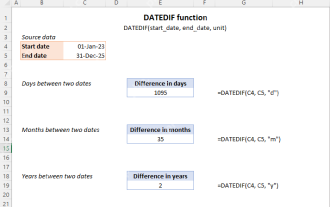 Excel DATEDIF function to get difference between two dates
May 08, 2025 am 10:45 AM
Excel DATEDIF function to get difference between two dates
May 08, 2025 am 10:45 AM
This tutorial provides a concise explanation of Excel's DATEDIF function and offers formula examples for calculating date differences in days, weeks, months, or years. We've previously covered date and time manipulation in Excel, including formattin
 How to add and subtract dates in Excel
May 08, 2025 am 11:36 AM
How to add and subtract dates in Excel
May 08, 2025 am 11:36 AM
In this tutorial, you will find a variety of useful formulas to add and subtract dates in Excel, such as subtracting two dates, adding days, weeks, months and years to a date, and more. If you have been following our tutorials to working
