Chances are that you want to set some kind of minimum requirements on your WooCommerce store before your customers checkout. What follows is a guide on how to set these requirements and restrictions, without needing to use any plugins at all:
- Setting A Minimum Weight Requirement Per Order
- Setting A Minimum Number Of Products Required Per Order
- Setting A Minimum Quantity Per Product
- Setting A Minimum Dollar Amount Per Order
Key Takeaways
- Setting minimum requirements in WooCommerce can be achieved without the use of plugins, allowing for better control and customization of the checkout process. This includes setting a minimum weight requirement per order, a minimum number of products required per order, a minimum quantity per product, and a minimum dollar amount per order.
- The process involves using the ‘woocommerce_check_cart_items’ action provided by WooCommerce to run functions and execute code. This code should be placed in the theme’s functions.php file and is compatible with the latest versions of WordPress and WooCommerce.
- Specific WooCommerce functions can be used to set minimum requirements such as weight, product count, product quantity, and total cart value. Each requirement comes with its own function that checks the cart items and compares them to the set minimum requirement, displaying an error message if the requirement is not met.
- WooCommerce also provides the flexibility to set minimum and maximum quantities for specific products or categories, display quantity requirements on the product page, and update product stock programmatically. These can be achieved through built-in functions or plugins like ‘WooCommerce Min/Max Quantities’ and ‘WooCommerce Quantity Increment’.
Methods Used In This Article
There is always more than one way of setting minimum requirements in WooCommerce; the results might even be identical. But I consider the methods described below to be the right (or better) way of doing it. Any suggestions on how you accomplish these tasks or further improvements are always welcome and received well.
The following code has been tested in the latest versions available for WordPress (3.9.1) and WooCommerce (2.1.12). We’ll be using the dummy data provided for WooCommerce when you install the plugin. The code should go in your theme’s functions.php file and is heavily commented so it’s easier to follow and/or modify if needed.
We are going to be using the woocommerce_check_cart_items action provided by WooCommerce to run our functions and execute our code. Visit the following link for a complete list of WooCommerce actions and filters, also known as hooks.
Setting A Minimum Weight Requirement Per Order

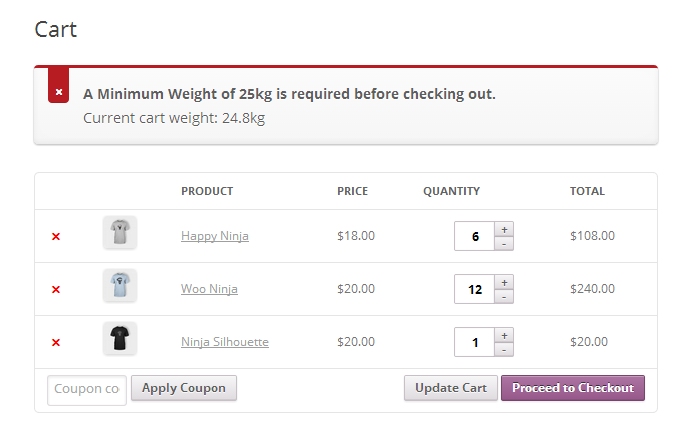
It is often useful to restrict your customer(s) from completing the checkout process without having met a minimum weight requirement. Minium weight requirements can help make your shipping costs more manageable, and the shipping process more streamlined. Don’t forget to change the minimum weight requirement to whatever works best for you, and keep in mind that weight is calculated in whatever weight unit you have set under WooCommerce -> Settings -> Products.
<span>// Set a minimum weight requirement before checking out
</span><span>add_action( 'woocommerce_check_cart_items', 'spyr_set_weight_requirements' );
</span><span>function spyr_set_weight_requirements() {
</span>	<span>// Only run in the Cart or Checkout pages
</span>	<span>if( is_cart() || is_checkout() ) {
</span>		<span>global $woocommerce;
</span>		<span>// Set the minimum weight before checking out
</span>		<span>$minimum_weight = 25;
</span>		<span>// Get the Cart's content total weight
</span>		<span>$cart_contents_weight = WC()->cart->cart_contents_weight;
</span>		<span>// Compare values and add an error is Cart's total weight
</span>	    <span>// happens to be less than the minimum required before checking out.
</span>		<span>// Will display a message along the lines of
</span>		<span>// A Minimum Weight of 25kg is required before checking out. (Cont. below)
</span>		<span>// Current cart weight: 12.5kg
</span>		<span>if( $cart_contents_weight < $minimum_weight  ) {
</span>			<span>// Display our error message
</span>			<span>wc_add_notice( sprintf('<strong>A Minimum Weight of %s%s is required before checking out.</strong>'
</span>				<span>. '<br />Current cart weight: %s%s',
</span>				<span>$minimum_weight,
</span>				<span>get_option( 'woocommerce_weight_unit' ),
</span>				<span>$cart_contents_weight,
</span>				<span>get_option( 'woocommerce_weight_unit' ),
</span>				<span>get_permalink( wc_get_page_id( 'shop' ) )
</span>				<span>),
</span>			<span>'error'	);
</span>		<span>}
</span>	<span>}
</span><span>}</span>
Setting A Minimum Number Of Products Required Per Order

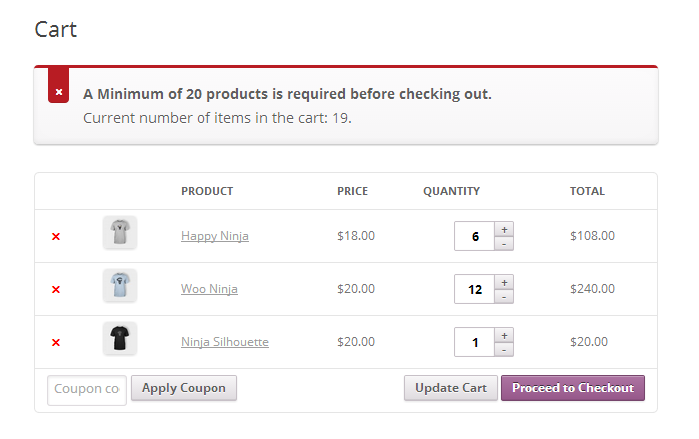
Another valid scenario is setting a minimum number of products that have to be ordered at a time before allowing the customer to fully pay for his order and shipped. Change ’20’ to whatever works best for your needs. As in the previous example, you want to make sure that you only run this code on the cart and checkout pages. This is we use is_cart() and is_checkout(), which return ‘true’ whenever we are on those two specific pages. Learn more about WooCommerce conditionals Tags.
<span>// Set a minimum number of products requirement before checking out
</span><span>add_action( 'woocommerce_check_cart_items', 'spyr_set_min_num_products' );
</span><span>function spyr_set_min_num_products() {
</span>	<span>// Only run in the Cart or Checkout pages
</span>	<span>if( is_cart() || is_checkout() ) {
</span>		<span>global $woocommerce;
</span>
		<span>// Set the minimum number of products before checking out
</span>		<span>$minimum_num_products = 20;
</span>		<span>// Get the Cart's total number of products
</span>		<span>$cart_num_products = WC()->cart->cart_contents_count;
</span>
		<span>// Compare values and add an error is Cart's total number of products
</span>	    <span>// happens to be less than the minimum required before checking out.
</span>		<span>// Will display a message along the lines of
</span>		<span>// A Minimum of 20 products is required before checking out. (Cont. below)
</span>		<span>// Current number of items in the cart: 6
</span>		<span>if( $cart_num_products < $minimum_num_products ) {
</span>			<span>// Display our error message
</span>	        <span>wc_add_notice( sprintf( '<strong>A Minimum of %s products is required before checking out.</strong>'
</span>	        	<span>. '<br />Current number of items in the cart: %s.',
</span>	        	<span>$minimum_num_products,
</span>	        	<span>$cart_num_products ),
</span>	        <span>'error' );
</span>		<span>}
</span>	<span>}
</span><span>}</span>
Setting A Minimum Quantity Per Product

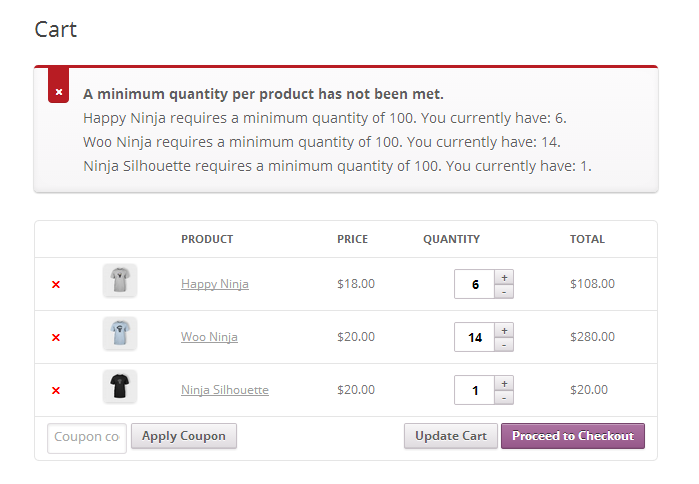
Setting a minimum quantity per product is a common requirement for WooCommerce stores, specially if you are selling wholesale. Setting a minimum quantity will restrict your customer(s) from purchasing a specific product in lesser quantities. For us to check for the minimum quantities, we need to loop through every single product in the cart and check it against our minimum quantity per product requirements set in place.
To set these restrictions, you need to create an array which holds your rules/restrictions inside another array. Be careful when editing this array, and make sure that all code is entered accurately in order to prevent errors and unexpected results. The format you need to use is as follows:
<span>// Product Id and Min. Quantities per Product
</span><span>// id = Product ID
</span><span>// min = Minimum quantity
</span><span>$product_min_qty = array(
</span>	<span>array( 'id' => 47, 'min' => 100 ),
</span>	<span>array( 'id' => 37, 'min' => 100 ),
</span>	<span>array( 'id' => 34, 'min' => 100 ),
</span>	<span>array( 'id' => 31, 'min' => 100 ),
</span><span>);</span>
Here is where the magic happens.
<span>// Set minimum quantity per product before checking out
</span><span>add_action( 'woocommerce_check_cart_items', 'spyr_set_min_qty_per_product' );
</span><span>function spyr_set_min_qty_per_product() {
</span>	<span>// Only run in the Cart or Checkout pages
</span>	<span>if( is_cart() || is_checkout() ) {
</span>		<span>global $woocommerce;
</span>
		<span>// Product Id and Min. Quantities per Product
</span>		<span>$product_min_qty = array(
</span>			<span>array( 'id' => 47, 'min' => 100 ),
</span>			<span>array( 'id' => 37, 'min' => 100 ),
</span>			<span>array( 'id' => 34, 'min' => 100 ),
</span>			<span>array( 'id' => 31, 'min' => 100 ),
</span>		<span>);
</span>
		<span>// Will increment
</span>		<span>$i = 0;
</span>		<span>// Will hold information about products that have not
</span>		<span>// met the minimum order quantity
</span>		<span>$bad_products = array();
</span>
		<span>// Loop through the products in the Cart
</span>		<span>foreach( $woocommerce->cart->cart_contents as $product_in_cart ) {
</span>			<span>// Loop through our minimum order quantities per product
</span>			<span>foreach( $product_min_qty as $product_to_test ) {
</span>				<span>// If we can match the product ID to the ID set on the minimum required array
</span>				<span>if( $product_to_test['id'] == $product_in_cart['product_id'] ) {
</span>					<span>// If the quantity required is less than than the quantity in the cart now
</span>					<span>if( $product_in_cart['quantity'] < $product_to_test['min'] ) {
</span>						<span>// Get the product ID
</span>						<span>$bad_products[$i]['id'] = $product_in_cart['product_id'];
</span>						<span>// Get the Product quantity already in the cart for this product
</span>						<span>$bad_products[$i]['in_cart'] = $product_in_cart['quantity'];
</span>						<span>// Get the minimum required for this product
</span>						<span>$bad_products[$i]['min_req'] = $product_to_test['min'];
</span>					<span>}
</span>				<span>}
</span>			<span>}
</span>			<span>// Increment $i
</span>			<span>$i++;
</span>		<span>}
</span>
		<span>// Time to build our error message to inform the customer
</span>		<span>// About the minimum quantity per order.
</span>		<span>if( is_array( $bad_products) && count( $bad_products ) > 1 ) {
</span>			<span>// Lets begin building our message
</span>			<span>$message = '<strong>A minimum quantity per product has not been met.</strong><br />';
</span>			<span>foreach( $bad_products as $bad_product ) {
</span>				<span>// Append to the current message
</span>				<span>$message .= get_the_title( $bad_product['id'] ) .' requires a minimum quantity of '
</span>						 <span>. $bad_product['min_req']
</span>						 <span>.'. You currently have: '. $bad_product['in_cart'] .'.<br />';
</span>			<span>}
</span>			<span>wc_add_notice( $message, 'error' );
</span>		<span>}
</span>	<span>}
</span><span>}</span>
Setting A Minimum Dollar Amount Per Order

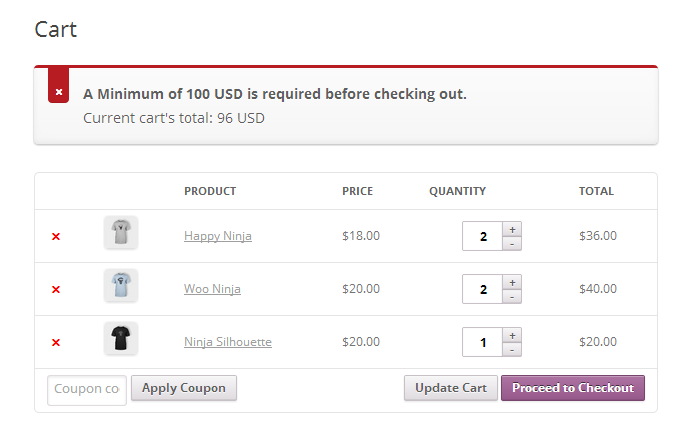
Last but not least, you may want to set a minimum dollar amount that must be spent before your customer is allowed to checkout. Please note that we are calculating the total value using the subtotal, before shipping and taxes are added to the final order total.
<span>// Set a minimum dollar amount per order
</span><span>add_action( 'woocommerce_check_cart_items', 'spyr_set_min_total' );
</span><span>function spyr_set_min_total() {
</span>	<span>// Only run in the Cart or Checkout pages
</span>	<span>if( is_cart() || is_checkout() ) {
</span>		<span>global $woocommerce;
</span>
		<span>// Set minimum cart total
</span>		<span>$minimum_cart_total = 10;
</span>
		<span>// Total we are going to be using for the Math
</span>		<span>// This is before taxes and shipping charges
</span>		<span>$total = WC()->cart->subtotal;
</span>
		<span>// Compare values and add an error is Cart's total
</span>	    <span>// happens to be less than the minimum required before checking out.
</span>		<span>// Will display a message along the lines of
</span>		<span>// A Minimum of 10 USD is required before checking out. (Cont. below)
</span>		<span>// Current cart total: 6 USD
</span>		<span>if( $total <= $minimum_cart_total  ) {
</span>			<span>// Display our error message
</span>			<span>wc_add_notice( sprintf( '<strong>A Minimum of %s %s is required before checking out.</strong>'
</span>				<span>.'<br />Current cart\'s total: %s %s',
</span>				<span>$minimum_cart_total,
</span>				<span>get_option( 'woocommerce_currency'),
</span>				<span>$total,
</span>				<span>get_option( 'woocommerce_currency') ),
</span>			<span>'error' );
</span>		<span>}
</span>	<span>}
</span><span>}</span>
Conclusion
Are you can see, WooCommerce allows you to use actions and filters to change the normal checkout process. All stores are different and being able to set these restrictions when needed is crucial. For us developers, who need to accomplish tasks like these, knowing how to do it is vital.
Thanks for reading, comments or suggestions on how to improve the code are always welcome. If you have ideas for a specific WooCommerce modification, don’t be shy and post a link to it in the comments for discussion.
Frequently Asked Questions on Minimum Checkout Requirements in WooCommerce
How Can I Set a Minimum Quantity for a Specific Product in WooCommerce?
To set a minimum quantity for a specific product in WooCommerce, you need to navigate to the product data section of the product you want to set a minimum quantity for. Under the ‘Inventory’ tab, you will find an option to set the ‘Minimum Quantity’. Enter the desired number and save your changes. This will ensure that customers must purchase at least this quantity of the product to proceed with checkout.
Can I Set a Maximum Quantity for Products in WooCommerce?
Yes, you can set a maximum quantity for products in WooCommerce. Similar to setting a minimum quantity, you can do this from the product data section under the ‘Inventory’ tab. There, you will find an option to set the ‘Maximum Quantity’. Enter the desired number and save your changes. This will limit the number of each product a customer can purchase in a single order.
Is it Possible to Limit the Total Quantity of Products in a Single Order?
Yes, it is possible to limit the total quantity of products in a single order in WooCommerce. This can be done by using a plugin like ‘MinMax Quantity for WooCommerce’. Once installed and activated, you can set a minimum and maximum limit for the total quantity of products in a single order from the plugin’s settings.
How Can I Update Product Stock Programmatically in WooCommerce?
Updating product stock programmatically in WooCommerce can be done by using WooCommerce’s built-in functions. You can use the wc_update_product_stock() function to update the stock quantity of a product. This function takes two parameters: the product ID and the new stock quantity.
Can I Set a Minimum Order Amount in WooCommerce?
Yes, you can set a minimum order amount in WooCommerce. This can be done by using a plugin like ‘WooCommerce Min/Max Quantities’. Once installed and activated, you can set a minimum order amount from the plugin’s settings. This will require customers to reach this minimum order amount before they can proceed with checkout.
How Can I Set Quantity Increments for Products in WooCommerce?
Setting quantity increments for products in WooCommerce can be done by using a plugin like ‘WooCommerce Quantity Increment’. Once installed and activated, you can set quantity increments for each product from the product data section under the ‘Inventory’ tab.
Can I Set Different Minimum and Maximum Quantities for Different Products?
Yes, you can set different minimum and maximum quantities for different products in WooCommerce. This can be done from the product data section of each product. Under the ‘Inventory’ tab, you can set the ‘Minimum Quantity’ and ‘Maximum Quantity’ for each product individually.
Is it Possible to Set a Minimum and Maximum Quantity for Variations of a Product?
Yes, it is possible to set a minimum and maximum quantity for variations of a product in WooCommerce. This can be done from the variations section of the product data. For each variation, you can set a ‘Minimum Quantity’ and ‘Maximum Quantity’.
How Can I Display the Minimum and Maximum Quantity Requirements on the Product Page?
Displaying the minimum and maximum quantity requirements on the product page can be done by using a plugin like ‘WooCommerce Min/Max Quantities’. This plugin adds a notice on the product page displaying the minimum and maximum quantity requirements for the product.
Can I Set a Minimum and Maximum Quantity for Specific Categories of Products?
Yes, you can set a minimum and maximum quantity for specific categories of products in WooCommerce. This can be done by using a plugin like ‘WooCommerce Min/Max Quantities’. Once installed and activated, you can set minimum and maximum quantities for each product category from the plugin’s settings.
The above is the detailed content of Setting Minimum Checkout Requirements in WooCommerce. For more information, please follow other related articles on the PHP Chinese website!

Hot AI Tools

Undress AI Tool
Undress images for free

Undresser.AI Undress
AI-powered app for creating realistic nude photos

AI Clothes Remover
Online AI tool for removing clothes from photos.

Clothoff.io
AI clothes remover

Video Face Swap
Swap faces in any video effortlessly with our completely free AI face swap tool!

Hot Article

Hot Tools

Notepad++7.3.1
Easy-to-use and free code editor

SublimeText3 Chinese version
Chinese version, very easy to use

Zend Studio 13.0.1
Powerful PHP integrated development environment

Dreamweaver CS6
Visual web development tools

SublimeText3 Mac version
God-level code editing software (SublimeText3)
 How to diagnose high CPU usage caused by WordPress
Jul 06, 2025 am 12:08 AM
The main reasons why WordPress causes the surge in server CPU usage include plug-in problems, inefficient database query, poor quality of theme code, or surge in traffic. 1. First, confirm whether it is a high load caused by WordPress through top, htop or control panel tools; 2. Enter troubleshooting mode to gradually enable plug-ins to troubleshoot performance bottlenecks, use QueryMonitor to analyze the plug-in execution and delete or replace inefficient plug-ins; 3. Install cache plug-ins, clean up redundant data, analyze slow query logs to optimize the database; 4. Check whether the topic has problems such as overloading content, complex queries, or lack of caching mechanisms. It is recommended to use standard topic tests to compare and optimize the code logic. Follow the above steps to check and solve the location and solve the problem one by one.
 How to minify JavaScript files in WordPress
Jul 07, 2025 am 01:11 AM
Miniving JavaScript files can improve WordPress website loading speed by removing blanks, comments, and useless code. 1. Use cache plug-ins that support merge compression, such as W3TotalCache, enable and select compression mode in the "Minify" option; 2. Use a dedicated compression plug-in such as FastVelocityMinify to provide more granular control; 3. Manually compress JS files and upload them through FTP, suitable for users familiar with development tools. Note that some themes or plug-in scripts may conflict with the compression function, and you need to thoroughly test the website functions after activation.
 How to optimize WordPress without plugins
Jul 05, 2025 am 12:01 AM
Methods to optimize WordPress sites that do not rely on plug-ins include: 1. Use lightweight themes, such as Astra or GeneratePress, to avoid pile-up themes; 2. Manually compress and merge CSS and JS files to reduce HTTP requests; 3. Optimize images before uploading, use WebP format and control file size; 4. Configure.htaccess to enable browser cache, and connect to CDN to improve static resource loading speed; 5. Limit article revisions and regularly clean database redundant data.
 How to use the Transients API for caching
Jul 05, 2025 am 12:05 AM
TransientsAPI is a built-in tool in WordPress for temporarily storing automatic expiration data. Its core functions are set_transient, get_transient and delete_transient. Compared with OptionsAPI, transients supports setting time of survival (TTL), which is suitable for scenarios such as cache API request results and complex computing data. When using it, you need to pay attention to the uniqueness of key naming and namespace, cache "lazy deletion" mechanism, and the issue that may not last in the object cache environment. Typical application scenarios include reducing external request frequency, controlling code execution rhythm, and improving page loading performance.
 How to prevent comment spam programmatically
Jul 08, 2025 am 12:04 AM
The most effective way to prevent comment spam is to automatically identify and intercept it through programmatic means. 1. Use verification code mechanisms (such as Googler CAPTCHA or hCaptcha) to effectively distinguish between humans and robots, especially suitable for public websites; 2. Set hidden fields (Honeypot technology), and use robots to automatically fill in features to identify spam comments without affecting user experience; 3. Check the blacklist of comment content keywords, filter spam information through sensitive word matching, and pay attention to avoid misjudgment; 4. Judge the frequency and source IP of comments, limit the number of submissions per unit time and establish a blacklist; 5. Use third-party anti-spam services (such as Akismet, Cloudflare) to improve identification accuracy. Can be based on the website
 How to enqueue assets for a Gutenberg block
Jul 09, 2025 am 12:14 AM
When developing Gutenberg blocks, the correct method of enqueue assets includes: 1. Use register_block_type to specify the paths of editor_script, editor_style and style; 2. Register resources through wp_register_script and wp_register_style in functions.php or plug-in, and set the correct dependencies and versions; 3. Configure the build tool to output the appropriate module format and ensure that the path is consistent; 4. Control the loading logic of the front-end style through add_theme_support or enqueue_block_assets to ensure that the loading logic of the front-end style is ensured.
 How to add custom fields to users
Jul 06, 2025 am 12:18 AM
To add custom user fields, you need to select the extension method according to the platform and pay attention to data verification and permission control. Common practices include: 1. Use additional tables or key-value pairs of the database to store information; 2. Add input boxes to the front end and integrate with the back end; 3. Constrain format checks and access permissions for sensitive data; 4. Update interfaces and templates to support new field display and editing, while taking into account mobile adaptation and user experience.
 How to optimize WordPress robots txt
Jul 13, 2025 am 12:37 AM
robots.txt is crucial to the SEO of WordPress websites, and can guide search engines to crawl behavior, avoid duplicate content and improve efficiency. 1. Block system paths such as /wp-admin/ and /wp-includes/, but avoid accidentally blocking the /uploads/ directory; 2. Add Sitemap paths such as Sitemap: https://yourdomain.com/sitemap.xml to help search engines quickly discover site maps; 3. Limit /page/ and URLs with parameters to reduce crawler waste, but be careful not to block important archive pages; 4. Avoid common mistakes such as accidentally blocking the entire site, cache plug-in affecting updates, and ignoring the matching of mobile terminals and subdomains.


