


As a developer, mastering debugging techniques within integrated development environments (IDEs) is crucial for efficient and effective Java application development. Let's explore what IDEs are, why you should adeptly debug Java applications using them, and the step-by-step process to accomplish this.
What are IDEs?

IDEs, or Integrated Development Environments, are software suites that combine tools necessary for software development into a single graphical user interface. Common features include a code editor, debugger, compiler, and project management tools.
Popular IDEs for Java development include:
- IntelliJ IDEA
- Eclipse
- NetBeans
- Visual Studio Code with Java extensions
These IDEs not only help write and compile code but also provide extensive debugging tools, simplifying the process of identifying and resolving issues in your code.
Why Master Debugging Java Applications Using IDEs?
Debugging is vital for producing reliable and efficient code. Here are a few reasons why mastering debugging within IDEs is beneficial:
- Efficiency: IDEs provide powerful debugging capabilities that streamline the process of identifying and fixing bugs, saving valuable development time.
- Visualization: They offer visual aids like breakpoints, stack traces, and variable watchers that simplify understanding the code flow and state at runtime.
- Integration: Debugging tools are seamlessly integrated with other development tools within the IDE, providing a cohesive and unified workflow.
- Automation: IDEs can automate repetitive debugging tasks, allowing developers to focus more on solving complex problems.
How to Debug Java Applications Using IDEs?
Here’s a practical step-by-step guide on how to debug Java applications using an IDE, specifically IntelliJ IDEA, which is widely regarded for its robust debugging capabilities.
Step 1: Setting Up Your Project
First, ensure your Java project is correctly set up in the IDE:
- Open IntelliJ IDEA and create a new Java project or import an existing one.
- Ensure your project structure is correctly configured with all necessary dependencies.

Step 2: Writing Code
Write your Java code, ensuring you have a somewhat complex example that would benefit from debugging. Here’s a simple example:
public class Main {
    public static void main(String[] args) {
        int result = addNumbers(5, 3);
        System.out.println("Result: " + result);
    }

    public static int addNumbers(int a, int b) {
        int sum = a + b;
        return sum;
    }
}

Step 3: Setting Breakpoints
Breakpoints are crucial for inspecting the code flow:
- Click in the left margin next to the line number where you want to pause execution (e.g., on int sum = a b;).

Step 4: Running in Debug Mode
To start debugging:
- Click the debug icon (a bug symbol) or press Shift F9.
- The application will start and pause execution at the breakpoint.

Step 5: Inspecting Variables and State
When execution is paused, you can inspect variables and the application state:
- Hover over variables to see their current values.
- Use the Debug window to view the call stack, variables, and more.

Step 6: Stepping Through Code
Control execution using step commands:
- Step Over (F8): Move to the next line of code.
- Step Into (F7): Enter into the method call.
- Step Out (Shift F8): Exit the current method.
- Resume (F9): Continue execution until the next breakpoint.

Step 7: Evaluating Expressions
Evaluate complex expressions:
- Right-click the code and select "Evaluate Expression" to test specific conditions or logic on-the-fly.

Introducing EchoAPI for IntelliJ IDEA
Now that you understand how to debug Java applications using IntelliJ IDEA, let me introduce you to a fantastic tool that can further enhance your development experience: EchoAPI for IntelliJ IDEA.
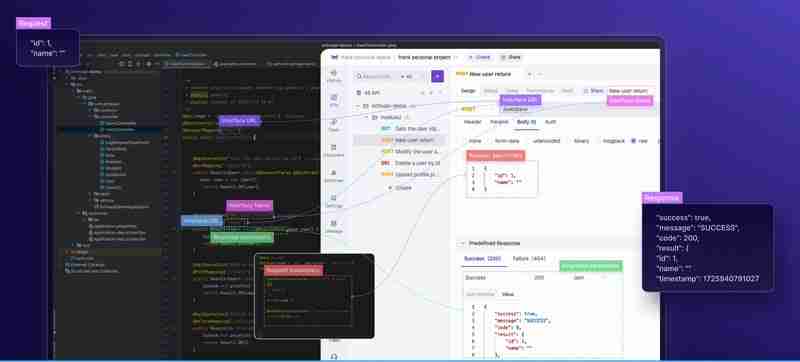
EchoAPI for IntelliJ IDEA is not just another plugin; it’s designed to streamline and elevate your Java development workflow. Imagine having the ability to generate comprehensive API documentation, test APIs instantly, and synchronize your data—all with a few clicks. Let's dive into some of the standout features EchoAPI offers:
Auto-Generated Documentation
With EchoAPI, you can effortlessly create detailed and comprehensive API documentation tailored specifically to your code. This frees you to focus more on coding, while the plugin handles the creation of clear and concise documents, aiding quick understanding and navigation.

One-Click Debugging
EchoAPI significantly boosts productivity by allowing you to test your APIs in real-time with just one click. This feature provides instant responses, helping you identify and fix issues on the fly, thus saving you precious development time.

Custom APIs
Creating and debugging custom APIs has never been easier. EchoAPI lets you craft APIs to meet specific needs and ensures their performance through easy, one-click testing, making your development process smooth and efficient.
One-Click Sync
Backing up your data securely is a breeze with EchoAPI’s One-Click Sync. This feature ensures that your data is safely stored in the EchoAPI Client, offering you peace of mind with up-to-date backups.
Flexible Parameter Parsing
Handling diverse data types and customizing parameter parsing to suit various API scenarios is made simple with EchoAPI. This flexibility ensures your APIs can accommodate a wide range of requests effortlessly.
Mini Lightweight Design
EchoAPI boasts a compact and efficient design, providing a responsive user experience without the bloat of unnecessary software. This minimalistic approach keeps the focus on coding and debugging, maintaining an agile development environment.

These features collectively enhance both the development and debugging processes, making EchoAPI for IntelliJ IDEA an indispensable tool for serious developers. By integrating EchoAPI into your workflow, you not only streamline your tasks but also elevate the overall efficiency and productivity of your coding endeavors.
Conclusion
Mastering debugging in IDEs is essential for any Java developer. It enhances efficiency, helps visualize complex code flows, and integrates seamlessly with other development tools, making it easier to identify and resolve issues. IntelliJ IDEA, with its powerful debugging capabilities, stands out as a premier choice for Java development.
Additionally, the EchoAPI for IntelliJ IDEA plugin further elevates the development experience by offering comprehensive API documentation, instantaneous debugging, custom API creation, secure data backup, flexible parameter parsing, and an efficient, lightweight design.
By combining the robust debugging tools of IntelliJ IDEA with the enhanced functionalities of EchoAPI, developers can achieve a more streamlined, productive, and efficient workflow. Happy coding and debugging!
The above is the detailed content of How to Debug Java Applications Using IDEs. For more information, please follow other related articles on the PHP Chinese website!

Hot AI Tools

Undress AI Tool
Undress images for free

Undresser.AI Undress
AI-powered app for creating realistic nude photos

AI Clothes Remover
Online AI tool for removing clothes from photos.

Clothoff.io
AI clothes remover

Video Face Swap
Swap faces in any video effortlessly with our completely free AI face swap tool!

Hot Article
Hot Tools

Notepad++7.3.1
Easy-to-use and free code editor

SublimeText3 Chinese version
Chinese version, very easy to use

Zend Studio 13.0.1
Powerful PHP integrated development environment

Dreamweaver CS6
Visual web development tools

SublimeText3 Mac version
God-level code editing software (SublimeText3)
Hot Topics


 Differences Between Callable and Runnable in Java
Jul 04, 2025 am 02:50 AM
Differences Between Callable and Runnable in Java
Jul 04, 2025 am 02:50 AM
There are three main differences between Callable and Runnable in Java. First, the callable method can return the result, suitable for tasks that need to return values, such as Callable; while the run() method of Runnable has no return value, suitable for tasks that do not need to return, such as logging. Second, Callable allows to throw checked exceptions to facilitate error transmission; while Runnable must handle exceptions internally. Third, Runnable can be directly passed to Thread or ExecutorService, while Callable can only be submitted to ExecutorService and returns the Future object to
 Asynchronous Programming Techniques in Modern Java
Jul 07, 2025 am 02:24 AM
Asynchronous Programming Techniques in Modern Java
Jul 07, 2025 am 02:24 AM
Java supports asynchronous programming including the use of CompletableFuture, responsive streams (such as ProjectReactor), and virtual threads in Java19. 1.CompletableFuture improves code readability and maintenance through chain calls, and supports task orchestration and exception handling; 2. ProjectReactor provides Mono and Flux types to implement responsive programming, with backpressure mechanism and rich operators; 3. Virtual threads reduce concurrency costs, are suitable for I/O-intensive tasks, and are lighter and easier to expand than traditional platform threads. Each method has applicable scenarios, and appropriate tools should be selected according to your needs and mixed models should be avoided to maintain simplicity
 Best Practices for Using Enums in Java
Jul 07, 2025 am 02:35 AM
Best Practices for Using Enums in Java
Jul 07, 2025 am 02:35 AM
In Java, enums are suitable for representing fixed constant sets. Best practices include: 1. Use enum to represent fixed state or options to improve type safety and readability; 2. Add properties and methods to enums to enhance flexibility, such as defining fields, constructors, helper methods, etc.; 3. Use EnumMap and EnumSet to improve performance and type safety because they are more efficient based on arrays; 4. Avoid abuse of enums, such as dynamic values, frequent changes or complex logic scenarios, which should be replaced by other methods. Correct use of enum can improve code quality and reduce errors, but you need to pay attention to its applicable boundaries.
 Understanding Java NIO and Its Advantages
Jul 08, 2025 am 02:55 AM
Understanding Java NIO and Its Advantages
Jul 08, 2025 am 02:55 AM
JavaNIO is a new IOAPI introduced by Java 1.4. 1) is aimed at buffers and channels, 2) contains Buffer, Channel and Selector core components, 3) supports non-blocking mode, and 4) handles concurrent connections more efficiently than traditional IO. Its advantages are reflected in: 1) Non-blocking IO reduces thread overhead, 2) Buffer improves data transmission efficiency, 3) Selector realizes multiplexing, and 4) Memory mapping speeds up file reading and writing. Note when using: 1) The flip/clear operation of the Buffer is easy to be confused, 2) Incomplete data needs to be processed manually without blocking, 3) Selector registration must be canceled in time, 4) NIO is not suitable for all scenarios.
 How Java ClassLoaders Work Internally
Jul 06, 2025 am 02:53 AM
How Java ClassLoaders Work Internally
Jul 06, 2025 am 02:53 AM
Java's class loading mechanism is implemented through ClassLoader, and its core workflow is divided into three stages: loading, linking and initialization. During the loading phase, ClassLoader dynamically reads the bytecode of the class and creates Class objects; links include verifying the correctness of the class, allocating memory to static variables, and parsing symbol references; initialization performs static code blocks and static variable assignments. Class loading adopts the parent delegation model, and prioritizes the parent class loader to find classes, and try Bootstrap, Extension, and ApplicationClassLoader in turn to ensure that the core class library is safe and avoids duplicate loading. Developers can customize ClassLoader, such as URLClassL
 Exploring Different Synchronization Mechanisms in Java
Jul 04, 2025 am 02:53 AM
Exploring Different Synchronization Mechanisms in Java
Jul 04, 2025 am 02:53 AM
Javaprovidesmultiplesynchronizationtoolsforthreadsafety.1.synchronizedblocksensuremutualexclusionbylockingmethodsorspecificcodesections.2.ReentrantLockoffersadvancedcontrol,includingtryLockandfairnesspolicies.3.Conditionvariablesallowthreadstowaitfor
 Handling Common Java Exceptions Effectively
Jul 05, 2025 am 02:35 AM
Handling Common Java Exceptions Effectively
Jul 05, 2025 am 02:35 AM
The key to Java exception handling is to distinguish between checked and unchecked exceptions and use try-catch, finally and logging reasonably. 1. Checked exceptions such as IOException need to be forced to handle, which is suitable for expected external problems; 2. Unchecked exceptions such as NullPointerException are usually caused by program logic errors and are runtime errors; 3. When catching exceptions, they should be specific and clear to avoid general capture of Exception; 4. It is recommended to use try-with-resources to automatically close resources to reduce manual cleaning of code; 5. In exception handling, detailed information should be recorded in combination with log frameworks to facilitate later
 How does a HashMap work internally in Java?
Jul 15, 2025 am 03:10 AM
How does a HashMap work internally in Java?
Jul 15, 2025 am 03:10 AM
HashMap implements key-value pair storage through hash tables in Java, and its core lies in quickly positioning data locations. 1. First use the hashCode() method of the key to generate a hash value and convert it into an array index through bit operations; 2. Different objects may generate the same hash value, resulting in conflicts. At this time, the node is mounted in the form of a linked list. After JDK8, the linked list is too long (default length 8) and it will be converted to a red and black tree to improve efficiency; 3. When using a custom class as a key, the equals() and hashCode() methods must be rewritten; 4. HashMap dynamically expands capacity. When the number of elements exceeds the capacity and multiplies by the load factor (default 0.75), expand and rehash; 5. HashMap is not thread-safe, and Concu should be used in multithreaded
