Many users have been complaining about encountering error code caa90019 every time they try to log in using Microsoft Teams. Even though this is a convenient communication app, this mistake is very common.
Fix Microsoft Teams error: caa90019
In this case, the error message displayed by the system is: "Sorry, we are currently experiencing problems." We have prepared a list of ultimate solutions to help you resolve Microsoft Teams error caa90019.
1]Preliminary steps
If you have not done so already, please close and restart the application. It may require freeing memory or clearing temporary files. Please note that some apps may be running in the background, so the close button may not be fully functional. Applications can be closed properly through Task Manager.
If the problem persists, you may consider updating the application or operating system version. Sometimes, updating software can fix some bugs or issues. At the same time, make sure your computer has the latest drivers and patches installed to ensure system stability and security.
Please confirm that your Microsoft Teams application has been updated to the latest version and restart your router and modem to resolve issues that may be causing Microsoft Teams error caa90019.
If you are using an office-installed Teams app, please consult your system administrator or IT support for further assistance.
2]Run as administrator

If you are using a work or school account, you need to delete the account first and then run it again as an administrator.
Open Windows Settings and click Accounts on the left.
On the next screen, go to Account Settings on the right and click Access Work or School Options.
Next, click Remove to delete the account.
Now, restart your PC and reinstall Microsoft Team.
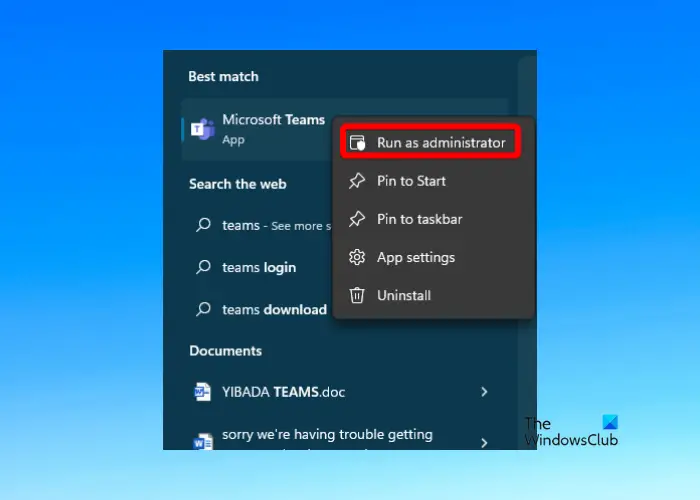
After reinstalling, right-click the application, select Run as administrator, log in to your account, and check if it still shows the error.
3]Clear Microsoft Teams application cache

More commonly, accumulated cache files are a reason behind Microsoft Teams errors. Therefore, it is recommended to clear the Microsoft Team cache regularly to prevent such issues from occurring.
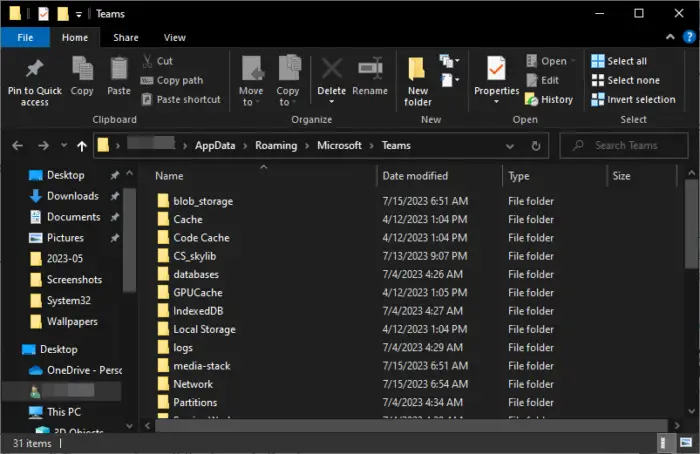
Open File Explorer and navigate to the following path:
C:UserNameAppDataRoamingMicrosoftTeams
Now, delete the files in the following folders individually:
%AppData%MicrosoftTeamsBLOB_STORAGE
%AppData%MicrosoftTeams應(yīng)用程序緩存緩存
%AppData%MicrosoftTeamsCACHE
%AppData%MicrosoftTeams數(shù)據(jù)庫
%AppData%MicrosoftTeamsIndexedDB
%AppData%MicrosoftTeamsgpucache
Meanwhile, if you are using the web version of Microsoft Team, make sure you also clear your browser cache to fix the caa90019 error.
The above is the detailed content of Fix caa90019 Microsoft Teams error. For more information, please follow other related articles on the PHP Chinese website!

Hot AI Tools

Undress AI Tool
Undress images for free

Undresser.AI Undress
AI-powered app for creating realistic nude photos

AI Clothes Remover
Online AI tool for removing clothes from photos.

Clothoff.io
AI clothes remover

Video Face Swap
Swap faces in any video effortlessly with our completely free AI face swap tool!

Hot Article

Hot Tools

Notepad++7.3.1
Easy-to-use and free code editor

SublimeText3 Chinese version
Chinese version, very easy to use

Zend Studio 13.0.1
Powerful PHP integrated development environment

Dreamweaver CS6
Visual web development tools

SublimeText3 Mac version
God-level code editing software (SublimeText3)

Hot Topics
 Shazam app not working in iPhone: Fix
Jun 08, 2024 pm 12:36 PM
Having issues with the Shazam app on iPhone? Shazam helps you find songs by listening to them. However, if Shazam isn't working properly or doesn't recognize the song, you'll have to troubleshoot it manually. Repairing the Shazam app won't take long. So, without wasting any more time, follow the steps below to resolve issues with Shazam app. Fix 1 – Disable Bold Text Feature Bold text on iPhone may be the reason why Shazam is not working properly. Step 1 – You can only do this from your iPhone settings. So, open it. Step 2 – Next, open the “Display & Brightness” settings there. Step 3 – If you find that “Bold Text” is enabled
 China Telecom Tiantong satellite covers Hong Kong! Xiaomi Mi 14 Ultra officially announced that it supports two-way satellite communication
May 09, 2024 am 09:01 AM
According to news on May 8, China Telecom held a launch conference for the direct-connect mobile phone satellite service in Hong Kong today, officially announcing the launch of the direct-connect mobile phone satellite service based on Tiantong Satellite System in Hong Kong. According to Xiaomi Mobile’s official WeChat account, Xiaomi Mi 14 Ultra currently supports two-way satellite communication in Hong Kong, China. Users only need to use a China Telecom or China Telecom (Hong Kong) SIM card and activate the direct connection satellite service of their mobile phones. It is worth noting that Xiaomi 14 Ultra needs to be the version sold in mainland China, and the system version must be upgraded to V1.0.9.0. Because only the version sold in the mainland of Xiaomi Mi 14 Ultra previously supported satellite communications, other versions did not support this function in hardware. Only telecom cards are supported because Tiantong satellite is operated by China Telecom. It is reported that
 Do laptop graphics card drivers need to be up to date?
May 10, 2024 am 12:54 AM
Yes, laptop graphics card driver updates are necessary because it improves performance, resolves glitches, and supports new technologies. Update methods include: 1. Manually visit the official website of the graphics card to download and install the driver; 2. Use driver update software to automatically scan and install the latest driver. When updating, pay attention to driver compatibility and create system restore points. You need to restart the computer after updating.
 Solutions to the errors reported by MySQL on a specific system version
Apr 08, 2025 am 11:54 AM
The solution to MySQL installation error is: 1. Carefully check the system environment to ensure that the MySQL dependency library requirements are met. Different operating systems and version requirements are different; 2. Carefully read the error message and take corresponding measures according to prompts (such as missing library files or insufficient permissions), such as installing dependencies or using sudo commands; 3. If necessary, try to install the source code and carefully check the compilation log, but this requires a certain amount of Linux knowledge and experience. The key to ultimately solving the problem is to carefully check the system environment and error information, and refer to the official documents.
 What systems does oracle database support?
May 10, 2024 am 02:06 AM
Operating systems supported by Oracle Database include Unix systems (such as Linux, Solaris), Windows systems (such as Windows Server, Windows 11), z/OS, and macOS, with specific requirements varying by database version and operating system. Supported platforms include x86, x86-64, ARM, SPARC, and POWER, depending on database version and compatibility. Factors such as hardware compatibility, performance, security, usability, and budget constraints should be considered when selecting an operating system.
 oracle database cpu requirements
May 10, 2024 am 02:12 AM
Oracle Database CPU requirements include: support for x86 and SPARC processor types; CPU with 8 or more physical cores recommended; CPU with clock speed of 2.5 GHz or higher recommended; CPU with 32 MB or more recommended L3 cache CPU; need to support the following instruction sets: x86: SSE4.2, AVX, AVX2; SPARC: UltraSPARC III, UltraSPARC T5. In addition, factors such as hyper-threading (not supported), virtualization (caution required), operating system requirements, etc. should also be considered.
 What to do if nginx restart fails
Apr 14, 2025 am 11:27 AM
Reasons and solutions for the failure of nginx restart: Configuration file error: Check nginx configuration file to ensure that the syntax is correct and the instructions are valid. Open port conflict: Check whether the port is occupied, close the occupied process or change the nginx port configuration. Process is running: manually terminate or stop nginx process using service command. Missing dependencies: Install or update required nginx dependencies such as openssl, zlib, pcre. File permissions issue: Grant nginx users to read and write permissions to files and directories. Memory leak or high load: monitor memory and CPU usage of nginx processes, upgrade nginx version or reconfigure worker processes. External factors: Check for prevention
 How to check Debian OpenSSL configuration
Apr 12, 2025 pm 11:57 PM
This article introduces several methods to check the OpenSSL configuration of the Debian system to help you quickly grasp the security status of the system. 1. Confirm the OpenSSL version First, verify whether OpenSSL has been installed and version information. Enter the following command in the terminal: If opensslversion is not installed, the system will prompt an error. 2. View the configuration file. The main configuration file of OpenSSL is usually located in /etc/ssl/openssl.cnf. You can use a text editor (such as nano) to view: sudonano/etc/ssl/openssl.cnf This file contains important configuration information such as key, certificate path, and encryption algorithm. 3. Utilize OPE


