


win7 iis To modify upload restrictions, you need to modify 2 places:
1. "Double-click "ASP" in "Internet Information Services (IIS) Manager" – Open "Configure ASP Application Properties" - expand "Restriction Properties"; modify the value of "Maximum Request Entity Body Limit", the default value is 200000, change it to the size you want to modify.


2. Open "Internet Information Services (IIS) Manager" - double-click "Request Filtering" - "Edit Function Settings" - "Request Restrictions" "——Modify "Maximum allowed content length", the default is 30M, you can change it to a larger size, I changed it to 300M - Click "OK" - Restart IIS


Recommended tutorial: IIS tutorial
The above is the detailed content of Modify win7 iis upload file size limit to 200KB. For more information, please follow other related articles on the PHP Chinese website!

Hot AI Tools

Undress AI Tool
Undress images for free

Undresser.AI Undress
AI-powered app for creating realistic nude photos

AI Clothes Remover
Online AI tool for removing clothes from photos.

Clothoff.io
AI clothes remover

Video Face Swap
Swap faces in any video effortlessly with our completely free AI face swap tool!

Hot Article
Hot Tools

Notepad++7.3.1
Easy-to-use and free code editor

SublimeText3 Chinese version
Chinese version, very easy to use

Zend Studio 13.0.1
Powerful PHP integrated development environment

Dreamweaver CS6
Visual web development tools

SublimeText3 Mac version
God-level code editing software (SublimeText3)
Hot Topics


 What should I do if the Win7 taskbar does not display the icon? How to solve the problem of the computer taskbar icon disappearing
Jun 09, 2024 pm 01:49 PM
What should I do if the Win7 taskbar does not display the icon? How to solve the problem of the computer taskbar icon disappearing
Jun 09, 2024 pm 01:49 PM
Recently, many users using Win7 system have found that the icons in the taskbar suddenly disappeared, which makes the operation very inconvenient and they do not know how to solve the problem. This article will introduce to you how to solve the problem of disappearing taskbar icons in Win7 system. Bar! Cause Analysis When encountering such a situation, there are generally two situations: one is that the taskbar on the computer does not really disappear, but is just hidden, and the other is that the taskbar does disappear. Method 1: 1. There is a situation that you need to confirm first, that is, when the mouse is placed at the bottom of the screen, the taskbar will be displayed. You can directly click the mouse on the taskbar and select "Properties". 2. In the dialog box that opens, click & on the "Hide taskbar" option.
 How to clear all desktop background images in Win7? Tips for deleting personalized background images in Win7
Jun 02, 2024 am 09:01 AM
How to clear all desktop background images in Win7? Tips for deleting personalized background images in Win7
Jun 02, 2024 am 09:01 AM
In Win7 system, many users want to delete personalized desktop background images, but do not know how to delete them. This article will show you how to delete personalized background images in Win7 system. 1. First, open the control panel interface of the Win7 system and click to enter the "Appearance and Personalization" settings; 2. Then, in the opened interface, click the "Change Desktop Background" setting; 3. Then, click below "Desktop background" option; 4. Then, select Select all, and then click Clear all. Of course, you can also use it under "Customize", right-click the theme you want to delete, and then click &q on the shortcut menu
 Where is the network discovery in Win7? Tips for enabling the network discovery function in Win7
Jun 04, 2024 am 09:02 AM
Where is the network discovery in Win7? Tips for enabling the network discovery function in Win7
Jun 04, 2024 am 09:02 AM
Many computer users know that network discovery is a network setting. This setting will affect whether the computer can find other computers and devices on the network and whether it can find the computer when other computers on the network are found. So how to enable network discovery in win7? The following computer System Home U Disk Installation will introduce you to the tutorial on how to enable network discovery in win7 system. 1. First, click the "Start Menu" icon on the desktop taskbar and choose to open the "Control Panel" interface. 2. Then, in the interface that opens, set "View by" to "Category", and then choose to enter "Network and Internet"
 What to do if explore.exe file system error occurs? How to solve the problem of lost exeplorer file on win7 computer
Jun 04, 2024 pm 07:38 PM
What to do if explore.exe file system error occurs? How to solve the problem of lost exeplorer file on win7 computer
Jun 04, 2024 pm 07:38 PM
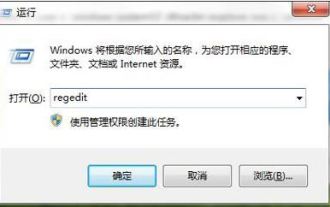
How to solve the problem that win7 system prompts that the exeplorer file is missing? Some of our users still use win7. When accessing the web page through the browser, a prompt that the exeplorer file is missing will pop up, which will cause many pages to be inaccessible. Faced with this problem, many people do not know what method to use. To solve it, then this issue of win7 tutorial will share the solution with everyone. Friends in need can follow the steps in the text. The solution is as follows 1. First, we press win+r and enter "regedit" in the pop-up run interface to open the registry editor function. 2. Then we open it in order: HKEY_LOCAL_MACHI
 What should I do if Win7 cannot connect to the remote desktop? Tips for solving the problem of Win7 unable to connect to the remote desktop
Jun 02, 2024 pm 07:34 PM
What should I do if Win7 cannot connect to the remote desktop? Tips for solving the problem of Win7 unable to connect to the remote desktop
Jun 02, 2024 pm 07:34 PM
Recently, many users using Win7 system have found that they cannot connect to the remote desktop. This is probably caused by registry settings. So how to solve it? Let’s take a look below! 1. First, press the "Win+R" keys to open the run window, and enter the "regedit" command to open the registry editor. 2. Then, in the opened registry interface, click to expand "Computer\HKEY_LOCAL_MACHINE\SOFTWARE\Microsoft\TerminalServerClient". 3. Then, right-click on the blank space and select "
 Black screen when booting, mouse does not display desktop, explorer kills by mistake
Jun 18, 2024 pm 04:05 PM
Black screen when booting, mouse does not display desktop, explorer kills by mistake
Jun 18, 2024 pm 04:05 PM
Yesterday (2024/06/17), many users suddenly experienced a black screen on startup, and the following interface popped up: MicrosoftVisualC++RuntimeLibraryRuntimeError!Program:C:\WINDOWS\Explorer.EXEThis application has requested theRuntimetoterminateitinanunusualway.Pleasecontacttheapplication'ssupportteamformoreinformation. It may also be this
 Guide to Personalized Beautification of Win7 System: Minimalist UI Design Gives Your Desktop a New Life
May 09, 2024 pm 04:22 PM
Guide to Personalized Beautification of Win7 System: Minimalist UI Design Gives Your Desktop a New Life
May 09, 2024 pm 04:22 PM
Windows 7 is a classic operating system launched by Microsoft. Although official support has been stopped, many users still choose to continue using it. This article will start from two aspects: minimalist UI design and personalized desktop experience, and provide you with an in-depth analysis of the desktop and system beautification of win7! 1. Minimalist UI design: simplifying complexity and improving operating efficiency. Windows 7 adheres to the minimalist concept in UI design and creates a fresh and simple visual experience by streamlining redundant elements and optimizing layout. The classic Aero frosted glass effect, combined with translucent window borders and taskbars, creates a light and transparent texture. The start menu adopts a rectangular tile layout, and commonly used programs are clear at a glance, which greatly improves startup efficiency. At the same time, the taskbar supports custom tiles
 How to set the screen to always be on in Windows 7? Tips for disabling screen sleep in Windows 7
Jun 25, 2024 pm 10:47 PM
How to set the screen to always be on in Windows 7? Tips for disabling screen sleep in Windows 7
Jun 25, 2024 pm 10:47 PM
The screen sleep of win7 system means that when the computer is not operated for a certain period of time, the system will automatically turn off the screen display to save power and protect the hardware. But sometimes, we may not want the screen to sleep, but to keep it always on, so that it can be viewed at any time. Or operate a computer, let’s take a look at the detailed setting method below. Win7 screen always on setting tutorial: Method 1: 1. Find the computer icon on the desktop, right-click and select Properties. 2. Find the performance information and tool options in the opened interface and open them. 3. Find the Adjust power settings option on the left side of the new opening interface and click it. 4. After entering the power settings, continue to find the option to turn off the monitor on the left side of the interface and click it. 5. In the newly opened interface, the monitor will be turned off and the computer will go to sleep.
