

How to change the taskbar alignment in Windows 11
Jul 31, 2025 am 02:41 AM
As of 2024, Windows 11 does not offer a built-in setting to change taskbar alignment from centered to left-aligned, despite user demand. 2. Official methods through Settings or Registry Editor are unavailable or unsupported, with Microsoft prioritizing a centered, symmetrical design for aesthetic and touch-focused usability. 3. The most reliable workaround is using the third-party tool ExplorerPatcher, which allows users to set taskbar alignment to left via a simple interface, reverting to a Windows 10-style layout. 4. ExplorerPatcher is lightweight, open-source, and reversible, but must be downloaded from the official GitHub page to avoid security risks. 5. While Microsoft may consider adding native alignment options in the future due to ongoing feedback, for now, third-party tools remain the only effective solution for left-aligned taskbar icons in Windows 11.

Windows 11 introduced a new centered taskbar by default, which was a big change from the left-aligned layout in Windows 10. While Microsoft has gradually added more customization options, changing the taskbar alignment directly through built-in settings is still limited — especially if you want to switch from centered to left-aligned (or vice versa). Here's how things stand and what you can do.
? Official Way: Limited Options (As of 2024)
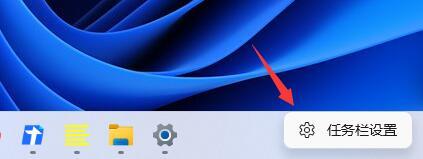
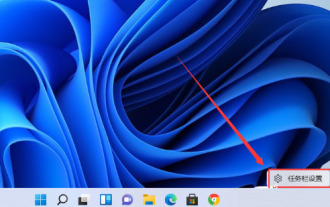
As of the latest Windows 11 updates (including version 23H2 and 24H2), Microsoft has not added a native setting in Settings app to change taskbar icon alignment. You can't simply go to Settings > Personalization > Taskbar and switch between centered and left-aligned.
- The taskbar remains centered by default for Start, Search, Task View, Widgets, Chat, and system tray icons.
- Even if you uninstall or hide certain icons (like Widgets or Chat), the remaining icons stay centered.
- No registry tweak officially supported — Microsoft discourages modifying the registry, and changes may not work or could be overwritten by updates.
So, if you're looking for a built-in toggle, it doesn't exist — yet.
?? Workarounds: Third-Party Tools
Since Microsoft hasn't provided a direct way, users rely on lightweight third-party tools to restore the classic left-aligned taskbar. The most popular and reliable one is:
ExplorerPatcher
-
Download ExplorerPatcher from the official GitHub page:

Install and run the tool.
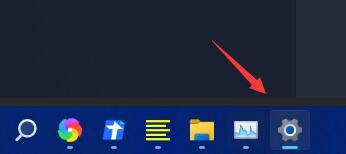
Right-click the taskbar and select "Explorer Patcher Settings".
Go to the Taskbar section.
Look for "Taskbar alignment" and change it from Center to Left.
Apply the change — the taskbar icons will immediately shift to the left.

? Pros:
- Lightweight and open-source.
- Reverts cleanly if uninstalled.
- Also brings back other Windows 10-style features.
?? Caution:
- Always download from the official GitHub to avoid malware.
- Some antivirus tools may flag it (false positive), but it's widely trusted by the community.
?? Why Microsoft Removed This Option
Microsoft designed Windows 11 with a focus on symmetry and modern aesthetics. The centered taskbar aligns with touch-first design and tablet usability. However, many desktop users find it less efficient for mouse navigation, especially on ultrawide or large monitors.
There’s ongoing user feedback, so a future update might reintroduce alignment options natively — but for now, third-party tools are the only reliable way.
Final Notes
- You cannot change taskbar alignment using Settings or Registry Editor safely or effectively.
- ExplorerPatcher is the most trusted workaround for getting left-aligned icons.
- Keep the tool updated, and avoid unofficial clones.
If you prefer the classic layout, using a lightweight utility like ExplorerPatcher is currently the best option. It’s not built-in, but it’s stable and reversible.
Basically, Microsoft hasn’t listened fully on this one — so users are filling the gap.
The above is the detailed content of How to change the taskbar alignment in Windows 11. For more information, please follow other related articles on the PHP Chinese website!

Hot AI Tools

Undress AI Tool
Undress images for free

Undresser.AI Undress
AI-powered app for creating realistic nude photos

AI Clothes Remover
Online AI tool for removing clothes from photos.

Clothoff.io
AI clothes remover

Video Face Swap
Swap faces in any video effortlessly with our completely free AI face swap tool!

Hot Article
Hot Tools

Notepad++7.3.1
Easy-to-use and free code editor

SublimeText3 Chinese version
Chinese version, very easy to use

Zend Studio 13.0.1
Powerful PHP integrated development environment

Dreamweaver CS6
Visual web development tools

SublimeText3 Mac version
God-level code editing software (SublimeText3)
Hot Topics


 How to disable taskbar thumbnail preview in Win11? Turn off the taskbar icon display thumbnail technique by moving the mouse
Feb 29, 2024 pm 03:20 PM
How to disable taskbar thumbnail preview in Win11? Turn off the taskbar icon display thumbnail technique by moving the mouse
Feb 29, 2024 pm 03:20 PM
This article will introduce how to turn off the thumbnail function displayed when the mouse moves the taskbar icon in Win11 system. This feature is turned on by default and displays a thumbnail of the application's current window when the user hovers the mouse pointer over an application icon on the taskbar. However, some users may find this feature less useful or disruptive to their experience and want to turn it off. Taskbar thumbnails can be fun, but they can also be distracting or annoying. Considering how often you hover over this area, you may have inadvertently closed important windows a few times. Another drawback is that it uses more system resources, so if you've been looking for a way to be more resource efficient, we'll show you how to disable it. but
 How to solve the problem of Win11 taskbar icon turning black
Jan 02, 2024 pm 04:25 PM
How to solve the problem of Win11 taskbar icon turning black
Jan 02, 2024 pm 04:25 PM
If we find that our taskbar icon has turned black when using win11 system, this may be because we have turned on dark mode. We only need to change it to light mode in the color settings. Here is a guide Get up and sort it out. What to do if win11 displays black taskbar icons: 1. First click on a blank space on the desktop, and then select "Personalization" in the right-click menu 2. Click "Color" on the right side of Personalization 3. Then select the mode and change it 4. After the setting is completed, we will find that our taskbar icon becomes white.
 How to pin the Win11 taskbar
Jan 04, 2024 pm 04:31 PM
How to pin the Win11 taskbar
Jan 04, 2024 pm 04:31 PM
In previous Windows systems, we often used the function of locking the taskbar to avoid misoperation of the taskbar. However, many users found that they could no longer lock the taskbar after updating the win11 system. This is actually because Microsoft has canceled this function. The following is Just follow the editor and take a look. How to lock the taskbar in win11: Answer: Unable to lock. 1. Microsoft has canceled the function of locking the taskbar in the win11 system, so we cannot lock the taskbar now. 2. Generally speaking, we can right-click on the blank space of the taskbar to lock the taskbar. 3. But in win11 system, right-clicking on the blank space of the taskbar only has the taskbar settings option. 4. If we open the taskbar settings, the corresponding taskbar lock cannot be found.
 How to expand the stacked display of the Win11 taskbar? Tutorial on stacking and expanding the Win11 taskbar
Jan 29, 2024 am 11:33 AM
How to expand the stacked display of the Win11 taskbar? Tutorial on stacking and expanding the Win11 taskbar
Jan 29, 2024 am 11:33 AM
When we use win11 system, we will find that our taskbar windows are merged. Many users don't like this operation very much. So how to expand the win11 taskbar stacking? Users can directly click on the taskbar settings under the right button, and then directly find the taskbar corner overflow option in the right menu to operate. Let this site carefully introduce to users how to expand the win11 taskbar stack. How to expand taskbar stacking in Windows 11 Method 1. 1. Right-click on a blank space on the taskbar and select Taskbar Settings. 3. After clicking the taskbar corner overflow, turn on the switch for the application icon to be displayed. Method two: 1. We need to use a software to achieve this, search, download and install star by ourselves
 How to make the Win11 taskbar black? Introduction to how to set the black taskbar in Win11
Apr 22, 2024 pm 06:40 PM
How to make the Win11 taskbar black? Introduction to how to set the black taskbar in Win11
Apr 22, 2024 pm 06:40 PM
Some friends also want the taskbar to turn black after changing the dark wallpaper on their computers, but they don’t know how to do it. Let’s take a look at the specific methods below! 1. Right-click an empty area in the taskbar and select "Taskbar Settings." 2. In the taskbar settings window, find the "Appearance" tab and click it. 3. Under the "Appearance" tab, find the "Taskbar Background" option and click the drop-down menu. 4. Select "Black". 5. Close the "Taskbar Settings" window. Taskbar beautification Xiaozhi Eye Protector is a very easy-to-use win11 transparent taskbar tool. It supports taskbar transparency, taskbar beautification, and multiple styles to beautify the taskbar interface, making your computer interface more beautiful. Xiaozhi Eye Protector Eye Baby (click to download now) Xiaozhi Eye Protection
 What should I do if the Win7 taskbar does not display the icon? How to solve the problem of the computer taskbar icon disappearing
Jun 09, 2024 pm 01:49 PM
What should I do if the Win7 taskbar does not display the icon? How to solve the problem of the computer taskbar icon disappearing
Jun 09, 2024 pm 01:49 PM
Recently, many users using Win7 system have found that the icons in the taskbar suddenly disappeared, which makes the operation very inconvenient and they do not know how to solve the problem. This article will introduce to you how to solve the problem of disappearing taskbar icons in Win7 system. Bar! Cause Analysis When encountering such a situation, there are generally two situations: one is that the taskbar on the computer does not really disappear, but is just hidden, and the other is that the taskbar does disappear. Method 1: 1. There is a situation that you need to confirm first, that is, when the mouse is placed at the bottom of the screen, the taskbar will be displayed. You can directly click the mouse on the taskbar and select "Properties". 2. In the dialog box that opens, click & on the "Hide taskbar" option.
 How to reduce the height of the taskbar in win11? Tutorial on resizing the taskbar in Windows 11
Feb 29, 2024 pm 12:37 PM
How to reduce the height of the taskbar in win11? Tutorial on resizing the taskbar in Windows 11
Feb 29, 2024 pm 12:37 PM
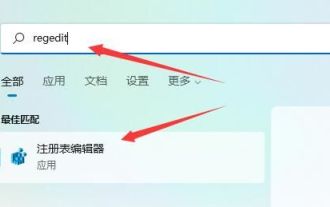
When we use win11, we will find that the height of the taskbar is a bit high, which feels a bit unsightly to some users. So how to reduce the height of the win11 taskbar? Users can directly click the Registry Editor under the Start menu, and then find the Advanced folder to operate. Let this site carefully introduce to users how to adjust the taskbar size in Windows 11. How to resize the taskbar in Windows 11 First, we need to open the Registry Editor. You can open the registry editor by clicking the Start menu and entering "regedit" in the search box, or by pressing the Win+R key combination to open the Run function and entering "regedit".
 How to solve the problem that the win11 taskbar does not respond when clicked/cannot be used
May 09, 2024 pm 06:43 PM
How to solve the problem that the win11 taskbar does not respond when clicked/cannot be used
May 09, 2024 pm 06:43 PM
After upgrading to Windows 11 system, many users encountered the problem that the taskbar cannot be clicked, which has a great impact on life and work. So how to solve it specifically? Let’s take a look below! Method 1 1. First, we press the Ctrl+Shift+Esc shortcut keys on the keyboard to open the Task Manager. 2. Then click File in the upper left corner and select Run New Task. 3. After opening it, enter control and press Enter to enter the control panel. 4. Find the time and area and choose to change the date and time. 5. Change the time to September 4 or later, turn off automatic time synchronization after the setting is completed, and then restart the computer. 6. After restarting, re-enter the time settings and come to the internet time selection.
