


First, check physical connections and test the microphone on another device to rule out hardware issues. 2. In Windows, go to Settings > System > Sound and ensure the correct input device is selected with visible input levels. 3. Run the built-in Audio Troubleshooter via Settings > System > Sound to automatically detect and fix common problems. 4. Go to Settings > Privacy & security > Microphone and confirm microphone access is enabled for both system and specific apps. 5. Update or reinstall audio drivers through Device Manager, or download the latest driver from the manufacturer’s website. 6. If applicable, enter BIOS/UEFI during boot and enable the internal microphone under onboard devices. 7. Check for Windows Updates to install any audio-related patches. 8. Disable audio enhancements in the microphone’s properties, test in different apps, and consider rolling back the driver if the issue started after an update. Following these steps in order typically resolves microphone issues in Windows 11 through systematic troubleshooting of hardware, settings, permissions, and drivers.

If your microphone isn't working in Windows 11, it can be frustrating—especially during calls or recordings. The issue might stem from hardware, drivers, settings, or permissions. Here’s how to fix it step by step.

1. Check Physical Connections and Hardware
Before diving into software fixes, rule out hardware problems:
- For external mics: Unplug and reconnect the microphone. Try a different USB port.
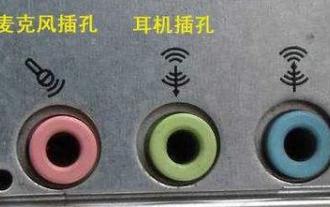
- For headsets: Make sure the headset is properly plugged into the correct audio jack (if using 3.5mm).
- Test on another device: Plug the mic into a phone or another computer to confirm it works.
- Try a different microphone: If possible, test with another mic to see if the issue is with the device itself.
If the mic works elsewhere, the problem is likely with Windows settings or drivers.

2. Set the Correct Input Device in Windows
Windows might be using the wrong microphone input.
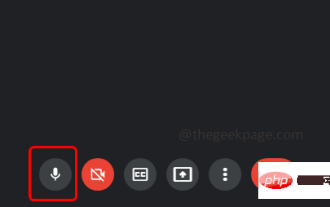
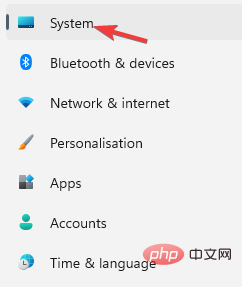
- Right-click the speaker icon in the taskbar and select Settings.
- Go to System > Sound.
- Under Input, check the Input device dropdown.
- Select the correct microphone (e.g., "Microphone (Realtek Audio)" or your headset).
- Speak into the mic and watch the input level bar—if it moves, Windows is detecting sound.
? If your mic doesn’t appear in the list, it may not be detected at all—proceed to driver troubleshooting.


3. Run the Audio Troubleshooter
Windows 11 includes a built-in tool to detect and fix common audio problems.
- Go to Settings > System > Sound.
- Scroll down and click Troubleshoot common sound problems.
- Follow the prompts and let Windows scan for issues.
- Apply any recommended fixes.
This often resolves configuration or detection issues automatically.
4. Check Microphone Permissions
Apps like Teams, Zoom, or Chrome won’t access the mic if permissions are blocked.
- Go to Settings > Privacy & security > Microphone.
- Make sure Microphone access is turned on.
- Scroll down and ensure Let apps access your microphone is enabled.
- Check that the specific app you're using (e.g., Zoom) has permission listed under Let apps access your microphone.
? Some apps require permission even if system access is on—open the app and check its audio settings.
5. Update or Reinstall Audio Drivers
Outdated or corrupted drivers are a common cause.
Option A: Update via Device Manager
- Press Win X and select Device Manager.
- Expand Audio inputs and outputs.
- Right-click your microphone (e.g., "Microphone Array") and choose Update driver.
- Select Search automatically for drivers.
Option B: Reinstall the driver
- In Device Manager, right-click the mic and choose Uninstall device.
- Restart your PC—Windows will reinstall the driver automatically.
Option C: Update from manufacturer
- Visit your PC or motherboard manufacturer’s website (e.g., Dell, HP, ASUS).
- Download the latest audio driver (e.g., Realtek) for your model.
6. Enable the Microphone in BIOS/UEFI (if applicable)
Some laptops disable the internal mic by default or after a BIOS update.
- Restart your PC and enter BIOS/UEFI (usually by pressing F2, F10, or Del during boot).
- Look for Integrated Peripherals or Onboard Devices.
- Ensure Internal Microphone or Audio Device is set to Enabled.
- Save and exit.
7. Check for Windows Updates
Microsoft often releases patches for audio issues.
- Go to Settings > Windows Update.
- Click Check for updates.
- Install any available updates and restart.
8. Additional Fixes if Nothing Works
-
Disable audio enhancements:
- In Sound settings, click More sound settings under Advanced.
- Go to the Recording tab, right-click your mic, select Properties.
- On the Advanced tab, check Disable all enhancements.
- Also, uncheck Allow applications to take exclusive control.
Test in another app: Try using the mic in Voice Recorder, Discord, or Chrome (test mic at webcammictest.com).
Roll back driver: If the mic stopped working after a driver update, go to Device Manager > Microphone > Driver > Roll Back Driver.
Fixing a non-working mic in Windows 11 usually comes down to settings, permissions, or drivers. Start with the basics—check connections and input selection—then work through permissions and drivers. Most issues can be resolved without needing professional help.
Basically, it's a process of elimination—don’t skip the simple stuff.
The above is the detailed content of Fix microphone not working in Windows 11. For more information, please follow other related articles on the PHP Chinese website!

Hot AI Tools

Undress AI Tool
Undress images for free

Undresser.AI Undress
AI-powered app for creating realistic nude photos

AI Clothes Remover
Online AI tool for removing clothes from photos.

Clothoff.io
AI clothes remover

Video Face Swap
Swap faces in any video effortlessly with our completely free AI face swap tool!

Hot Article
Hot Tools

Notepad++7.3.1
Easy-to-use and free code editor

SublimeText3 Chinese version
Chinese version, very easy to use

Zend Studio 13.0.1
Powerful PHP integrated development environment

Dreamweaver CS6
Visual web development tools

SublimeText3 Mac version
God-level code editing software (SublimeText3)
Hot Topics


 Your microphone is muted by system settings on Google Meet on Windows 10/11
May 12, 2023 pm 11:58 PM
Your microphone is muted by system settings on Google Meet on Windows 10/11
May 12, 2023 pm 11:58 PM
GoogleMeet is used for communication and collaboration purposes. High-quality video conferences can be held where people can talk and share their views. But a few users face microphone issues, and the most common error is "Your microphone has been muted by the system setting." If this happens, others will not be able to hear you. But don’t panic this problem can be solved. A few reasons for microphone issues are, your microphone gets muted, changes in microphone settings, outdated drivers, etc. In this article, we will see different ways on how to fix “Your microphone is muted by the system” Settings issue in Windows 10. Method One: Check if the Microphone is Mute Before jumping into different solutions, just check the screen when you are in a meeting
 Hyperx headset microphone has no sound
Feb 16, 2024 am 09:12 AM
Hyperx headset microphone has no sound
Feb 16, 2024 am 09:12 AM
The quality of hyperx headphones has always been very good, but some users find that the microphone of the headphones has no sound when using it. There are many possible reasons for this situation. Here are some of them. Several kinds. There is no sound from the hyperx headset microphone. 1. Connect and check whether the microphone is fully inserted into the headphone jack. You can try plugging and unplugging it a few times. 2. If other equipment conditions permit, you can plug the headset into other normally operating equipment to see if it can be used normally and whether the audio link is normal. 3. Audio settings Check the audio settings to make sure that the speakers and microphone are enabled normally and not muted or at a low volume. 4. To disable the software, you can try disabling the audio adapter.
 Logitech headset microphone is silent, please fix it
Jan 18, 2024 am 08:03 AM
Logitech headset microphone is silent, please fix it
Jan 18, 2024 am 08:03 AM
Some users may encounter the problem of no sound from the headset microphone when using Logitech drivers. Check whether the headset microphone cable is plugged in properly or whether the headset is muted. This can be solved by turning it on in the settings. There is no sound from the Logitech-driven headset microphone: 1. Users need to first check whether the headset microphone is plugged into the wrong wire. 2. If it is wrong, just plug it in again. If not, then you need to check whether the headset microphone is broken. 3. Open "Settings" and search for "Control Panel" in "Settings". 4. Select "Hardware and Sound". 5. Click "Manage Audio Devices". 6. After entering the interface, click the "Recording" option and double-click "Microphone". 7. After entering, click "Level" to increase the microphone volume to the maximum. If it is not loud enough, you can strengthen the microphone settings. 8. Last look
 How to solve the microphone mute problem in Win10 Knives Out
Jan 11, 2024 am 10:24 AM
How to solve the microphone mute problem in Win10 Knives Out
Jan 11, 2024 am 10:24 AM
Knives Out is a very popular game on Windows 10 computers. Many friends like to play it with their friends, but many of them encounter the situation where the microphone has no sound, so what should I do? Let’s take a look at the solution below. What to do if there is no sound from the Knives Out microphone in Windows 10: 1. Enter the Knives Out game interface and turn on the microphone switch. 2. Enter the game settings and check "My Microphone" in the sound settings. 3. If it still doesn’t work, click Start in the lower left corner and open the “Control Panel”. 4. After opening, click "Hardware and Sound" and then "Manage Audio Devices". 5. Select the "Recording" tab and double-click "Microphone". 6. Click "Use this device". 7. Then turn up the volume.
 Can't allow access to camera and microphone in iPhone
Apr 23, 2024 am 11:13 AM
Can't allow access to camera and microphone in iPhone
Apr 23, 2024 am 11:13 AM
Are you getting "Unable to allow access to camera and microphone" when trying to use the app? Typically, you grant camera and microphone permissions to specific people on a need-to-provide basis. However, if you deny permission, the camera and microphone will not work and will display this error message instead. Solving this problem is very basic and you can do it in a minute or two. Fix 1 – Provide Camera, Microphone Permissions You can provide the necessary camera and microphone permissions directly in settings. Step 1 – Go to the Settings tab. Step 2 – Open the Privacy & Security panel. Step 3 – Turn on the “Camera” permission there. Step 4 – Inside, you will find a list of apps that have requested permission for your phone’s camera. Step 5 – Open the “Camera” of the specified app
 How to Fix Acer Swift 3 Laptop Microphone Not Working
May 01, 2023 pm 10:40 PM
How to Fix Acer Swift 3 Laptop Microphone Not Working
May 01, 2023 pm 10:40 PM
This can be annoying if your AcerSwift3 laptop microphone is not detected and there is no sound. Although the microphone appears active, you won't hear anything at all while playing or recording audio, playing games on apps like Discord, or communicating on Skype. There may be different reasons that may trigger this issue, some common ones include outdated or corrupted drivers, etc. This article will cover all these issues and more and provide you with different solutions to fix Acer Swift 3 built-in microphone not working issue. What should I do if the AcerSwift3 microphone is not detected? 1. Run Record Audio Troubleshooter while pressing
 Error 0x80049dd3 error occurs in Windows 10/11
Apr 29, 2023 pm 11:28 PM
Error 0x80049dd3 error occurs in Windows 10/11
Apr 29, 2023 pm 11:28 PM
Error code 0x80049d is bound to the voice input function. Some users have encountered this issue when trying to voice type in Windows 11. Mainly when the audio device driver is faulty or it does have an old, corrupt driver, this error message will show "There is a problem with 0x80049dd3". So, don’t waste any more time and follow the steps below to quickly resolve the issue and start using your microphone again. Fix 1 – Run the Recording Audio Troubleshooter You should run the Recording Audio Troubleshooter so that it can identify the issue and resolve it accordingly. 1. Open Settings by right-clicking on the Windows icon and clicking "Settings". 2. Once you reach the "Settings" page, click "System" settings. 3. In the right window
 Why can't my computer detect the microphone?
Sep 12, 2023 pm 05:11 PM
Why can't my computer detect the microphone?
Sep 12, 2023 pm 05:11 PM
The reason why the microphone is not detected on the computer may be a microphone connection problem, a microphone driver problem, a system settings problem, a microphone failure, an operating system problem, a firewall or security software problem, etc. Detailed introduction: 1. Microphone connection problem, please make sure the microphone is correctly connected to the computer, check whether the microphone is plugged into the correct audio jack, and make sure the connection is firm. If you are using a USB microphone, make sure the USB plug is correctly plugged into the computer's USB interface. , the plug is not inserted to the bottom, which may cause the computer to be unable to detect the microphone, etc.
