


Updating BIOS/UEFI can improve system stability, support new hardware or repair security vulnerabilities, but operation should be cautious to avoid damaging the system; first back up data and ensure stable power supply, download matching update files through the manufacturer's official website or motherboard manufacturer page, use msinfo32 to confirm the current version, and give priority to using built-in motherboard tools (such as Q-Flash, EZ Flash) to manually update in BIOS through FAT32 format USB flash drive, avoid using third-party tools or directly update in Windows, verify the version after update and check the startup settings, and update only if necessary.

Updating your BIOS/UEFI on Windows 11 can improve system stability, add hardware support, or fix security vulnerabilities — but it's a process that needs to be handled carefully. While it's possible to do it directly from Windows, it's not always the safest method. Here's how to do it properly and what to keep in mind.
? Before You Begin: Important Precautions
BIOS/UEFI updates are powerful but risky. An interrupted update can permanently damage your system. So:
- Back up your data before proceeding.
- Connect your laptop to AC power or ensure your desktop has a stable power supply (better yet, use a UPS).
- Don't interrupt the update — no shutdowns, restarts, or power loss.
- Check your current BIOS version first:
- Press
Win R, typemsinfo32, and look for "BIOS Version/Date".
- Press
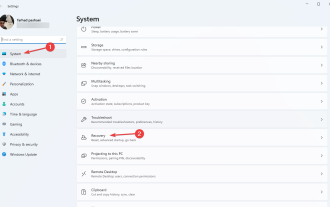
? Step 1: Find the Right BIOS Update
You can't use just any BIOS update — it must match your exact motherboard or device model.
For branded PCs (Dell, HP, Lenovo, etc.):
- Go to the manufacturer's support website.
- Enter your model number (eg, Dell XPS 13 9315).
- Look under "Drivers & Downloads" → "BIOS" or "Firmware".
For custom-built PCs (with standalone motherboards):
- Identify your motherboard model (check manual or use tools like CPU-Z).
- Visit the motherboard manufacturer's site (eg, ASUS, MSI, Gigabyte).
- Navigate to the support/downloads section for your model.
Always download the latest version and read the release notes — sometimes updates aren't needed unless you're fixing a specific issue.
? Step 2: Update BIOS from Windows (if supported)
Some manufacturers provide Windows-based BIOS update tools. This is the easiest method — but only use it if explicitly offered.
Example (ASUS, MSI, Dell, etc.):
- Download the Windows BIOS updater (eg, "ASUS Live Update", "Dell Command Update").
- Run it as Administrator.
- Let it detect the latest BIOS version.
- Follow the prompts and let it restart the system .
?? Note: This still reboots into a pre-OS environment to flash the BIOS — it just starts from Windows.
?? Step 3: Manual BIOS Update (Recommended for Safety)
This method is safe because it avoids Windows interference.
Steps:
- Download the BIOS file (usually a
.CAP,.ROM, or.BINfile). - Format a USB drive as FAT32 .
- Copy the BIOS file to the root of the USB.
- Restart your PC and enter the BIOS setup ( usually by pressing F2, Del, or F10 during boot).
- Look for a feature like:
- Q-Flash (Gigabyte)
- EZ Flash (ASUS)
- M-Flash (MSI)
- BIOS Flashback (via button on motherboard)
- Select the USB drive and the BIOS file.
- Confirm and wait — don't touch anything until it finishes and auto-restarts.
? This method bypasses Windows entirely and is less prone to errors.
? What NOT to Do
- Don't use third-party "BIOS updater" tools from unknown sources.
- Don't assume automatic Windows updates include BIOS updates — they don't.
- Don't update BIOS unless necessary (eg, no new CPU support needed or known bug fixes).
? After the Update
- Confirm the new version using
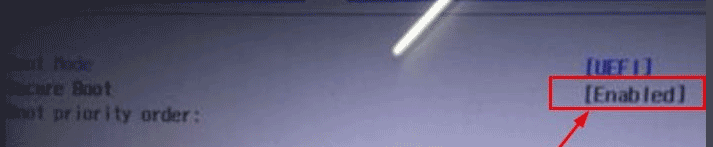
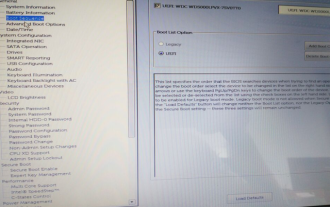
msinfo32again. - Re-check your boot settings if something changed (eg, Secure Boot, boot order).
- Reset BIOS settings to default if you encounter issues (look for "Load Optimized Defaults").
Updating BIOS on Windows 11 isn't built into the OS — it depends entirely on your hardware manufacturer. The safest path is using the motherboard's built-in flash tool from a USB drive. It takes a few extra steps, but it's worth avoiding a bricked system.
Basically: Download the right file, use a FAT32 USB, flash from BIOS, and don't rush it.
The above is the detailed content of How to update BIOS/UEFI on Windows 11. For more information, please follow other related articles on the PHP Chinese website!

Hot AI Tools

Undress AI Tool
Undress images for free

Undresser.AI Undress
AI-powered app for creating realistic nude photos

AI Clothes Remover
Online AI tool for removing clothes from photos.

Clothoff.io
AI clothes remover

Video Face Swap
Swap faces in any video effortlessly with our completely free AI face swap tool!

Hot Article
Hot Tools

Notepad++7.3.1
Easy-to-use and free code editor

SublimeText3 Chinese version
Chinese version, very easy to use

Zend Studio 13.0.1
Powerful PHP integrated development environment

Dreamweaver CS6
Visual web development tools

SublimeText3 Mac version
God-level code editing software (SublimeText3)
Hot Topics


 Ventoy secure boot settingsSecure Boot
Jun 18, 2024 pm 09:00 PM
Ventoy secure boot settingsSecure Boot
Jun 18, 2024 pm 09:00 PM
Ventoy is a USB boot tool that can directly boot ISO/WIM/IMG/VHD(x)/EFI and other types of files in the USB flash drive. It is very easy to use. Laptops have secure boot turned on by default. If they are not turned off or cannot be turned off, they cannot be booted from a USB device. Ventoy also supports secure boot. The principle is to inject a GRUB installation certificate into the current computer. As long as your computer After being injected once, any USB disk PE booted based on grub can pass. The official description of Ventoy is a GIF image. The playback speed is too fast and you may not be able to remember it. The editor has divided the GIF image to make it easier to understand. Ventoy secure boot has EnrollKey and Enro
 Acer laptop disables secure boot and removes password in Bios
Jun 19, 2024 am 06:49 AM
Acer laptop disables secure boot and removes password in Bios
Jun 19, 2024 am 06:49 AM
I repaired an Acer laptop and had to turn off secure boot when entering PE. I recorded how to turn off secure boot and remove the password from Bios. Turn on the computer and when the screen is not on, keep pressing the F2 key to enter the BIOS. On Acer laptops, turn off Secure Boot and press the arrow keys to switch to Boot. If SecureBoot is gray and unclickable, switch to the Security page, select SetSupervisorPassword and press Enter to set the password. Then switch to Boot, SecureBoot can be selected as Disabled, and press F10 to save. Modify and clear the BIOS password on your Acer notebook. Switch to the Security menu and select SetSupervisorPasswo.
 Dell computer bios interface to set USB disk startup items
Feb 10, 2024 pm 10:09 PM
Dell computer bios interface to set USB disk startup items
Feb 10, 2024 pm 10:09 PM
How do you set up a USB drive if your computer is a Dell laptop? Many friends have found that Dell laptops will not display the USB disk option by pressing the boot hotkey, so they need to enter the BIOS to set up the USB disk boot, so what if they don't know how to operate it? Now follow the editor’s steps to demonstrate how to set up a USB flash drive on a Dell laptop. Many friends assemble Dell computers, but don't know how to use the USB boot tool after entering the USBPE interface. Many friends don't know that they need to enter the BIOS interface to set up USB boot, so pressing the boot hotkey will not appear. what should we do? Let’s see how Dell sets up USB boot! Set up Dell laptop to reinstall system bootable from USB disk
 The system has posted in safe mode ASUS motherboard
Jun 19, 2024 am 07:35 AM
The system has posted in safe mode ASUS motherboard
Jun 19, 2024 am 07:35 AM
After the computer is turned on, it prompts The system has posted in safe mode. You can set it in the BIOS to ignore the F1 error. Although it does not prompt, it directly enters the BIOS when it is turned on. Sometimes F1 is useless every time it is turned on. Then you need to restart the BIOS, and then exit the BIOS to enter the system. . thesystemhaspostedinsafemode=The system is in safe mode. This problem is relatively common on ASUS motherboards. As long as you turn off the XMP of the memory and adjust the memory frequency back to normal, you can boot normally without the thesystemhaspostedinsafemode error. Updating the latest motherboard BIOS should be OK.
![Windows PC keeps booting into BIOS [Fix]](https://img.php.cn/upload/article/000/887/227/171012121854600.jpg?x-oss-process=image/resize,m_fill,h_207,w_330) Windows PC keeps booting into BIOS [Fix]
Mar 11, 2024 am 09:40 AM
Windows PC keeps booting into BIOS [Fix]
Mar 11, 2024 am 09:40 AM
If your Windows PC frequently enters the BIOS interface, this may cause difficulty in use. I'm stuck with the BIOS screen every time I turn on my computer, and restarting doesn't help. If you are facing this problem, then the solutions provided in this article will help you. Why does my computer keep booting in BIOS? Your computer's frequent restarts in BIOS mode may be caused by a variety of reasons, such as improper boot sequence settings, damaged SATA cables, loose connections, BIOS configuration errors, or hard drive failures, etc. Fix Windows PC Keeps Booting into BIOS If your Windows PC keeps booting into BIOS, use the fix below. Check your boot order and re-plug the
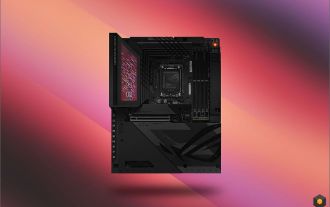 ASUS releases BIOS update for Z790 motherboards to alleviate instability issues with Intel's 13th/14th generation Core processors
Aug 09, 2024 am 12:47 AM
ASUS releases BIOS update for Z790 motherboards to alleviate instability issues with Intel's 13th/14th generation Core processors
Aug 09, 2024 am 12:47 AM
According to news from this website on August 8, MSI and ASUS today launched a beta version of BIOS containing the 0x129 microcode update for some Z790 motherboards in response to the instability issues in Intel Core 13th and 14th generation desktop processors. ASUS's first batch of motherboards to provide BIOS updates include: ROGMAXIMUSZ790HEROBetaBios2503ROGMAXIMUSZ790DARKHEROBetaBios1503ROGMAXIMUSZ790HEROBTFBetaBios1503ROGMAXIMUSZ790HEROEVA-02 joint version BetaBios2503ROGMAXIMUSZ790A
 How to deal with the black screen problem after entering Win11 BIOS
Jan 03, 2024 pm 01:05 PM
How to deal with the black screen problem after entering Win11 BIOS
Jan 03, 2024 pm 01:05 PM
Bios setting is a very important function in the computer. If the user finds that he cannot enter the BIOS setting page and the computer has a black screen, then the editor strongly recommends that you read this article. What to do if win11 enters BIOS black screen 1. First, check whether the monitor is fully functional and operating normally. Please confirm whether the monitor's power cord is firmly connected. 2. In addition, you need to carefully check the power switch of the monitor to see if it can start up and shut down normally. 3. Also make sure that the monitor's interface is fastened and not loose, and that the monitor's settings should also remain correct in their default state. 4. If the above steps prove that the monitor is running well, then we can start troubleshooting other problems! 5. It is recommended to scan and
 Confirmation process for changing startup order in Windows 11
Jun 03, 2023 am 08:15 AM
Confirmation process for changing startup order in Windows 11
Jun 03, 2023 am 08:15 AM
In some cases, you need to change the startup order in Windows 11. You may want to boot from a USB drive or external hard drive, or you may want to change the default operating system. Before Windows 10, there weren't many ways to accomplish this. You can only press the key multiple times at startup and simply miss entering the BIOS. Today, however, there are many more ways to achieve this. This article will detail all the ways to change the startup order in Windows 11. How to change the boot order in Windows 11? 1. Enter the BIOS menu. First, click on the Start menu, search for Settings, and then click on Open. From the left panel, select System and scroll down
